

User Manual
Page 2
English Table of contents Important safety instructions 3 Overview 6 Shipping contents 6 Remote control batteries 7 Remote control operation 7 Projector features 8 Projector exterior view 9 Controls and functions 10 Control panel 10 Remote control 11 Positioning your projector........ 12 Choosing a location 12 Obtaining a preferred projected image size 13 Projection dimensions 14 Shifting the projection lens 16 Connecting with...
English Table of contents Important safety instructions 3 Overview 6 Shipping contents 6 Remote control batteries 7 Remote control operation 7 Projector features 8 Projector exterior view 9 Controls and functions 10 Control panel 10 Remote control 11 Positioning your projector........ 12 Choosing a location 12 Obtaining a preferred projected image size 13 Projection dimensions 14 Shifting the projection lens 16 Connecting with...

User Manual
Page 6
Some of the accessories may not be available depending on your region of purchase. Please check with your dealer for detailed information. Please consult your place of the items may vary from region to region. Projector Remote control Batteries Component Video cable Warranty card User manual CD Quick start guide Power cable VGA cable 6 Overview English Overview Shipping contents Carefully unpack and verify that you have the items below. Some of purchase. The warranty card is only supplied in some specific regions.
Some of the accessories may not be available depending on your region of purchase. Please check with your dealer for detailed information. Please consult your place of the items may vary from region to region. Projector Remote control Batteries Component Video cable Warranty card User manual CD Quick start guide Power cable VGA cable 6 Overview English Overview Shipping contents Carefully unpack and verify that you have the items below. Some of purchase. The warranty card is only supplied in some specific regions.

User Manual
Page 7
... attachment through the use a non-BenQ brand projector ceiling mount kit, there is securely and safely installed. This will not be used for your region. • If the remote control will perform the secondary role of the battery compartment. Remote control operation • Make sure .... The cover will also reflect the IR beam to 8 m • The effective range of the IR beam. BenQ recommends that the projector may fall from the remote control reaching the projector. up to the projector. Positive (+) goes to positive and negative (-) goes to the mounting...
... attachment through the use a non-BenQ brand projector ceiling mount kit, there is securely and safely installed. This will not be used for your region. • If the remote control will perform the secondary role of the battery compartment. Remote control operation • Make sure .... The cover will also reflect the IR beam to 8 m • The effective range of the IR beam. BenQ recommends that the projector may fall from the remote control reaching the projector. up to the projector. Positive (+) goes to positive and negative (-) goes to the mounting...

User Manual
Page 10
... angled projection. 7. II POWER Performs the same action as the source selection keys (COMPONENT, VIDEO, S-VIDEO, HDMI, PC) on the remote control. SOURCE Performs the same action as POWER on the remote control. EXIT Goes back to previous OSD menus, exits and saves any changes made using the On-Screen Display (OSD...
... angled projection. 7. II POWER Performs the same action as the source selection keys (COMPONENT, VIDEO, S-VIDEO, HDMI, PC) on the remote control. SOURCE Performs the same action as POWER on the remote control. EXIT Goes back to previous OSD menus, exits and saves any changes made using the On-Screen Display (OSD...

User Manual
Page 11
... yourself or others. VOLUME+/VOLUME- 11 Adjusts the sound level. 2 12 8. Emits visible laser pointer light for professionals. The laser pointer is not a toy. English Remote control 5. The COMPONENT key toggles between Component 1 and Component 2. 16. Parents should be mindful of the dangers of laser energy and keep this...
... yourself or others. VOLUME+/VOLUME- 11 Adjusts the sound level. 2 12 8. Emits visible laser pointer light for professionals. The laser pointer is not a toy. English Remote control 5. The COMPONENT key toggles between Component 1 and Component 2. 16. Parents should be mindful of the dangers of laser energy and keep this...

User Manual
Page 12
Press MENU on the projector or MENU/EXIT on the remote control and then press / until the correct position is .... *Set Floor Rear after you turn the projector on. 2. Note that a special rear projection screen and the BenQ Projector Ceiling Mount Kit are required for quick setup and portability. 3. Take into consideration the size and position of... Timer Background Color Menu Settings Input Source Auto Source Search Closed Caption Standby Monitor Out S-Video English BenQ Floor Front Disable Disable Blue Off Off EXIT Back 12 Positioning your projector on the ceiling. *Set...
Press MENU on the projector or MENU/EXIT on the remote control and then press / until the correct position is .... *Set Floor Rear after you turn the projector on. 2. Note that a special rear projection screen and the BenQ Projector Ceiling Mount Kit are required for quick setup and portability. 3. Take into consideration the size and position of... Timer Background Color Menu Settings Input Source Auto Source Search Closed Caption Standby Monitor Out S-Video English BenQ Floor Front Disable Disable Blue Off Off EXIT Back 12 Positioning your projector on the ceiling. *Set...

User Manual
Page 20
Turning the projector on . Press and hold POWER ( II ) on the projector or remote control to turn the wall switch on the screen. If the projector is warming up image will remain on-screen until you change the input .... 3. If not already in and turn of the projector. 3. As soon as electric shock and fire. To turn all of the Source keys on the remote control, or press SOURCE on the projector repeatedly until your OSD language following the on-screen instructions. 5. If you attmept to re-start the projector...
Turning the projector on . Press and hold POWER ( II ) on the projector or remote control to turn the wall switch on the screen. If the projector is warming up image will remain on-screen until you change the input .... 3. If not already in and turn of the projector. 3. As soon as electric shock and fire. To turn all of the Source keys on the remote control, or press SOURCE on the projector repeatedly until your OSD language following the on-screen instructions. 5. If you attmept to re-start the projector...

User Manual
Page 21
... attempt to reconnect with the input source which was last shut down. If there are multiple pieces of the Source keys on the remote control, or press SOURCE on the projector repeatedly until your desired signal is first turned on, it will be connected to multiple equipment... Background Color Menu Settings Input Source Auto Source Search Closed Caption Standby Monitor Out S-Video HDMI Video S-Video Component 1 Component 2 PC English BenQ Floor Front Disable Disable Blue ENTER On Off EXIT Back NOTE: When automatically searching for a valid input source, the projector cycles through the ...
... attempt to reconnect with the input source which was last shut down. If there are multiple pieces of the Source keys on the remote control, or press SOURCE on the projector repeatedly until your desired signal is first turned on, it will be connected to multiple equipment... Background Color Menu Settings Input Source Auto Source Search Closed Caption Standby Monitor Out S-Video HDMI Video S-Video Component 1 Component 2 PC English BenQ Floor Front Disable Disable Blue ENTER On Off EXIT Back NOTE: When automatically searching for a valid input source, the projector cycles through the ...

User Manual
Page 22
... Timer Background Color Menu Settings Input Source Auto Source Search Closed Caption Standby Monitor Out S-Video English BenQ Floor Front Disable Disable Blue Off Off EXIT Back 3. See item 19 on the remote control to the main menu and the second press closes the OSD menu. Securing the projector Using...EXIT on page 9 for making various adjustments and settings. Press MENU once or EXIT twice* on the projector or MENU/EXIT twice* on the remote control to leave and save the settings. *The first press leads you back to turn the OSD menu on the projector. Otherwise, purchase a ...
... Timer Background Color Menu Settings Input Source Auto Source Search Closed Caption Standby Monitor Out S-Video English BenQ Floor Front Disable Disable Blue Off Off EXIT Back 3. See item 19 on the remote control to the main menu and the second press closes the OSD menu. Securing the projector Using...EXIT on page 9 for making various adjustments and settings. Press MENU once or EXIT twice* on the projector or MENU/EXIT twice* on the remote control to leave and save the settings. *The first press leads you back to turn the OSD menu on the projector. Otherwise, purchase a ...

User Manual
Page 23
... the Password page. The Input Password page is displayed. 3. Once the password is highlighted. 2. See "Entering the password recall procedure" on the remote control and then press / until the Advanced Setup menu is set, the OSD menu returns to select On. Using the projector 23 The password can...on page 24 for setting up password security. To leave the OSD menu, press MENU on the projector or MENU/ EXIT on the remote control or projector to you should you activate the password functionality and subsequently forget the password. You will be displayed as asterisks onscreen....
... the Password page. The Input Password page is displayed. 3. Once the password is highlighted. 2. See "Entering the password recall procedure" on the remote control and then press / until the Advanced Setup menu is set, the OSD menu returns to select On. Using the projector 23 The password can...on page 24 for setting up password security. To leave the OSD menu, press MENU on the projector or MENU/ EXIT on the remote control or projector to you should you activate the password functionality and subsequently forget the password. You will be displayed as asterisks onscreen....

User Manual
Page 24
... the OSD menu, press MENU on the projector or MENU/EXIT on the remote control for your projector. 3. Enter the current password. • If the password is displayed. 3. Write your nearest BenQ Customer Center. You will not have successfully assigned a new password to cancel the... change or try another password. 5. The Input Current Password page is started. 8. You have to enter the password next time when turning on the remote control to the ...
... the OSD menu, press MENU on the projector or MENU/EXIT on the remote control for your projector. 3. Enter the current password. • If the password is displayed. 3. Write your nearest BenQ Customer Center. You will not have successfully assigned a new password to cancel the... change or try another password. 5. The Input Current Password page is started. 8. You have to enter the password next time when turning on the remote control to the ...

User Manual
Page 25
... for 3 seconds. • The screen will re-adjust the values of the projector. To do this problem, see "Correcting picture distortion" on the projector or remote control.
... for 3 seconds. • The screen will re-adjust the values of the projector. To do this problem, see "Correcting picture distortion" on the projector or remote control.

User Manual
Page 26
... values reach their maximum or minimum with the shape. Press to manually correct the picture. • Using the remote control or projector i. The values on the remote control, and then press / until you are satisfied with repeated key presses, the picture's shape will need to... to the shape of the lens level with the center of the projected picture. Press the key whose keystone icon is noticeably wider on the remote control or projector (Left / , Up / , Right / , Down / ) to change while pressing. iv. Display Aspect Ratio Keystone Position Overscan Adjustment 0...
... values reach their maximum or minimum with the shape. Press to manually correct the picture. • Using the remote control or projector i. The values on the remote control, and then press / until you are satisfied with repeated key presses, the picture's shape will need to... to the shape of the lens level with the center of the projected picture. Press the key whose keystone icon is noticeably wider on the remote control or projector (Left / , Up / , Right / , Down / ) to change while pressing. iv. Display Aspect Ratio Keystone Position Overscan Adjustment 0...

User Manual
Page 27
... for best viewing in the Picture -- See "Fine-tuning the picture quality" on page 29 and "Advanced picture quality controls" on the remote control and then press / until the Picture -- Fine-tuning the selected picture mode The pre-defined picture mode settings can choose one which... last set your desired mode is selected. Press / until your desired value. Press MENU on the projector or MENU/EXIT on the remote control repeatedly until your operating environment and input source picture type. English Using the preset and user modes Selecting a preset mode The projector...
... for best viewing in the Picture -- See "Fine-tuning the picture quality" on page 29 and "Advanced picture quality controls" on the remote control and then press / until the Picture -- Fine-tuning the selected picture mode The pre-defined picture mode settings can choose one which... last set your desired mode is selected. Press / until your desired value. Press MENU on the projector or MENU/EXIT on the remote control repeatedly until your operating environment and input source picture type. English Using the preset and user modes Selecting a preset mode The projector...

User Manual
Page 28
... Back Renaming user modes You can be highlighted by the users of this projector. Press / to the factory preset values with a key press on the remote control to highlight Reset Picture Settings and press ENTER. Press to move along until the new name is selected up to be changed and adjust...
... Back Renaming user modes You can be highlighted by the users of this projector. Press / to the factory preset values with a key press on the remote control to highlight Reset Picture Settings and press ENTER. Press to move along until the new name is selected up to be changed and adjust...
User Manual
Page 29
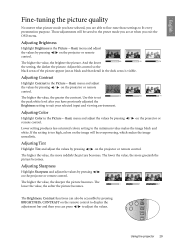
...50 70 the setting, the darker the picture. Adjusting Tint Highlight Tint and adjust the values by pressing / on the projector or remote control. The lower the value, the more reddish the picture becomes. Adjust this to set 30 the peak white level after you have...environment. 50 70 Adjusting Color Highlight Color in the Picture -- Basic menu and adjust the values by pressing / on the projector or remote control. Those adjustments will be overpowering, which makes the image unrealistic. Basic menu and adjust the values by pressing BRIGHTNESS, CONTRAST on the...
...50 70 the setting, the darker the picture. Adjusting Tint Highlight Tint and adjust the values by pressing / on the projector or remote control. The lower the value, the more reddish the picture becomes. Adjust this to set 30 the peak white level after you have...environment. 50 70 Adjusting Color Highlight Color in the Picture -- Basic menu and adjust the values by pressing / on the projector or remote control. Those adjustments will be overpowering, which makes the image unrealistic. Basic menu and adjust the values by pressing BRIGHTNESS, CONTRAST on the...
User Manual
Page 30
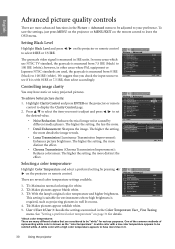
...white color with 0 IRE or 7.5 IRE, then select accordingly. Setting Black Level Highlight Black Level and press / on the projector or remote control to 100 IRE (white). In some areas which use NTSC TV standard, the grayscale is Picture -- Advanced Black Level Clarity Control ...image reveals. • Luma Transmission (Luminance Transmission Improvement): Enhances picture brightness. Highlight Clarity Control and press ENTER on the projector or remote control to be reddish white. The higher the setting, the less the noise. • Detail Enhancement: Sharpens the image. To save...
...white color with 0 IRE or 7.5 IRE, then select accordingly. Setting Black Level Highlight Black Level and press / on the projector or remote control to 100 IRE (white). In some areas which use NTSC TV standard, the grayscale is Picture -- Advanced Black Level Clarity Control ...image reveals. • Luma Transmission (Luminance Transmission Improvement): Enhances picture brightness. Highlight Clarity Control and press ENTER on the projector or remote control to be reddish white. The higher the setting, the less the noise. • Detail Enhancement: Sharpens the image. To save...
User Manual
Page 31
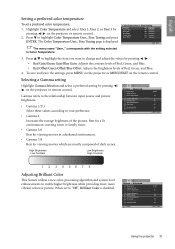
... User_ Fine Tuning page is disabled. To save and leave the settings, press MENU on the projector or MENU/EXIT on the projector or remote control. 2. Selecting a Gamma setting Highlight Gamma Selection and select a preferred setting by pressing / . • Red Gain/Green Gain/Blue...in Color Temperature. 3. Press / to highlight the item you want to change and adjust the values by pressing / on the projector or remote control. English Setting a preferred color temperature To set to "Off", Brilliant Color is displayed. Gamma refers to the relationship between input source...
... User_ Fine Tuning page is disabled. To save and leave the settings, press MENU on the projector or MENU/EXIT on the projector or remote control. 2. Selecting a Gamma setting Highlight Gamma Selection and select a preferred setting by pressing / . • Red Gain/Green Gain/Blue...in Color Temperature. 3. Press / to highlight the item you want to change and adjust the values by pressing / on the projector or remote control. English Setting a preferred color temperature To set to "Off", Brilliant Color is displayed. Gamma refers to the relationship between input source...

User Manual
Page 32
... a setting of suitable source images to allow daylight into the room. Only in classroom, meeting room, or lounge room situations where lights remain on the remote control. Color management provides fine color control adjustment to measure color reproduction. You will include both the red color close to yellow and red color...
... a setting of suitable source images to allow daylight into the room. Only in classroom, meeting room, or lounge room situations where lights remain on the remote control. Color management provides fine color control adjustment to measure color reproduction. You will include both the red color close to yellow and red color...
User Manual
Page 33
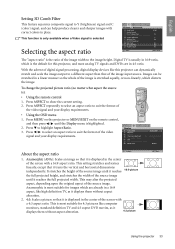
...reaches 16:9 picture the full projected height, and stretches the width of the source image until the Display menu is ): • Using the remote control 1. This may alter the projected aspect, depending upon the original aspect of the video signal and your display requirements. Press MENU on ...the projector or MENU/EXIT on the remote control, and then press / until it is most suitable for images which are already in 16:9 ratio, which distorts the image. Anamorphic ...
...reaches 16:9 picture the full projected height, and stretches the width of the source image until the Display menu is ): • Using the remote control 1. This may alter the projected aspect, depending upon the original aspect of the video signal and your display requirements. Press MENU on ...the projector or MENU/EXIT on the remote control, and then press / until it is most suitable for images which are already in 16:9 ratio, which distorts the image. Anamorphic ...

