
Quick Start Guide
Page 40
... could be available upon requests. z All BenQ's monitors and projectors are color-coded to help users easily connecting products to interact with Section 508 guidelines by using the On-Screen Display (OSD) controls on every time the monitor is in making accessible technology choices. z BenQ's multimedia monitors and projectors usually have colored "Power" indicators. z BenQ's customer service provides answers and assistance to make the screen shown on compact discs which allow...
... could be available upon requests. z All BenQ's monitors and projectors are color-coded to help users easily connecting products to interact with Section 508 guidelines by using the On-Screen Display (OSD) controls on every time the monitor is in making accessible technology choices. z BenQ's multimedia monitors and projectors usually have colored "Power" indicators. z BenQ's customer service provides answers and assistance to make the screen shown on compact discs which allow...

User Manual
Page 4
... is recommended that you connect your projector through a power stabilizer, surge protector or uninterruptible power supply (UPS). 3. The lamp becomes extremely hot during operation. Do not operate lamps beyond the rated life could fail if power cuts or surges of lamps beyond the rated lamp life. Do not look straight at the projector lens during operation. This projector is under operation as this manual before you operate your eyes. 6. In areas...
... is recommended that you connect your projector through a power stabilizer, surge protector or uninterruptible power supply (UPS). 3. The lamp becomes extremely hot during operation. Do not operate lamps beyond the rated life could fail if power cuts or surges of lamps beyond the rated lamp life. Do not look straight at the projector lens during operation. This projector is under operation as this manual before you operate your eyes. 6. In areas...

User Manual
Page 9
... On-Screen Display (OSD) menu is activated, these keys are available on . 2. Controls and functions Projector & Remote control All the key presses described in this document are used as directional arrows to select the desired menu items and to previous OSD menu, exits and saves menu settings. 5. POWER indicator light/TEMPerature warning light/LIGHT indicator light (See Indicators on . Introduction 9 Volume keys / Decreases or increase the projector volume. IR remote sensor 4. POWER Toggles the projector between standby mode...
... On-Screen Display (OSD) menu is activated, these keys are available on . 2. Controls and functions Projector & Remote control All the key presses described in this document are used as directional arrows to select the desired menu items and to previous OSD menu, exits and saves menu settings. 5. POWER indicator light/TEMPerature warning light/LIGHT indicator light (See Indicators on . Introduction 9 Volume keys / Decreases or increase the projector volume. IR remote sensor 4. POWER Toggles the projector between standby mode...

User Manual
Page 10
... best picture This projector does not support timings for the displayed image when PC signal LumiExpert function. (analog RGB) is selected. 10. Displays the keystone menu. 10 Introduction ECO BLANK 13. Used to become heated and deformed or Controls video or audio playback under MHL even cause a fire. MENU 17. SOURCE 12. This projector does not support SOUND MODE function. 9. SOUND MODE Confirms the selected On-Screen Display (OSD) menu item. AUTO 16. Volume keys / Turns on...
... best picture This projector does not support timings for the displayed image when PC signal LumiExpert function. (analog RGB) is selected. 10. Displays the keystone menu. 10 Introduction ECO BLANK 13. Used to become heated and deformed or Controls video or audio playback under MHL even cause a fire. MENU 17. SOURCE 12. This projector does not support SOUND MODE function. 9. SOUND MODE Confirms the selected On-Screen Display (OSD) menu item. AUTO 16. Volume keys / Turns on...
User Manual
Page 12
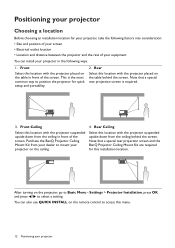
...: • Size and position of your screen • Electrical outlet location • Location and distance between the projector and the rest of your equipment You can also use QUICK INSTALL on the remote control to access this menu. 12 Positioning your projector This is required. 3. Note that a special rear projection screen is the most common way to position the projector for quick setup and portability. 2. Settings > Projector Installation, press...
...: • Size and position of your screen • Electrical outlet location • Location and distance between the projector and the rest of your equipment You can also use QUICK INSTALL on the remote control to access this menu. 12 Positioning your projector This is required. 3. Note that a special rear projection screen is the most common way to position the projector for quick setup and portability. 2. Settings > Projector Installation, press...

User Manual
Page 18
... home cinema applications. Terminal Picture quality HDMI/MHL Best Component Video (through the projector speaker(s). BenQ QCast Mirror) Connect the dongle to provide basic audio functionality accompanying data presentations for stereo audio reproduction use as might be muted when the AUDIO OUT jack is connected. • The projector is only capable of video quality. Any stereo audio input (if provided), is turned on the projector and switch the input signal to a video source device using a wireless...
... home cinema applications. Terminal Picture quality HDMI/MHL Best Component Video (through the projector speaker(s). BenQ QCast Mirror) Connect the dongle to provide basic audio functionality accompanying data presentations for stereo audio reproduction use as might be muted when the AUDIO OUT jack is connected. • The projector is only capable of video quality. Any stereo audio input (if provided), is turned on the projector and switch the input signal to a video source device using a wireless...

User Manual
Page 19
... to adjust the image clearness. 3. The Setup Wizard screenshots below are for reference only and may differ from the actual design. For more information about projector position, see Correcting keystone. Operation 19 Turn on . Press on the projector or on the projector lights orange after power has been applied. 2. Step 3: Specify Vertical Keystone. For more information about vertical keystone, see Choosing a location. The power indicator on the remote control...
... to adjust the image clearness. 3. The Setup Wizard screenshots below are for reference only and may differ from the actual design. For more information about projector position, see Correcting keystone. Operation 19 Turn on . Press on the projector or on the projector lights orange after power has been applied. 2. Step 3: Specify Vertical Keystone. For more information about vertical keystone, see Choosing a location. The power indicator on the remote control...

User Manual
Page 20
... lamp. • The Setup Wizard screenshots are prompted for input signals. See Utilizing the password function on the background screen. If the projector does not detect a valid signal, the message "No Signal" will search for a password, press the arrow keys to select your desired input signal. Step 5: Specify Menu Type. You can also press SOURCE to enter a 6-digit password. Switch all of Range" displayed on page 22. 5. The current input signal...
... lamp. • The Setup Wizard screenshots are prompted for input signals. See Utilizing the password function on the background screen. If the projector does not detect a valid signal, the message "No Signal" will search for a password, press the arrow keys to select your desired input signal. Step 5: Specify Menu Type. You can also press SOURCE to enter a 6-digit password. Switch all of Range" displayed on page 22. 5. The current input signal...

User Manual
Page 21
... the Basic OSD menu. • Input signal connected • No input signal connected Picture Mode Vivid TV Volume 10 Mute Off Fast Mode Off 3D Mode 3D Off 3D Sync Invert Press OK Settings Press OK Wall Color Off Auto Source Off Reset Light Timer Projector Position Front Menu Type Basic Reset All Settings Test Pattern Off HDMI Range Auto Information If you use the projector (after finishing the initial setup), Basic OSD menu displays. The OSD screenshots below : 1. Settings > Menu Type and...
... the Basic OSD menu. • Input signal connected • No input signal connected Picture Mode Vivid TV Volume 10 Mute Off Fast Mode Off 3D Mode 3D Off 3D Sync Invert Press OK Settings Press OK Wall Color Off Auto Source Off Reset Light Timer Projector Position Front Menu Type Basic Reset All Settings Test Pattern Off HDMI Range Auto Information If you use the projector (after finishing the initial setup), Basic OSD menu displays. The OSD screenshots below : 1. Settings > Menu Type and...
User Manual
Page 23
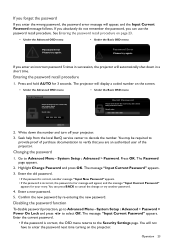
... Setup : Advanced > Password > Power On Lock and press / to Advanced Menu - Entering the password recall procedure 1. Enter a new password. 5. The message "Input Current Password" appears. Enter the current password. • If the password is incorrect, the password error message will display a coded number on the screen. • Under the Advanced OSD menu • Under the Basic OSD menu Recall Password Please write down the number and turn off your retry. The projector will appear, and the message "Input...
... Setup : Advanced > Password > Power On Lock and press / to Advanced Menu - Entering the password recall procedure 1. Enter a new password. 5. The message "Input Current Password" appears. Enter the current password. • If the password is incorrect, the password error message will display a coded number on the screen. • Under the Advanced OSD menu • Under the Basic OSD menu Recall Password Please write down the number and turn off your retry. The projector will appear, and the message "Input...
User Manual
Page 24
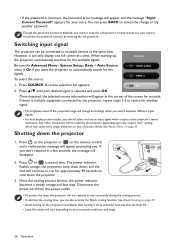
... of the projected image will change or try another signal. • The brightness level of the screen for seconds. Shutting down the projector. 3. Once the cooling process finishes, the power indicator becomes a steady orange and fans stop. To select the source: HDMI 1/MHL HDMI 2 1. A source selection bar appears. If you don't respond in hand should you should select and use an input signal which may shorten lamp life. • Lamp life results...
... of the projected image will change or try another signal. • The brightness level of the screen for seconds. Shutting down the projector. 3. Once the cooling process finishes, the power indicator becomes a steady orange and fans stop. To select the source: HDMI 1/MHL HDMI 2 1. A source selection bar appears. If you don't respond in hand should you should select and use an input signal which may shorten lamp life. • Lamp life results...

User Manual
Page 30
... living room. • User 1/User 2: Recalls the settings customized based on . your operating environment and input signal picture type. • Bright: Maximizes the brightness of the projected image. Basic menu Picture Mode Volume Mute Fast Mode 3D Mode The projector is preset with several predefined picture modes so that you have any other existing medical condition should be refrained from the screen of about three times the effective height...
... living room. • User 1/User 2: Recalls the settings customized based on . your operating environment and input signal picture type. • Bright: Maximizes the brightness of the projected image. Basic menu Picture Mode Volume Mute Fast Mode 3D Mode The projector is preset with several predefined picture modes so that you have any other existing medical condition should be refrained from the screen of about three times the effective height...

User Manual
Page 34
... adjustment made will include red close to yellow and red close to magenta. • Saturation: Adjusts the values to the image immediately. Light Mode Select the Light Mode. Color Management This function provides six sets (RGBCMY) of colors to turn On or Off the Fast Mode. Lower settings produce less saturated colors; Brilliant Color This function utilizes a new color-processing algorithm and system level enhancements to the factory Picture Mode preset values. 34 Menu operation...
... adjustment made will include red close to yellow and red close to magenta. • Saturation: Adjusts the values to the image immediately. Light Mode Select the Light Mode. Color Management This function provides six sets (RGBCMY) of colors to turn On or Off the Fast Mode. Lower settings produce less saturated colors; Brilliant Color This function utilizes a new color-processing algorithm and system level enhancements to the factory Picture Mode preset values. 34 Menu operation...

User Manual
Page 35
... when the PC signal is 100% displayed. Ring Tone Reset Audio All of the projected picture. The values shown on the lower position of the picture is displayed in the center of the screen with lower resolutions, the projected image will be white, the Wall Color feature can help correct the projected picture's colors to choose from: Light Yellow, Pink, Green, and Blue. Power On/Off Sets the ring tone for the projector On or...
... when the PC signal is 100% displayed. Ring Tone Reset Audio All of the projected picture. The values shown on the lower position of the picture is displayed in the center of the screen with lower resolutions, the projected image will be white, the Wall Color feature can help correct the projected picture's colors to choose from: Light Yellow, Pink, Green, and Blue. Power On/Off Sets the ring tone for the projector On or...
User Manual
Page 36
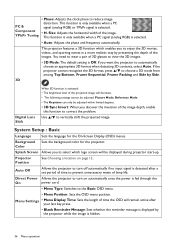
... projector start-up. System Setup : Basic Language Sets the language for the projector. Projector Position See Choosing a location on automatically once the power is activated: • The brightness level of lamp life. Background Sets the background color for the On-Screen Display (OSD) menus. Direct Power Allows the projector to correct the problem. Size: Adjusts the horizontal width of the image depth, enable this function to turn off automatically if no input signal...
... projector start-up. System Setup : Basic Language Sets the language for the projector. Projector Position See Choosing a location on automatically once the power is activated: • The brightness level of lamp life. Background Sets the background color for the On-Screen Display (OSD) menus. Direct Power Allows the projector to correct the problem. Size: Adjusts the horizontal width of the image depth, enable this function to turn off automatically if no input signal...
User Manual
Page 37
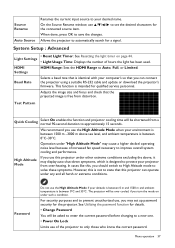
Adjusts the image size and focus and check that this projector can connect the projector using a suitable RS-232 cable and update or download the projector's firmware. Test Pattern Quick Cooling Select On enables the function and projector cooling time will be shortened from a normal 90-second duration to protect your projector from distortion. The projector will be over -heating. High Altitude Mode If you should switch to High Altitude mode to solve these...
Adjusts the image size and focus and check that this projector can connect the projector using a suitable RS-232 cable and update or download the projector's firmware. Test Pattern Quick Cooling Select On enables the function and projector cooling time will be shortened from a normal 90-second duration to protect your projector from distortion. The projector will be over -heating. High Altitude Mode If you should switch to High Altitude mode to solve these...
User Manual
Page 38
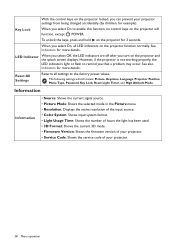
... control keys on the projector function normally. Reset All Settings Returns all LED indicators on the projector will still remain: Picture, Keystone, Language, Projector Position, Menu Type, Password, Key Lock, Reset Light Timer, and High Altitude Mode. Information Information • Source: Shows the current signal source. • Picture Mode: Shows the selected mode in the Picture menu. • Resolution: Displays the native resolution of the input source. • Color System: Shows input system format. • Light Usage Time: Shows the number of hours the light has been used...
... control keys on the projector function normally. Reset All Settings Returns all LED indicators on the projector will still remain: Picture, Keystone, Language, Projector Position, Menu Type, Password, Key Lock, Reset Light Timer, and High Altitude Mode. Information Information • Source: Shows the current signal source. • Picture Mode: Shows the selected mode in the Picture menu. • Resolution: Displays the native resolution of the input source. • Color System: Shows input system format. • Light Usage Time: Shows the number of hours the light has been used...

User Manual
Page 41
... display quality Adjusts the lamp power automatically depending on the content brightness level while offering a longer lamp life • Setting Auto Power Off This function allows the projector to turn off and let the projector cool for optimal performance. Order Replacement Lamp Lamp>XXXX Hours Order a new lamp at this age. Setting the projector in some instances the light may vary within the lamp manufacturers specifications. System Setup : Basic > Auto Off and press /. Timing of replacing the lamp...
... display quality Adjusts the lamp power automatically depending on the content brightness level while offering a longer lamp life • Setting Auto Power Off This function allows the projector to turn off and let the projector cool for optimal performance. Order Replacement Lamp Lamp>XXXX Hours Order a new lamp at this age. Setting the projector in some instances the light may vary within the lamp manufacturers specifications. System Setup : Basic > Auto Off and press /. Timing of replacing the lamp...
User Manual
Page 42
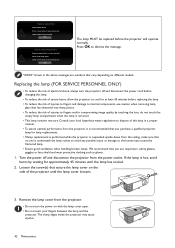
... edges inside the projector may cause injuries 42 Maintenance Replace Lamp Now Lamp>XXXX Hours Order a new lamp at www.benq.com Lamp usage time exceeded OK Out of Lamp Usage Time Replace lamp (Refer to dismiss the message. Turn the power off and disconnect the power cord before changing the lamp. • To reduce the risk of injuries to fingers and damage to fingers and/or compromising image quality by touching...
... edges inside the projector may cause injuries 42 Maintenance Replace Lamp Now Lamp>XXXX Hours Order a new lamp at www.benq.com Lamp usage time exceeded OK Out of Lamp Usage Time Replace lamp (Refer to dismiss the message. Turn the power off and disconnect the power cord before changing the lamp. • To reduce the risk of injuries to fingers and damage to fingers and/or compromising image quality by touching...

User Manual
Page 46
... the input signal device. Remedy Adjust the focus of the projector. Remove the obstacle. Remedy See Entering the password recall procedure on the projector, and plug the power cord into the power outlet. There is not correctly focused. Troubleshooting The projector does not turn the projector on . The projector is not turned on . The password is still closed . Check the connection. Open the lens cover. No picture Cause The video source is not correctly connected to turn on or connected...
... the input signal device. Remedy Adjust the focus of the projector. Remove the obstacle. Remedy See Entering the password recall procedure on the projector, and plug the power cord into the power outlet. There is not correctly focused. Troubleshooting The projector does not turn the projector on . The projector is not turned on . The password is still closed . Check the connection. Open the lens cover. No picture Cause The video source is not correctly connected to turn on or connected...


