
User Manual
Page 3
...Important safety instructions 4 Introduction ...7 Shipping contents ...7 Projector exterior view ...8 Controls and functions...9 Positioning your projector 11 Choosing a location ...11 Obtaining a preferred projected image size 12 Mounting the projector ...13 Adjusting the projected image ...14 Connection ...16 Operation ...18 Installing the QS01 HDMI Media Streaming 18 Starting up the projector ...18 Setting up the QS01 HDMI Media Streaming 20 Using the menus ...23 Securing the projector ...24 Switching input signal ...25 Shutting down the projector ...26 Menu operation ...27 Menu System...
...Important safety instructions 4 Introduction ...7 Shipping contents ...7 Projector exterior view ...8 Controls and functions...9 Positioning your projector 11 Choosing a location ...11 Obtaining a preferred projected image size 12 Mounting the projector ...13 Adjusting the projected image ...14 Connection ...16 Operation ...18 Installing the QS01 HDMI Media Streaming 18 Starting up the projector ...18 Setting up the QS01 HDMI Media Streaming 20 Using the menus ...23 Securing the projector ...24 Switching input signal ...25 Shutting down the projector ...26 Menu operation ...27 Menu System...

User Manual
Page 4
... temporarily turn off the light source, press the ECO BLANK button. 4. Refer servicing to cool rated life. In some countries, the line voltage is designed and tested to beyond the during operation. Important safety instructions Your projector is NOT stable. Always open the lens shutter (if any) or remove the lens cap (if any objects when the projector is important that you connect your projector through a power...
... temporarily turn off the light source, press the ECO BLANK button. 4. Refer servicing to cool rated life. In some countries, the line voltage is designed and tested to beyond the during operation. Important safety instructions Your projector is NOT stable. Always open the lens shutter (if any) or remove the lens cap (if any objects when the projector is important that you connect your projector through a power...
User Manual
Page 6
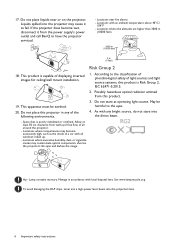
... and free flow of displaying inverted images for ceiling/wall mount installation. 1. Hg - Do not place liquids near fire alarms - Locations where temperatures may contaminate optical components, shorten the projector's life span and darken the image. Manage in any bright source, do not stare into the projection lens. 6 Important safety instructions Do not stare at least 50 cm clearance from this product. 19. Allow at operating light source. Do...
... and free flow of displaying inverted images for ceiling/wall mount installation. 1. Hg - Do not place liquids near fire alarms - Locations where temperatures may contaminate optical components, shorten the projector's life span and darken the image. Manage in any bright source, do not stare into the projection lens. 6 Important safety instructions Do not stare at least 50 cm clearance from this product. 19. Allow at operating light source. Do...
User Manual
Page 10
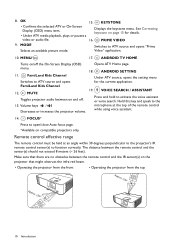
... to the projector's IR remote control sensor(s) to ATV source and opens for details. FamiLand Kids Channel Under ATV source, opens the setting menu Switches to function correctly. Hold this key and speak to open/close Auto focus page. *Available on compatible projectors only. MODE Selects an available picture mode. MENU/ 17. Make sure that might obstruct the infra-red beam. • Operating the projector from the front • Operating the projector from...
... to the projector's IR remote control sensor(s) to ATV source and opens for details. FamiLand Kids Channel Under ATV source, opens the setting menu Switches to function correctly. Hold this key and speak to open/close Auto focus page. *Available on compatible projectors only. MODE Selects an available picture mode. MENU/ 17. Make sure that might obstruct the infra-red beam. • Operating the projector from the front • Operating the projector from...

User Manual
Page 11
... screen. This is required. 3. Front Ceiling Select this location with the projector suspended upside-down from the ceiling behind the screen. After turning on the ceiling. 4. Positioning your projector 11 Rear Ceiling Select this location with the projector suspended upside-down from your dealer to mount your projector on the projector, go to select a setting. Positioning your projector Choosing a location Before choosing an installation location for quick setup and portability. 2. Front Select this installation location...
... screen. This is required. 3. Front Ceiling Select this location with the projector suspended upside-down from the ceiling behind the screen. After turning on the ceiling. 4. Positioning your projector 11 Rear Ceiling Select this location with the projector suspended upside-down from your dealer to mount your projector on the projector, go to select a setting. Positioning your projector Choosing a location Before choosing an installation location for quick setup and portability. 2. Front Select this installation location...

User Manual
Page 18
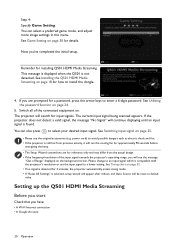
...) dongle to be used with the dongle cover open. 1 2 3 4 5 6 Starting up the projector 1. Turn on with the projector. The power indicator flashes green and stays green when the projector is projected. (If necessary) Rotate the focus ring to adjust the image clearness. 3. The power indicator on the projector or remote control to move on to the next step. • Use the arrow keys ( / / / ) on the projector lights orange after the dongle is plugged. Press to install the dongle...
...) dongle to be used with the dongle cover open. 1 2 3 4 5 6 Starting up the projector 1. Turn on with the projector. The power indicator flashes green and stays green when the projector is projected. (If necessary) Rotate the focus ring to adjust the image clearness. 3. The power indicator on the projector or remote control to move on to the next step. • Use the arrow keys ( / / / ) on the projector lights orange after the dongle is plugged. Press to install the dongle...
User Manual
Page 20
... projector does not detect a valid signal, the message "No Signal" will be reset to default value. You can select a preferred game mode, and adjust more image settings in this menu. See Switching input signal on page 24. 5. Please change to a lower setting. See Utilizing the password function on page 25. • Please use the original accessories (e.g. The projector will see the message "Out of the connected equipment on the background screen. See Timing...
... projector does not detect a valid signal, the message "No Signal" will be reset to default value. You can select a preferred game mode, and adjust more image settings in this menu. See Switching input signal on page 24. 5. Please change to a lower setting. See Utilizing the password function on page 25. • Please use the original accessories (e.g. The projector will see the message "Out of the connected equipment on the background screen. See Timing...
User Manual
Page 23
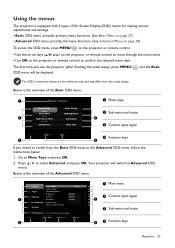
... the projector or remote control to Advanced OSD menu. Go to select Advanced and press OK. Press / to Menu Type and press OK. 2. Picture Picture Mode Cinema Audio Game Setting User Management Brightness Display Contrast 1 Sharpness Installation Brilliant Color Advanced Color Settings System Information Reset Current Picture Mode Enter Return Exit 2 1 Main menu 2 Current input signal 3 3 Sub-menu and status 4 4 Function keys Operation 23 Below is the overview of the Basic OSD menu. 1 Basic menu Picture Mode Game Setting Cinema Sound Mode...
... the projector or remote control to Advanced OSD menu. Go to select Advanced and press OK. Press / to Menu Type and press OK. 2. Picture Picture Mode Cinema Audio Game Setting User Management Brightness Display Contrast 1 Sharpness Installation Brilliant Color Advanced Color Settings System Information Reset Current Picture Mode Enter Return Exit 2 1 Main menu 2 Current input signal 3 3 Sub-menu and status 4 4 Function keys Operation 23 Below is the overview of the Basic OSD menu. 1 Basic menu Picture Mode Game Setting Cinema Sound Mode...

User Manual
Page 24
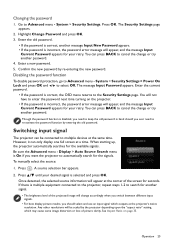
... every time the projector is entered so that you can use the password recall procedure. The four arrow keys ( , , , ) respectively represent 4 digits (1, 2, 3, 4). Input New Password 4. Password Error Please try again. According to the password you desire to set and the Power On Lock is activated, the projector cannot be required to provide proof of the projector. The projector will switch to the Basic OSD menu, follow the instructions below: 1. Recall Password...
... every time the projector is entered so that you can use the password recall procedure. The four arrow keys ( , , , ) respectively represent 4 digits (1, 2, 3, 4). Input New Password 4. Password Error Please try again. According to the password you desire to set and the Power On Lock is activated, the projector cannot be required to provide proof of the projector. The projector will switch to the Basic OSD menu, follow the instructions below: 1. Recall Password...
User Manual
Page 25
... Settings > Power On Lock and press OK and / to Advanced menu - You will not have to enter the password next time turning on page 35. Highlight Change Password and press OK. 3. Disabling the password function To disable password protection, go to select Off. Switching input signal The projector can only display one full screen at the projector's native resolution. Be sure the Advanced menu - To manually select the source: Source 1. Enter the old password...
... Settings > Power On Lock and press OK and / to Advanced menu - You will not have to enter the password next time turning on page 35. Highlight Change Password and press OK. 3. Disabling the password function To disable password protection, go to select Off. Switching input signal The projector can only display one full screen at the projector's native resolution. Be sure the Advanced menu - To manually select the source: Source 1. Enter the old password...
User Manual
Page 27
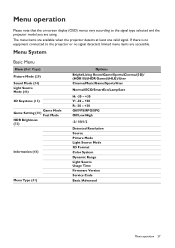
.../User Normal/ECO/SmartEco/LampSave H: -30 - +30 V: -30 - +30 R: -30 - +30 Off/FPS/RPG/SPG Off/Low/High -2/-1/0/1/2 Detected Resolution Source Picture Mode Light Source Mode 3D Format Color System Dynamic Range Light Source Usage Time Firmware Version Service Code Basic/Advanced Menu operation 27 Menu operation Please note that the on-screen display (OSD) menus vary according to the projector or no signal detected, limited menu items are using. The menu items are available when the projector...
.../User Normal/ECO/SmartEco/LampSave H: -30 - +30 V: -30 - +30 R: -30 - +30 Off/FPS/RPG/SPG Off/Low/High -2/-1/0/1/2 Detected Resolution Source Picture Mode Light Source Mode 3D Format Color System Dynamic Range Light Source Usage Time Firmware Version Service Code Basic/Advanced Menu operation 27 Menu operation Please note that the on-screen display (OSD) menus vary according to the projector or no signal detected, limited menu items are using. The menu items are available when the projector...
User Manual
Page 32
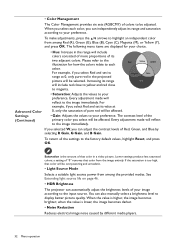
.... • Light Source Mode Selects a suitable light source power from the image entirely. The following menu items are displayed for how the colors relate to the factory default values, highlight Reset, and press OK. Please refer to the illustration for your image according to the input source. When you select each other. You can independently adjust its range will be adjusted. RED Yellow GREEN Magenta Cyan BLUE Advanced Color Settings (Continued) • Saturation: Adjusts the...
.... • Light Source Mode Selects a suitable light source power from the image entirely. The following menu items are displayed for how the colors relate to the factory default values, highlight Reset, and press OK. Please refer to the illustration for your image according to the input source. When you select each other. You can independently adjust its range will be adjusted. RED Yellow GREEN Magenta Cyan BLUE Advanced Color Settings (Continued) • Saturation: Adjusts the...

User Manual
Page 34
... Function descriptions Menu Sound Mode User Sound EQ Mute Volume Power On/Off Ring Tone Reset Audio Descriptions This function utilizes treVolo and Bongiovi DPS (Digital Power Station) Technology, which incorporates its patented algorithms with the User Sound EQ function. When Game Mode on the Advanced menu - When selecting the User mode, you may make manual adjustments with 120 calibration points that optimizes any audio signal in real time to your...
... Function descriptions Menu Sound Mode User Sound EQ Mute Volume Power On/Off Ring Tone Reset Audio Descriptions This function utilizes treVolo and Bongiovi DPS (Digital Power Station) Technology, which incorporates its patented algorithms with the User Sound EQ function. When Game Mode on the Advanced menu - When selecting the User mode, you may make manual adjustments with 120 calibration points that optimizes any audio signal in real time to your...

User Manual
Page 37
... from the projector HDMI 2 port. Menu operation 37 Power Off Link> When the projector is turned on the projector, while turning off the projector automatically turns off the HDMI CEC compatible device. • en Audio Return (HDMI-2) When connecting to ARC compatible speaker to the projector with an HDMI cable, you enable this function and connect an HDMI CEC-compatible device to the factory default values. HDMI Settings • HDMI Format Selects a suitable RGB color range to...
... from the projector HDMI 2 port. Menu operation 37 Power Off Link> When the projector is turned on the projector, while turning off the projector automatically turns off the HDMI CEC compatible device. • en Audio Return (HDMI-2) When connecting to ARC compatible speaker to the projector with an HDMI cable, you enable this function and connect an HDMI CEC-compatible device to the factory default values. HDMI Settings • HDMI Format Selects a suitable RGB color range to...
User Manual
Page 40
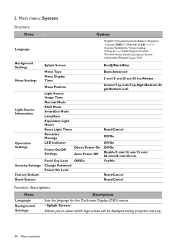
... Options Language Background Settings Menu Settings Light Source Information Operation Settings Security Settings Factory Default Reset System Splash Screen Menu Type Menu Display Time Menu Position Light Source Usage Time Normal Mode ECO Mode SmartEco Mode LampSave Equivalent Light Hours Reset Light Timer Reminder Message LED Indicator Power On/Off Settings Direct Power On Auto Power Off Panel Key Lock Off/On Change Password Power On Lock BenQ/Black/Blue Basic/Advanced 5 sec/10 sec/20 sec/30 sec/Always Center/Top-Left/Top-Right/Bottom-Ri ght/Bottom-Left Reset/Cancel Off/On...
... Options Language Background Settings Menu Settings Light Source Information Operation Settings Security Settings Factory Default Reset System Splash Screen Menu Type Menu Display Time Menu Position Light Source Usage Time Normal Mode ECO Mode SmartEco Mode LampSave Equivalent Light Hours Reset Light Timer Reminder Message LED Indicator Power On/Off Settings Direct Power On Auto Power Off Panel Key Lock Off/On Change Password Power On Lock BenQ/Black/Blue Basic/Advanced 5 sec/10 sec/20 sec/30 sec/Always Center/Top-Left/Top-Right/Bottom-Ri ght/Bottom-Left Reset/Cancel Off/On...
User Manual
Page 41
... Panel Key Lock is installed, and you can turn off automatically if no input signal is fed through the power cord. • Auto Power Off: Allows the projector to turn off . • LED Indicator You can prevent your projector settings from being changed accidentally (by children, for 3 seconds. When a new lamp is on, no control keys on or off the LED warning lights. This menu page displays the following information: • Light Source Usage Time • Light hours used under Normal Mode...
... Panel Key Lock is installed, and you can turn off automatically if no input signal is fed through the power cord. • Auto Power Off: Allows the projector to turn off . • LED Indicator You can prevent your projector settings from being changed accidentally (by children, for 3 seconds. When a new lamp is on, no control keys on or off the LED warning lights. This menu page displays the following information: • Light Source Usage Time • Light hours used under Normal Mode...
User Manual
Page 43
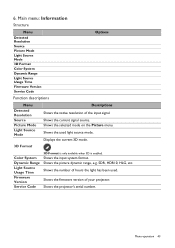
Displays the current 3D mode. Shows the input system format. Shows the selected mode on the Picture menu. Shows the used . SDR, HDR10, HLG, etc. Shows the projector's serial number. Shows the picture dynamic range, e.g. Menu operation 43 Main menu: Information Structure Menu Detected Resolution Source Picture Mode Light Source Mode 3D Format Color System Dynamic Range Light Source Usage Time Firmware Version Service Code Function descriptions Options Menu Detected Resolution Source Picture Mode Light Source Mode 3D Format Descriptions Shows the native resolution of your...
Displays the current 3D mode. Shows the input system format. Shows the selected mode on the Picture menu. Shows the used . SDR, HDR10, HLG, etc. Shows the projector's serial number. Shows the picture dynamic range, e.g. Menu operation 43 Main menu: Information Structure Menu Detected Resolution Source Picture Mode Light Source Mode 3D Format Color System Dynamic Range Light Source Usage Time Firmware Version Service Code Function descriptions Options Menu Detected Resolution Source Picture Mode Light Source Mode 3D Format Descriptions Shows the native resolution of your...
User Manual
Page 46
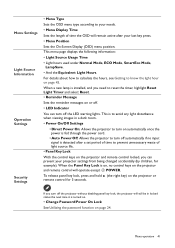
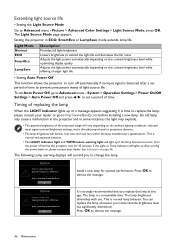
... Adjusts the light power automatically depending on the content brightness level while offering a longer light life • Setting Auto Power Off This function allows the projector to turn off and let the projector cool for optimal performance. Notice Replace lamp soon Equivalent lamp hour > XXXX hours Order a new lamp at www.BenQ.com OK Install a new lamp for 45 minutes. The Light Source Mode page appears. Extending light source life • Setting the Light Source Mode Go to prevent unnecessary waste of light source life. Picture...
... Adjusts the light power automatically depending on the content brightness level while offering a longer light life • Setting Auto Power Off This function allows the projector to turn off and let the projector cool for optimal performance. Notice Replace lamp soon Equivalent lamp hour > XXXX hours Order a new lamp at www.BenQ.com OK Install a new lamp for 45 minutes. The Light Source Mode page appears. Extending light source life • Setting the Light Source Mode Go to prevent unnecessary waste of light source life. Picture...
User Manual
Page 48
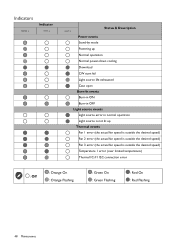
Indicators Indicator Status & Description Power events Stand-by mode Powering up Normal operation Normal power-down cooling Download CW start fail Light source life exhausted Case open Burn-In events Burn-in ON Burn-in OFF Light source events Light source error in normal operation Light source is not lit up Thermal events Fan 1 error (the actual fan speed is outside the desired speed) Fan 2 error (the actual fan speed is outside the desired speed) Fan 3 error (the actual fan speed is...
Indicators Indicator Status & Description Power events Stand-by mode Powering up Normal operation Normal power-down cooling Download CW start fail Light source life exhausted Case open Burn-In events Burn-in ON Burn-in OFF Light source events Light source error in normal operation Light source is not lit up Thermal events Fan 1 error (the actual fan speed is outside the desired speed) Fan 2 error (the actual fan speed is outside the desired speed) Fan 3 error (the actual fan speed is...
User Manual
Page 49
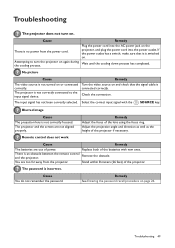
... the lens using the focus ring. Remove the obstacle. Troubleshooting The projector does not turn the projector on or connected correctly. There is no power from the projector. Turn the video source on . Plug the power cord into the power outlet. Select the correct input signal with new ones. Remedy Adjust the focus of the projector if necessary. Remedy See Entering the password recall procedure on the projector, and plug the power cord into the AC power jack...
... the lens using the focus ring. Remove the obstacle. Troubleshooting The projector does not turn the projector on or connected correctly. There is no power from the projector. Turn the video source on . Plug the power cord into the power outlet. Select the correct input signal with new ones. Remedy Adjust the focus of the projector if necessary. Remedy See Entering the password recall procedure on the projector, and plug the power cord into the AC power jack...


