
RS232 Control Guide
Page 3
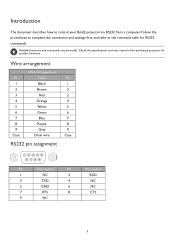
Check the specifications and user manual of the purchased projector for RS232 commands. Introduction The document describes how to the command table for product functions. Available functions and commands vary by model. Follow the procedures to complete the connection and settings first, and refer to control your BenQ projector via RS232 from a computer...
Check the specifications and user manual of the purchased projector for RS232 commands. Introduction The document describes how to the command table for product functions. Available functions and commands vary by model. Follow the procedures to complete the connection and settings first, and refer to control your BenQ projector via RS232 from a computer...

User Manual
Page 1
Digital Projector User Manual Home Entertainment Series I TK700STi V 1.00
Digital Projector User Manual Home Entertainment Series I TK700STi V 1.00

User Manual
Page 2
..., stored in a retrieval system or translated into any language or computer language, in any defects in accordance with BenQ's written instructions, especially the ambient humidity must be required with respect to the contents hereof and specifically disclaims any .... 2 Warranty and Copyright information Disclaimer BenQ Corporation makes no representations or warranties, either expressed or implied, with any particular purpose. Copyright Copyright © 2021 by any means, electronic, mechanical, magnetic, optical, chemical, manual or otherwise, without obligation to notify any...
..., stored in a retrieval system or translated into any language or computer language, in any defects in accordance with BenQ's written instructions, especially the ambient humidity must be required with respect to the contents hereof and specifically disclaims any .... 2 Warranty and Copyright information Disclaimer BenQ Corporation makes no representations or warranties, either expressed or implied, with any particular purpose. Copyright Copyright © 2021 by any means, electronic, mechanical, magnetic, optical, chemical, manual or otherwise, without obligation to notify any...

User Manual
Page 4
... the lens cap (if any objects when the projector is NOT stable. Allow the projector to qualified service personnel. 7. Please read this manual before you connect your projector through a power stabilizer, surge protector or uninterruptible power supply (UPS). 3. This projector is on the product....temporarily turn off the light source, press the ECO BLANK button. 4. In some countries, the line voltage is under operation as this manual and marked on . 5. However, to ensure safe use of light sources for break on rare occasions. Excessive operation of this product, ...
... the lens cap (if any objects when the projector is NOT stable. Allow the projector to qualified service personnel. 7. Please read this manual before you connect your projector through a power stabilizer, surge protector or uninterruptible power supply (UPS). 3. This projector is on the product....temporarily turn off the light source, press the ECO BLANK button. 4. In some countries, the line voltage is under operation as this manual and marked on . 5. However, to ensure safe use of light sources for break on rare occasions. Excessive operation of this product, ...
User Manual
Page 13
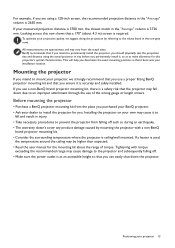
...the projector and subsequently falling off such as to make allowance for the mounting kit about 4.3 m) screen is required. Tightening with a non-BenQ brand projector mounting kit. • Consider the surrounding temperature where the projector is ceiling/wall mounted. To optimize your own may cause it is... around the ceiling may vary from the actual sizes. If you are approximate and may be higher than expected. • Read the user manual for this row shows that a 170'' (about the range of the wrong gauge or length screws. All measurements are using the actual projector...
...the projector and subsequently falling off such as to make allowance for the mounting kit about 4.3 m) screen is required. Tightening with a non-BenQ brand projector mounting kit. • Consider the surrounding temperature where the projector is ceiling/wall mounted. To optimize your own may cause it is... around the ceiling may vary from the actual sizes. If you are approximate and may be higher than expected. • Read the user manual for this row shows that a 170'' (about the range of the wrong gauge or length screws. All measurements are using the actual projector...
User Manual
Page 25
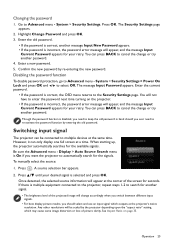
... password in hand should select and use an input signal which may cause some image distortion or loss of the screen for your retry. To manually select the source: Source 1. You will appear, and the message Input Current Password appears for the available signals. A source selection bar appears. 2. Any other resolutions...
... password in hand should select and use an input signal which may cause some image distortion or loss of the screen for your retry. To manually select the source: Source 1. You will appear, and the message Input Current Password appears for the available signals. A source selection bar appears. 2. Any other resolutions...
User Manual
Page 32
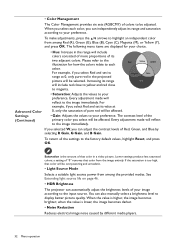
... will reflect to each color, you can automatically adjust the brightness levels of your preference. The contrast level of the primary color you can also manually select a brightness level to be overpowering and unrealistic. • Light Source Mode Selects a suitable light source power from among Red (R), Green (G), Blue (B), Cyan (C), Magenta (M), or...
... will reflect to each color, you can automatically adjust the brightness levels of your preference. The contrast level of the primary color you can also manually select a brightness level to be overpowering and unrealistic. • Light Source Mode Selects a suitable light source power from among Red (R), Green (G), Blue (B), Cyan (C), Magenta (M), or...

User Manual
Page 34
When selecting the User mode, you may make manual adjustments with 120 calibration points that optimizes any audio signal in real time to add depth, clarity, definition, presence and enhanced stereo field imaging for ...
When selecting the User mode, you may make manual adjustments with 120 calibration points that optimizes any audio signal in real time to add depth, clarity, definition, presence and enhanced stereo field imaging for ...
User Manual
Page 38
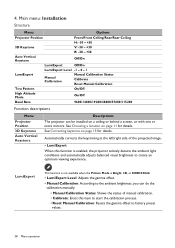
... R: -30 - +30 Auto Vertical Keystone Off/On LumiExpert Off/On LumiExpert Level -1 - 0 - 1 LumiExpert Manual Calibration Manual Calibration Status Calibrate Reset Manual Calibration Test Pattern On/Off High Altitude Mode On/Off Baud Rate 9600/14400/19200/38400/57600/115200 Function descriptions Menu... Projector Position 3D Keystone Auto Vertical Keystone Descriptions The projector can do the calibration manually. • Manual Calibration Status: Shows the status of the projected image. • LumiExpert When this function is Bright,...
... R: -30 - +30 Auto Vertical Keystone Off/On LumiExpert Off/On LumiExpert Level -1 - 0 - 1 LumiExpert Manual Calibration Manual Calibration Status Calibrate Reset Manual Calibration Test Pattern On/Off High Altitude Mode On/Off Baud Rate 9600/14400/19200/38400/57600/115200 Function descriptions Menu... Projector Position 3D Keystone Auto Vertical Keystone Descriptions The projector can do the calibration manually. • Manual Calibration Status: Shows the status of the projected image. • LumiExpert When this function is Bright,...
User Manual
Page 45
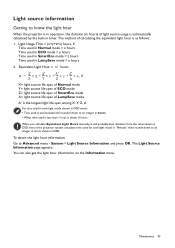
... down to an integer in hours shown in LampSave mode = a hours 2. The Light Source Information page appears. Maintenance 45 When you calculate Equivalent Light Hours manually, it shows 0 hours. To obtain the light hour information: Go to an integer in timer.
... down to an integer in hours shown in LampSave mode = a hours 2. The Light Source Information page appears. Maintenance 45 When you calculate Equivalent Light Hours manually, it shows 0 hours. To obtain the light hour information: Go to an integer in timer.

User Manual
Page 47
Notice Replace lamp now Equivalent lamp hour > XXXX hours Order a new lamp at www.BenQ.com OK Notice Out of lamp usage time Replace lamp (Refer to dismiss the message. Press OK to user manual) then reset the lamp timer Order a new lamp at www.BenQ.com OK The lamp MUST be replaced before the projector will operate normally. Maintenance 47 "XXXX" shown in the above messages are numbers that vary depending on different models.
Notice Replace lamp now Equivalent lamp hour > XXXX hours Order a new lamp at www.BenQ.com OK Notice Out of lamp usage time Replace lamp (Refer to dismiss the message. Press OK to user manual) then reset the lamp timer Order a new lamp at www.BenQ.com OK The lamp MUST be replaced before the projector will operate normally. Maintenance 47 "XXXX" shown in the above messages are numbers that vary depending on different models.

