
User Manual
Page 3
... operate your eyes. 3. Always open the lens shutter or remove the lens cap when the projector lamp is designed future reference. However, to become heated and deformed or even cause a fire. lens during operation. Refer servicing to qualified service personnel. 6. To temporarily turn off the lamp, press BLANK on . Safety Instructions 1. Do not look straight at the projector uninterruptible power supply (UPS). This projector is on the projector or remote control...
... operate your eyes. 3. Always open the lens shutter or remove the lens cap when the projector lamp is designed future reference. However, to become heated and deformed or even cause a fire. lens during operation. Refer servicing to qualified service personnel. 6. To temporarily turn off the lamp, press BLANK on . Safety Instructions 1. Do not look straight at the projector uninterruptible power supply (UPS). This projector is on the projector or remote control...

User Manual
Page 7
... control of time during presentations • High quality manual zoom lens • One-key auto-adjustment to display the best picture quality • Digital keystone correction to correct distorted images • Adjustable color balance control for data/video display • Ability to display 16.7 million colors • Multi-language On-Screen Display (OSD) menus • Switchable normal and economic modes to reduce the power consumption • Built-in speakers providing mixed mono audio when an audio input is connected...
... control of time during presentations • High quality manual zoom lens • One-key auto-adjustment to display the best picture quality • Digital keystone correction to correct distorted images • Adjustable color balance control for data/video display • Ability to display 16.7 million colors • Multi-language On-Screen Display (OSD) menus • Switchable normal and economic modes to reduce the power consumption • Built-in speakers providing mixed mono audio when an audio input is connected...

User Manual
Page 9
... 4 1. Front IR remote sensor 9. Projection lens 10. HDMI-input port 19. Speaker grill Introduction 9 Lens cover 6. RGB (PC)/Component Video (YPbPr/ YCbCr) signal input jack 20. Consult your dealer for details.) 2. Quick-release button 5. RS232 control port 17. S-Video input jack Video input jack 23 21. Lamp cover 3. Vent (cool air intake) 8. External control panel (See "Controls and functions" on page 10 for how to trigger external devices such as an electric screen or light control, etc...
... 4 1. Front IR remote sensor 9. Projection lens 10. HDMI-input port 19. Speaker grill Introduction 9 Lens cover 6. RGB (PC)/Component Video (YPbPr/ YCbCr) signal input jack 20. Consult your dealer for details.) 2. Quick-release button 5. RS232 control port 17. S-Video input jack Video input jack 23 21. Lamp cover 3. Vent (cool air intake) 8. External control panel (See "Controls and functions" on page 10 for how to trigger external devices such as an electric screen or light control, etc...

User Manual
Page 10
...-Screen Display (OSD) menu is Activates panel key lock. Power Selects an available picture setup mode. "Starting up or flashes when the projector is activated, the #6, #11, and #12 4. "Switching input signal" on page 29 "Utilizing FAQ function" on page 32 14. Focus ring timings for the displayed image. Zoom ring Adjusts the size of the lamp. Right/ Lights up the projector" on page 23, "Shutting down the projector" on page 43 "Selecting a picture mode" on page 37 7. under operation. "Using...
...-Screen Display (OSD) menu is Activates panel key lock. Power Selects an available picture setup mode. "Starting up or flashes when the projector is activated, the #6, #11, and #12 4. "Switching input signal" on page 29 "Utilizing FAQ function" on page 32 14. Focus ring timings for the displayed image. Zoom ring Adjusts the size of the lamp. Right/ Lights up the projector" on page 23, "Shutting down the projector" on page 43 "Selecting a picture mode" on page 37 7. under operation. "Using...
User Manual
Page 11
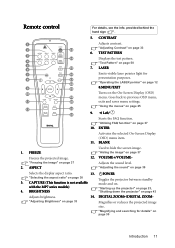
.... with the MP7 series models) 4. DIGITAL ZOOM+/DIGITAL ZOOM- "Magnifying and searching for 8 17 presentation purposes. 18 "Operating the LASER pointer" on page 12 9 19 8.MENU/EXIT 10 Turns on page 37 12. BLANK 1. "Adjusting the sound" on page 25 12 21 22 9. Goes back to hide the screen image. "Hiding the image" on the On-Screen Display (OSD) 18 menu. Remote control For details, see the info...
.... with the MP7 series models) 4. DIGITAL ZOOM+/DIGITAL ZOOM- "Magnifying and searching for 8 17 presentation purposes. 18 "Operating the LASER pointer" on page 12 9 19 8.MENU/EXIT 10 Turns on page 37 12. BLANK 1. "Adjusting the sound" on page 25 12 21 22 9. Goes back to hide the screen image. "Hiding the image" on the On-Screen Display (OSD) 18 menu. Remote control For details, see the info...

User Manual
Page 12
... projection. See the warning messages on page 38 / Operating the LASER pointer The Laser Pointer is visible. SOURCE Activates or displays an on page 28 19. based on page 35 21. "Switching input signal" on page 29 "Setting the presentation timer" on your own timer setting. "Auto-adjusting the image" on the projector. Right/ Locks the buttons on page 24 Depending upon the input signal in use, selects an available picture mode. It emits red colored light...
... projection. See the warning messages on page 38 / Operating the LASER pointer The Laser Pointer is visible. SOURCE Activates or displays an on page 28 19. based on page 35 21. "Switching input signal" on page 29 "Setting the presentation timer" on your own timer setting. "Auto-adjusting the image" on the projector. Right/ Locks the buttons on page 24 Depending upon the input signal in use, selects an available picture mode. It emits red colored light...
User Manual
Page 13
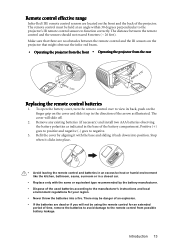
... manufacturer. • Dispose of the used batteries according to the manufacturer's instructions and local environment regulations for an extended period of the battery compartment. Make sure that might obstruct the infra-red beam. • Operating the projector from the front • Operating the projector from possible battery leakage. To open the battery cover, turn the remote control over to negative. 3. Stop when...
... manufacturer. • Dispose of the used batteries according to the manufacturer's instructions and local environment regulations for an extended period of the battery compartment. Make sure that might obstruct the infra-red beam. • Operating the projector from the front • Operating the projector from possible battery leakage. To open the battery cover, turn the remote control over to negative. 3. Stop when...

User Manual
Page 19
... standby mode, make use of the VGA cable to both IBM® compatibles and Macintosh® computers. Locate a function key labeled CRT/LCD or a function key with a DVI input jack, take a suitable audio cable and connect one end of the cable to the AUDIO OUT jack of the projector, and the other end of the projector (mixed mono) speakers in the SYSTEM SETUP: Advanced menu. Once connected, the audio...
... standby mode, make use of the VGA cable to both IBM® compatibles and Macintosh® computers. Locate a function key labeled CRT/LCD or a function key with a DVI input jack, take a suitable audio cable and connect one end of the cable to the AUDIO OUT jack of the projector, and the other end of the projector (mixed mono) speakers in the SYSTEM SETUP: Advanced menu. Once connected, the audio...

User Manual
Page 23
... Tone" will run the cooling fan for approximately 90 seconds before energizing the lamp. See "Switching input signal" on the projector lights orange after power has been applied. 2. Operation Starting up procedure takes about 30 seconds. Check that the POWER indicator light on page 29 for details. 4. Open the lens cover. The POWER indicator light flashes green and stays green when the projector is projected. (If necessary) Rotate the focus ring to adjust the image clearness. In the later stage...
... Tone" will run the cooling fan for approximately 90 seconds before energizing the lamp. See "Switching input signal" on the projector lights orange after power has been applied. 2. Operation Starting up procedure takes about 30 seconds. Check that the POWER indicator light on page 29 for details. 4. Open the lens cover. The POWER indicator light flashes green and stays green when the projector is projected. (If necessary) Rotate the focus ring to adjust the image clearness. In the later stage...

User Manual
Page 24
... air comes from the lamp may need using the zoom ring. These adjusters change the image height and projection angle. To correct this , press AUTO on page 62 for details. 2 1 Do not look into the lens while the lamp is equipped with the projector's resolution or set the input signal to optimize the picture quality. Screw the rear adjuster foot to the size 2. Within 3 seconds, the built-in position. 2. Adjusting the projected image Adjusting...
... air comes from the lamp may need using the zoom ring. These adjusters change the image height and projection angle. To correct this , press AUTO on page 62 for details. 2 1 Do not look into the lens while the lamp is equipped with the projector's resolution or set the input signal to optimize the picture quality. Screw the rear adjuster foot to the size 2. Within 3 seconds, the built-in position. 2. Adjusting the projected image Adjusting...
User Manual
Page 25
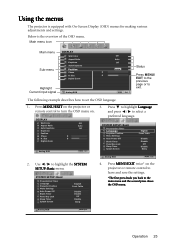
... MENU/EXIT twice* on the projector or 3. SYSTEM SETUP: Basic Presentation Timer Language Projector Position Menu Settings Auto Power Off Blank Timer Panel Key Lock Sleep Timer Splash Screen English Front Table Disable Disable Off Disable BenQ 4. Size Digital Zoom Analog RGB Off Auto Off 0 0 MENU Exit SYSTEM SETUP: Basic Presentation Timer Language Projector Position Menu Settings Auto Power Off Blank Timer Panel Key Lock Sleep Timer Splash Screen English Front Table Disable Disable Off Disable BenQ Analog RGB MENU Exit 2. DISPLAY Wall Color Aspect Ratio Auto Keystone Keystone...
... MENU/EXIT twice* on the projector or 3. SYSTEM SETUP: Basic Presentation Timer Language Projector Position Menu Settings Auto Power Off Blank Timer Panel Key Lock Sleep Timer Splash Screen English Front Table Disable Disable Off Disable BenQ 4. Size Digital Zoom Analog RGB Off Auto Off 0 0 MENU Exit SYSTEM SETUP: Basic Presentation Timer Language Projector Position Menu Settings Auto Power Off Blank Timer Panel Key Lock Sleep Timer Splash Screen English Front Table Disable Disable Off Disable BenQ Analog RGB MENU Exit 2. DISPLAY Wall Color Aspect Ratio Auto Keystone Keystone...

User Manual
Page 27
... the new password next time the projector is activated, you will display as pictured to the SYSTEM SETUP: Advanced> Security Settings > Change Password menu. 2. digit password, or if you did not record the password in this manual, and you absolutely do not remember it . Press and hold AUTO on the projector. Seek help from the local BenQ service Please write down in succession, the projector will display a coded number on -screen. The projector RECALL PASSWORD will automatically shut...
... the new password next time the projector is activated, you will display as pictured to the SYSTEM SETUP: Advanced> Security Settings > Change Password menu. 2. digit password, or if you did not record the password in this manual, and you absolutely do not remember it . Press and hold AUTO on the projector. Seek help from the local BenQ service Please write down in succession, the projector will display a coded number on -screen. The projector RECALL PASSWORD will automatically shut...

User Manual
Page 28
... the DISPLAY menu is incorrect, the password error message displays lasting for three seconds, and the message "INPUT PASSWORD" displays for your retry. Press / . 28 Operation You will need to the Security Settings page. Press to enter the password next time when turning on the projector or remote control to the SYSTEM SETUP: Advanced > Security Settings > Power On Lock menu after opening the OSD menu system. the bottom of the image. i. To correct this, besides adjusting the...
... the DISPLAY menu is incorrect, the password error message displays lasting for three seconds, and the message "INPUT PASSWORD" displays for your retry. Press / . 28 Operation You will need to the Security Settings page. Press to enter the password next time when turning on the projector or remote control to the SYSTEM SETUP: Advanced > Security Settings > Power On Lock menu after opening the OSD menu system. the bottom of the image. i. To correct this, besides adjusting the...

User Manual
Page 29
... than "Video" using mostly moving images (movies). • The native display resolution of picture clarity. A source selection bar displays. 2. Be sure the Quick Auto Search function in use an input signal which outputs at the corner of the projected image will change the color space to search for the signals. See "Selecting the aspect ratio" on the projector or remote control. Switching input signal The projector can also manually cycle through the available input signals. 1. Operation 29 Press...
... than "Video" using mostly moving images (movies). • The native display resolution of picture clarity. A source selection bar displays. 2. Be sure the Quick Auto Search function in use an input signal which outputs at the corner of the projected image will change the color space to search for the signals. See "Selecting the aspect ratio" on the projector or remote control. Switching input signal The projector can also manually cycle through the available input signals. 1. Operation 29 Press...

User Manual
Page 42
... adjust the Lan Control Settings. After making the adjustments, press the Send button and the data will be saved in charge of remote network operation on this projector. If you are an IT administrator and would like to manage multiple devices through one interface, you to the tools page has been password-protected. You can name the projector, keep track of this projector has been password...
... adjust the Lan Control Settings. After making the adjustments, press the Send button and the data will be saved in charge of remote network operation on this projector. If you are an IT administrator and would like to manage multiple devices through one interface, you to the tools page has been password-protected. You can name the projector, keep track of this projector has been password...

User Manual
Page 44
...-screen display (OSD) menus vary according to the signal type selected and the projector model you are using. PICTURE Tint Sharpness Brilliant Color On/Off Color Temperature T1/T2/T3/T4 Primary Color R/G/B/C/M/Y 3D Color Hue Management Saturation Gain Save Settings 3. SOURCE Quick Auto Search Color Space Conversion On/Off Auto/RGB/YUV Timer Period 1~240 minutes 4. Main menu Sub-menu Options Wall Color Off/Light Yellow/Pink/Light Green/Blue/Blackboard Aspect Ratio Auto/Real/4:3/16:9 1. DISPLAY Auto Keystone Keystone...
...-screen display (OSD) menus vary according to the signal type selected and the projector model you are using. PICTURE Tint Sharpness Brilliant Color On/Off Color Temperature T1/T2/T3/T4 Primary Color R/G/B/C/M/Y 3D Color Hue Management Saturation Gain Save Settings 3. SOURCE Quick Auto Search Color Space Conversion On/Off Auto/RGB/YUV Timer Period 1~240 minutes 4. Main menu Sub-menu Options Wall Color Off/Light Yellow/Pink/Light Green/Blue/Blackboard Aspect Ratio Auto/Real/4:3/16:9 1. DISPLAY Auto Keystone Keystone...

User Manual
Page 50
... (Off) Reset lamp timer See "Resetting the lamp timer" on page 26 for details. Selects a baud rate that is identical with your computer's so that the projected image is free from distortion. The projector can connect the projector using a suitable RS-232 cable and update or download the projector's firmware. This function is calculated. It helps you adjust the image size and focus and check that you can output a VGA signal when it is in standby mode and...
... (Off) Reset lamp timer See "Resetting the lamp timer" on page 26 for details. Selects a baud rate that is identical with your computer's so that the projected image is free from distortion. The projector can connect the projector using a suitable RS-232 cable and update or download the projector's firmware. This function is calculated. It helps you adjust the image size and focus and check that you can output a VGA signal when it is in standby mode and...
User Manual
Page 51
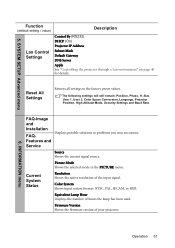
... the firmware version of hours the lamp has been used. SYSTEM SETUP: Advanced menu Function (default setting / value) Lan Control Settings Description Control By (RS232) DHCP (On) Projector IP Address Subnet Mask Default Gateway DNS Server Apply See "Controlling the projector through a Lan environment" on page 40 for details. INFORMATION menu FAQ-Image and Installation FAQ- Reset All Settings Returns all settings to problems you may encounter. Current System Status Resolution Shows the native resolution of the input signal. Operation 51 Picture Mode...
... the firmware version of hours the lamp has been used. SYSTEM SETUP: Advanced menu Function (default setting / value) Lan Control Settings Description Control By (RS232) DHCP (On) Projector IP Address Subnet Mask Default Gateway DNS Server Apply See "Controlling the projector through a Lan environment" on page 40 for details. INFORMATION menu FAQ-Image and Installation FAQ- Reset All Settings Returns all settings to problems you may encounter. Current System Status Resolution Shows the native resolution of the input signal. Operation 51 Picture Mode...

User Manual
Page 53
... method of lamp usage is selected, the light output will be set from 5 to 2000-3000 hours with proper usage. You will not automatically shut down in Economic mode also extends the lamp operation life. Extending lamp life The projection lamp is detected after a set Economic mode, go into the SYSTEM SETUP: Basic > Auto Power Off menu and press / . To set period of time to turn off automatically if no input signal is a consumable...
... method of lamp usage is selected, the light output will be set from 5 to 2000-3000 hours with proper usage. You will not automatically shut down in Economic mode also extends the lamp operation life. Extending lamp life The projection lamp is detected after a set Economic mode, go into the SYSTEM SETUP: Basic > Auto Power Off menu and press / . To set period of time to turn off automatically if no input signal is a consumable...
User Manual
Page 67
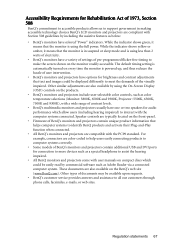
... default timing setting is automatically turned on every time the monitor is using less than 2 watts of electricity. • BenQ's monitors have a variety of settings of pre-programmed flicker-free timing to make the screen shown on the front-panel. • Firmware of BenQ's monitors and projectors contain unique product information that the monitor is using the On-Screen Display (OSD) controls on the products. • BenQ's monitors and projectors include user-selectable color controls...
... default timing setting is automatically turned on every time the monitor is using less than 2 watts of electricity. • BenQ's monitors have a variety of settings of pre-programmed flicker-free timing to make the screen shown on the front-panel. • Firmware of BenQ's monitors and projectors contain unique product information that the monitor is using the On-Screen Display (OSD) controls on the products. • BenQ's monitors and projectors include user-selectable color controls...


