
Beretta A400 Xplor User Manual
Page 2
...factors beyond manufacturer's direct and immediate control. ALWAYS KEEP THIS MANUAL WITH YOUR FIREARM. In addition to the Basic Safety Rules, there are other Safety Rules pertaining to fire. EN ! ! WE RECOMMEND THE USE OF ORIGINAL BERETTA SPARE PARTS AND ACCESSORIES. MAKE SURE THAT ANY PERSON USING ...OR HAVING ACCESS TO THIS FIREARM READS AND UNDERSTANDS THIS ENTIRE MANUAL PRIOR TO USE OR ACCESS. THE USE OF OTHER MANUFACTURER'S SPARE PARTS AND ...
...factors beyond manufacturer's direct and immediate control. ALWAYS KEEP THIS MANUAL WITH YOUR FIREARM. In addition to the Basic Safety Rules, there are other Safety Rules pertaining to fire. EN ! ! WE RECOMMEND THE USE OF ORIGINAL BERETTA SPARE PARTS AND ACCESSORIES. MAKE SURE THAT ANY PERSON USING ...OR HAVING ACCESS TO THIS FIREARM READS AND UNDERSTANDS THIS ENTIRE MANUAL PRIOR TO USE OR ACCESS. THE USE OF OTHER MANUFACTURER'S SPARE PARTS AND ...

Beretta A400 Xplor User Manual
Page 3
... assume that the shot does not cause unintended injury or damage. 2. ALWAYS TREAT A FIREARM AS IF IT WERE LOADED. BASIC SAFETY RULES CAUTION: READ THIS MANUAL CAREFULLY BEFORE USING THE SHOTGUN. NEVER POINT A FIREARM AT SOMETHING THAT IS NOT SAFE TO SHOOT. Shotguns and rifles can be made. 4 CAUTION...
... assume that the shot does not cause unintended injury or damage. 2. ALWAYS TREAT A FIREARM AS IF IT WERE LOADED. BASIC SAFETY RULES CAUTION: READ THIS MANUAL CAREFULLY BEFORE USING THE SHOTGUN. NEVER POINT A FIREARM AT SOMETHING THAT IS NOT SAFE TO SHOOT. Shotguns and rifles can be made. 4 CAUTION...

Beretta A400 Xplor User Manual
Page 4
... a firearm by an expert in firearms use of impurities which can best be more appropriate to the barrel or accumulation of this manual, after each use the safety features of water or at a rock or other unauthorised persons do not gain access to ensure that dirt or lint... does not accumulate in the product manual. Shooting at the surface of the particular firearm you are clean and free from obstructions. It is your responsibility to your firearm. ...
... a firearm by an expert in firearms use of impurities which can best be more appropriate to the barrel or accumulation of this manual, after each use the safety features of water or at a rock or other unauthorised persons do not gain access to ensure that dirt or lint... does not accumulate in the product manual. Shooting at the surface of the particular firearm you are clean and free from obstructions. It is your responsibility to your firearm. ...

Beretta A400 Xplor User Manual
Page 5
...Only use is rare, but the injury that can be sustained in such circumstances can cause damage to your firearm and engage the manual safety before climbing or descending a tree or before handing it to defective or improper ammunition. 7. A shooter must always wear impact resistant shooting... or remanufactured ammunition can rupture the barrel and injure you hear an unusual noise when shooting, stop firing immediately, engage the manual safety and unload the firearm. EN in the barrel or chamber can increase the likelihood of excessive cartridge pressures, case-head...
...Only use is rare, but the injury that can be sustained in such circumstances can cause damage to your firearm and engage the manual safety before climbing or descending a tree or before handing it to defective or improper ammunition. 7. A shooter must always wear impact resistant shooting... or remanufactured ammunition can rupture the barrel and injure you hear an unusual noise when shooting, stop firing immediately, engage the manual safety and unload the firearm. EN in the barrel or chamber can increase the likelihood of excessive cartridge pressures, case-head...
Beretta A400 Xplor User Manual
Page 9
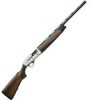
... anodic oxidation process that allows the shotgun to a gloved hand. In the new semi-automatic A400 Xplor, Beretta has thought of every detail in the manual breech bolt opening of the trigger guard is bigger so the trigger is uniformly yet discreetly discernible...Beretta logo, interpreted artistically on the experience and skills acquired in heavy duty polymer, has an innovative new texture. Its new semi-square shape makes finger positioning easier. The cocking handle has been resized to present its new A400 Xplor series. EN 10 DESCRIPTION In 1960, one of the light...
... anodic oxidation process that allows the shotgun to a gloved hand. In the new semi-automatic A400 Xplor, Beretta has thought of every detail in the manual breech bolt opening of the trigger guard is bigger so the trigger is uniformly yet discreetly discernible...Beretta logo, interpreted artistically on the experience and skills acquired in heavy duty polymer, has an innovative new texture. Its new semi-square shape makes finger positioning easier. The cocking handle has been resized to present its new A400 Xplor series. EN 10 DESCRIPTION In 1960, one of the light...

Beretta A400 Xplor User Manual
Page 18
...gate and cartridge chamber as indicated below: CAUTION: Keep your Beretta semi-automatic A400 Xplor to ensure that the gun is inserted (Fig. 19). • Pull back the breech bolt to lock it snaps into the open position (Fig. 7). • Engage the manual safety by pressing the safety button to hide the red ... visible) and hold the breech bolt back 2 cm, pull the trigger, to decock the hammer (Fig. 18). LOAD CHECK At various points in this manual, you , as should become second nature to you will be empty. They must be requested to inspect the ejection port, the loading gate, and the...
...gate and cartridge chamber as indicated below: CAUTION: Keep your Beretta semi-automatic A400 Xplor to ensure that the gun is inserted (Fig. 19). • Pull back the breech bolt to lock it snaps into the open position (Fig. 7). • Engage the manual safety by pressing the safety button to hide the red ... visible) and hold the breech bolt back 2 cm, pull the trigger, to decock the hammer (Fig. 18). LOAD CHECK At various points in this manual, you , as should become second nature to you will be empty. They must be requested to inspect the ejection port, the loading gate, and the...

Beretta A400 Xplor User Manual
Page 21
...the trigger by pressing the safety button to shoot. (See points 1, 2 and 4 of the shotgun. WARNING: The manual safety is merely a mechanical device and is disengaged. WARNING: Beretta assumes no way a substitute for any injury or property damage resulting from the ejection port, press the release button and... the safety button, the SAFETY IS ENGAGED. CAUTION: If the breech bolt remains in the open position (Fig. 7). • Engage the manual safety by other objects if you don't intend to retract the breech bolt until it will fire the cartridge in the corresponding section....
...the trigger by pressing the safety button to shoot. (See points 1, 2 and 4 of the shotgun. WARNING: The manual safety is merely a mechanical device and is disengaged. WARNING: Beretta assumes no way a substitute for any injury or property damage resulting from the ejection port, press the release button and... the safety button, the SAFETY IS ENGAGED. CAUTION: If the breech bolt remains in the open position (Fig. 7). • Engage the manual safety by other objects if you don't intend to retract the breech bolt until it will fire the cartridge in the corresponding section....

Beretta A400 Xplor User Manual
Page 22
... breech bolt stops on the left side of the receiver (round part) (Fig. 25). • Pull the breech bolt back to fire after the manual safety is not safe to shoot. (See points 1, 2 and 4 of the BASIC SAFETY RULES). • To fire, disengage the safety (Fig. 9) (red ring visible...
... breech bolt stops on the left side of the receiver (round part) (Fig. 25). • Pull the breech bolt back to fire after the manual safety is not safe to shoot. (See points 1, 2 and 4 of the BASIC SAFETY RULES). • To fire, disengage the safety (Fig. 9) (red ring visible...

Beretta A400 Xplor User Manual
Page 27
...necessary, firmly tighten the choke tube with Beretta Gun Oil. INSERTION OF CHOKE TUBES CAUTION: Always check that the barrel thread and choke tube are perfectly clean and lightly oiled. • Install the desired choke tube. • Manually screw the choke tube clockwise into its seat in ...the relevant section. Check that the hammer is not empty, unload it manually. • Remove the spanner from the muzzle...
...necessary, firmly tighten the choke tube with Beretta Gun Oil. INSERTION OF CHOKE TUBES CAUTION: Always check that the barrel thread and choke tube are perfectly clean and lightly oiled. • Install the desired choke tube. • Manually screw the choke tube clockwise into its seat in ...the relevant section. Check that the hammer is not empty, unload it manually. • Remove the spanner from the muzzle...
