

Manual
Page 3
Model 800 I he various parts of the machine 14 15 16 1 Free-arm cover-plate 2 Needle-plate 3 Presser-foot 4 Needle-clamp 5 Thread guide 6 Face-plate 7 Lamp switch 8 8 Take-up lever BERNINA' 01 9 9 Winder pre-tension 10 Thread tension and thread guide 11 Tension indicator window 17 12 Thread tension control wheel 13 Carrying handle 18 14 Winder spindle 9 15 Handwheel 16 Handwheel release 17 Left-center-right adjusting knob (needle position) 4r. 20 18 Zigzag adjusting knob ;CI 19 Stitch length adjustment (stitch length lever) 20 Drop-feed control 21 Free-arm 2 22 Base-...
Model 800 I he various parts of the machine 14 15 16 1 Free-arm cover-plate 2 Needle-plate 3 Presser-foot 4 Needle-clamp 5 Thread guide 6 Face-plate 7 Lamp switch 8 8 Take-up lever BERNINA' 01 9 9 Winder pre-tension 10 Thread tension and thread guide 11 Tension indicator window 17 12 Thread tension control wheel 13 Carrying handle 18 14 Winder spindle 9 15 Handwheel 16 Handwheel release 17 Left-center-right adjusting knob (needle position) 4r. 20 18 Zigzag adjusting knob ;CI 19 Stitch length adjustment (stitch length lever) 20 Drop-feed control 21 Free-arm 2 22 Base-...

Manual
Page 4
... dazzle-free light can be fitted on the free-arm, is used for mains and starter connection in the machine, only then connect the mains plug with cable and the BerninaInstruction manual. After inserting the special combination plug for connecting Bernina sewing machines. The container, which can be switched on the footboard of the starter. tr 0, 4 Electrical Connectior Connecting to change the bulb.
... dazzle-free light can be fitted on the free-arm, is used for mains and starter connection in the machine, only then connect the mains plug with cable and the BerninaInstruction manual. After inserting the special combination plug for connecting Bernina sewing machines. The container, which can be switched on the footboard of the starter. tr 0, 4 Electrical Connectior Connecting to change the bulb.

Manual
Page 5
.... forefinger of needle and thread. sewing machine 800. while those for Bernina . . . Bobbin and Case Removing the bobbin case Open hinged bobbin case cover. ti Needle and thread table Needle system 705 B very fine fine 60 70 Mercerised sewing thread (3 ply) 50 Darning thread (2 ply) 50 30-50 medium 80 50 30 strong 90 40 large 100 40 Correct choice of the left hand and remove the bobbin case. Use only needle system 705 B for darning are numbers 80, 90...
.... forefinger of needle and thread. sewing machine 800. while those for Bernina . . . Bobbin and Case Removing the bobbin case Open hinged bobbin case cover. ti Needle and thread table Needle system 705 B very fine fine 60 70 Mercerised sewing thread (3 ply) 50 Darning thread (2 ply) 50 30-50 medium 80 50 30 strong 90 40 large 100 40 Correct choice of the left hand and remove the bobbin case. Use only needle system 705 B for darning are numbers 80, 90...
Manual
Page 6
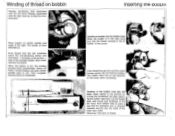
... bobbin case into the bobbin case. Draw thread from the reel clockwise round the pre-tensioning device and from there - Start motor with the left . Draw thread through slot and then under tension spring. as shown in the direction of the arrow. When the bobbin is full, the winding process stops automatically. "et 0 12 Insertion of bobbin into the hook. Winding of thread on bobbin Release handwheel: hold handwheel with the foot...
... bobbin case into the bobbin case. Draw thread from the reel clockwise round the pre-tensioning device and from there - Start motor with the left . Draw thread through slot and then under tension spring. as shown in the direction of the arrow. When the bobbin is full, the winding process stops automatically. "et 0 12 Insertion of bobbin into the hook. Winding of thread on bobbin Release handwheel: hold handwheel with the foot...

Manual
Page 7
... spool to the back leaving a loose end of the tension disc. Hold needle thread loosely. Fixing the needle. Loosen the needle clamp screw half a turn knob to be in particular darning, the feed dog must be altered. Tighten needle clamp screw. Threading the machine. The thread is in center of the take -up through the slot of approximately 10 cm (4 ins.). Place spool in center = Tighter tension. - Now draw thread through the thread guide (5) up lever...
... spool to the back leaving a loose end of the tension disc. Hold needle thread loosely. Fixing the needle. Loosen the needle clamp screw half a turn knob to be in particular darning, the feed dog must be altered. Tighten needle clamp screw. Threading the machine. The thread is in center of the take -up through the slot of approximately 10 cm (4 ins.). Place spool in center = Tighter tension. - Now draw thread through the thread guide (5) up lever...

Manual
Page 8
... presser feet - Only Bernina has this will you achieve easy and perfect work is finished. Removing work . this advantage. The work . Use the correct presser foot for sewing. The Bernina principle: "Just clip it can be used as a thread cutter. Fix the required presser foot on !" The patented Bernina presser foot clamping lever permits quick and easy changes. Raise presser foot by use of work . The presser foot is secured and the machine is made in this way will release the top thread tension...
... presser feet - Only Bernina has this will you achieve easy and perfect work is finished. Removing work . this advantage. The work . Use the correct presser foot for sewing. The Bernina principle: "Just clip it can be used as a thread cutter. Fix the required presser foot on !" The patented Bernina presser foot clamping lever permits quick and easy changes. Raise presser foot by use of work . The presser foot is secured and the machine is made in this way will release the top thread tension...

Manual
Page 9
... higher the number, the wider the zig- depending on the pointer is at the Turn knob (19) clockwise to 0 1 2 3 4 °"" Zigzag sewing The satin stitch spacing can then adjust the satin stitch displacement becomes greater. The line on the scale at 00». to be moved left. thread - Stitch It. length : Needle position: center Zigzag width: 1 1,5 2,5 3 3,5 4 Satin stitch spacing Satin Stitch / Zigzag Sewing 4 close to the right back. Setting the zigzag spacing: knob...
... higher the number, the wider the zig- depending on the pointer is at the Turn knob (19) clockwise to 0 1 2 3 4 °"" Zigzag sewing The satin stitch spacing can then adjust the satin stitch displacement becomes greater. The line on the scale at 00». to be moved left. thread - Stitch It. length : Needle position: center Zigzag width: 1 1,5 2,5 3 3,5 4 Satin stitch spacing Satin Stitch / Zigzag Sewing 4 close to the right back. Setting the zigzag spacing: knob...

Manual
Page 10
...). 2. Satin Stitch: Lift needle out of work firmly. Buttonholes Buttonhole foot 033 Needle: 80-70 Thread: 30 or 50 For sewing a buttonhole, thread bottom cotton through hole in finger of bobbin case. 10 0 12 3 4 -18 0 123 4 17 Adjustment of the Buttonhole Two mechanical spring settings have been built-in for the buttonhole: one stitch, turning handwheel by Adjust zigzag again to the right until it stops. Set zigzag to sew. Sew stitches for bar tack. Turn work It is vertical (stitch length...
...). 2. Satin Stitch: Lift needle out of work firmly. Buttonholes Buttonhole foot 033 Needle: 80-70 Thread: 30 or 50 For sewing a buttonhole, thread bottom cotton through hole in finger of bobbin case. 10 0 12 3 4 -18 0 123 4 17 Adjustment of the Buttonhole Two mechanical spring settings have been built-in for the buttonhole: one stitch, turning handwheel by Adjust zigzag again to the right until it stops. Set zigzag to sew. Sew stitches for bar tack. Turn work It is vertical (stitch length...

Manual
Page 11
Lower needle to the raised foot and make a trial but- If not do one stitch by turning the hand wheel towards you, bringing the needle to sew the buttonhole with reinforcing cord Set machine. Under no circumstances should the zigzag or needle position be foot is lowered it is in the center. Do not lower the foot yet. The method of adjusting is recommended to make sure that first bead now...
Lower needle to the raised foot and make a trial but- If not do one stitch by turning the hand wheel towards you, bringing the needle to sew the buttonhole with reinforcing cord Set machine. Under no circumstances should the zigzag or needle position be foot is lowered it is in the center. Do not lower the foot yet. The method of adjusting is recommended to make sure that first bead now...

Manual
Page 12
... pulled back a little. Darning Small darning foot 285 Needle: 80-70 Thread: 50 e7) Darning material Stitch width: 0 Stitch length: 0 Drop feed control: center Needle position: lowered The quick mastering of this work depends on top) - When wrong side of each row Frequent thread breaking - opposite one another. Selvedgeway. (Not too dense or it becomes too thick around the hole. 3. How to be guided must be firmly held. holes at the ends...
... pulled back a little. Darning Small darning foot 285 Needle: 80-70 Thread: 50 e7) Darning material Stitch width: 0 Stitch length: 0 Drop feed control: center Needle position: lowered The quick mastering of this work depends on top) - When wrong side of each row Frequent thread breaking - opposite one another. Selvedgeway. (Not too dense or it becomes too thick around the hole. 3. How to be guided must be firmly held. holes at the ends...
Manual
Page 13
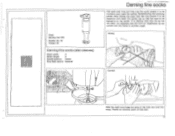
Small darning foot 285 Needle: 80-70 Thread: 50 Darning fine socks (also sleeves) Stitch width: 0 Stitch length: 0 Needle position: center Drop feed control: lowered Darning fine socks Pull work over ring (not ring over the work) stretch it to another angle. Thumb on extreme point of the hole taut over the ring stretch it to its maximum and insert the spring clip so that we do the 1st stitch run sideways and the...
Small darning foot 285 Needle: 80-70 Thread: 50 Darning fine socks (also sleeves) Stitch width: 0 Stitch length: 0 Needle position: center Drop feed control: lowered Darning fine socks Pull work over ring (not ring over the work) stretch it to another angle. Thumb on extreme point of the hole taut over the ring stretch it to its maximum and insert the spring clip so that we do the 1st stitch run sideways and the...

Manual
Page 14
... removing thread particles. Test by turning the hand- Insert the shuttle right hand press latch to room tempera- Replace arm cover and re-screw tightly. Cleaning and oiling Cleaning the machine. X. •ritiVe L. • art• • •"er- \\ X ' Cleaning and oiling the hook. Remove After cleaning pour a few drops of he into position. Remove presser foot or needle, open hinged cover. Never use , After removing the cover, the feed dog so that it should be removed from free-arm. is inserted the hinged shuttle cover...
... removing thread particles. Test by turning the hand- Insert the shuttle right hand press latch to room tempera- Replace arm cover and re-screw tightly. Cleaning and oiling Cleaning the machine. X. •ritiVe L. • art• • •"er- \\ X ' Cleaning and oiling the hook. Remove After cleaning pour a few drops of he into position. Remove presser foot or needle, open hinged cover. Never use , After removing the cover, the feed dog so that it should be removed from free-arm. is inserted the hinged shuttle cover...
Manual
Page 15
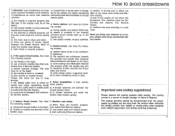
...- Needle breaks. plate and broke; The moving needle is inserted properly (the movement. e) poor quality or knotted thread. Seam irregularities. bobbin case tension spring. d) use of the machine. Call Bernina dealer; c) the machine is damag- e) there are caus- Faulty stitches. b) bobbin is crooked or not inserted free arm cover plate and remove sewing correctly (push needle right up in , therefore it bent, touched the throat must be dis- c) needle hole in throat plate is cleaned properly. Can have 7. thread tension discs...
...- Needle breaks. plate and broke; The moving needle is inserted properly (the movement. e) poor quality or knotted thread. Seam irregularities. bobbin case tension spring. d) use of the machine. Call Bernina dealer; c) the machine is damag- e) there are caus- Faulty stitches. b) bobbin is crooked or not inserted free arm cover plate and remove sewing correctly (push needle right up in , therefore it bent, touched the throat must be dis- c) needle hole in throat plate is cleaned properly. Can have 7. thread tension discs...

Manual
Page 16
Address of my Bernina agency: Subject to changes in design from those shown in text and illustrations.
Address of my Bernina agency: Subject to changes in design from those shown in text and illustrations.


