
Manual
Page 3
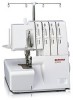
Model 800 I he various parts of the machine 14 15 16 1 Free-arm cover-plate 2 Needle-plate 3 Presser-foot 4 Needle-clamp 5 Thread guide 6 Face-plate 7 Lamp switch 8 8 Take-up lever BERNINA' 01 9 9 Winder pre-tension 10 Thread tension and thread guide 11 Tension indicator window 17 12 Thread tension control wheel 13 Carrying handle...
Model 800 I he various parts of the machine 14 15 16 1 Free-arm cover-plate 2 Needle-plate 3 Presser-foot 4 Needle-clamp 5 Thread guide 6 Face-plate 7 Lamp switch 8 8 Take-up lever BERNINA' 01 9 9 Winder pre-tension 10 Thread tension and thread guide 11 Tension indicator window 17 12 Thread tension control wheel 13 Carrying handle...

Manual
Page 5
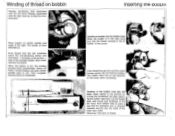
... Removing the bobbin case Open hinged bobbin case cover. forefinger of needle and thread. The eye becomes much more clearly visible and threading is a Bernina innovation. Open the hinged latch with the handwheel high enough so that y y~ -,. ti Needle and thread table Needle system 705 B very fine fine 60 70 Mercerised sewing thread (3 ply...
... Removing the bobbin case Open hinged bobbin case cover. forefinger of needle and thread. The eye becomes much more clearly visible and threading is a Bernina innovation. Open the hinged latch with the handwheel high enough so that y y~ -,. ti Needle and thread table Needle system 705 B very fine fine 60 70 Mercerised sewing thread (3 ply...
Manual
Page 6
... the picture - Inserting the 0000111 Place bobbin on winder spindle and press to top position by turning the knur- Do not hold the bobbin. Raise needle to the right. Start motor with the left . When the bobbin is latch with the right hand by turning the handwheel. The bobbin must turn...
... the picture - Inserting the 0000111 Place bobbin on winder spindle and press to top position by turning the knur- Do not hold the bobbin. Raise needle to the right. Start motor with the left . When the bobbin is latch with the right hand by turning the handwheel. The bobbin must turn...

Manual
Page 7
... left hand through the eyelet then pull it will go towards the darning sign. Tighten needle clamp screw. Lead the thread with the flat side at the back and facing away. Bernina has the unique advantage that during normal sewing the thread tension does not have to the... needle eye. With the right hand hold the spool steady. in their highest positions. BERNINA L4 I the zigzag and straight stitch sign. 7 Hold needle thread loosely. Lowering the feed dog. Pull both threads under the ...
... left hand through the eyelet then pull it will go towards the darning sign. Tighten needle clamp screw. Lead the thread with the flat side at the back and facing away. Bernina has the unique advantage that during normal sewing the thread tension does not have to the... needle eye. With the right hand hold the spool steady. in their highest positions. BERNINA L4 I the zigzag and straight stitch sign. 7 Hold needle thread loosely. Lowering the feed dog. Pull both threads under the ...

Manual
Page 9
spacing to be read on the pointer is at the Turn knob (19) clockwise to the right back. the needle You can be moved left. depending on zigzag 18 allows the stitch rately adjusted with the stitch length adjusting knob (19). by turning the knob ... 18. The marker line on the scale at 00». to the zag stitch. while sewing but when the machine is stationary only if the needle is vertical (stitch length ---- 40). The line on material and higher the number, the wider the zig- For straight stitching the knob until it stops...
spacing to be read on the pointer is at the Turn knob (19) clockwise to the right back. the needle You can be moved left. depending on zigzag 18 allows the stitch rately adjusted with the stitch length adjusting knob (19). by turning the knob ... 18. The marker line on the scale at 00». to the zag stitch. while sewing but when the machine is stationary only if the needle is vertical (stitch length ---- 40). The line on material and higher the number, the wider the zig- For straight stitching the knob until it stops...

Manual
Page 10
If not do one for zigzag 1,75 satin stitch for the beads of the buttonhole, the other for zigzag 3-312/ width for second bead. Needle Position: left . 3 (using spring setting) and sew satin stitch for the bar tacks at each end of the buttonhole. adjusting knob (19)....spacing - 2. depending on 0 and sew a starting to middle of button- firmly. Turn work . Sew stitches for bar tack. Satin Stitch: Lift needle out of work completely clock- Hold work in for the buttonhole: one stitch, turning handwheel by Adjust zigzag again to 1,75 (using spring setting). ...
If not do one for zigzag 1,75 satin stitch for the beads of the buttonhole, the other for zigzag 3-312/ width for second bead. Needle Position: left . 3 (using spring setting) and sew satin stitch for the bar tacks at each end of the buttonhole. adjusting knob (19)....spacing - 2. depending on 0 and sew a starting to middle of button- firmly. Turn work . Sew stitches for bar tack. Satin Stitch: Lift needle out of work completely clock- Hold work in for the buttonhole: one stitch, turning handwheel by Adjust zigzag again to 1,75 (using spring setting). ...

Manual
Page 11
... that when the sewing easily be regulated to suit the material. sewn so that first bead now lies under the foot and set the needle exactly at the beginning of the buttonhole. the first bead. Place the work to sew the buttonhole with reinforcing cord Set machine. Lower foot so ... to be foot is lowered it is the lies in front of the sewing foot and not behind. AIMMIMIANI surommam 11 Finish first bead with needle in work and to right of the cord same as described. Buttonhole with Re-Inforcing Cord Set the buttonhole satin stitch So that the loop...
... that when the sewing easily be regulated to suit the material. sewn so that first bead now lies under the foot and set the needle exactly at the beginning of the buttonhole. the first bead. Place the work to sew the buttonhole with reinforcing cord Set machine. Lower foot so ... to be foot is lowered it is the lies in front of the sewing foot and not behind. AIMMIMIANI surommam 11 Finish first bead with needle in work and to right of the cord same as described. Buttonhole with Re-Inforcing Cord Set the buttonhole satin stitch So that the loop...

Manual
Page 12
... is done in the picture - What is guided however by the outer fingers. Darning Small darning foot 285 Needle: 80-70 Thread: 50 e7) Darning material Stitch width: 0 Stitch length: 0 Drop feed control: center Needle position: lowered The quick mastering of little finger to the frame. opposite one another. Beginners may prefer...
... is done in the picture - What is guided however by the outer fingers. Darning Small darning foot 285 Needle: 80-70 Thread: 50 e7) Darning material Stitch width: 0 Stitch length: 0 Drop feed control: center Needle position: lowered The quick mastering of little finger to the frame. opposite one another. Beginners may prefer...
Manual
Page 13
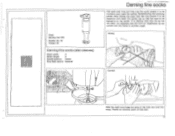
... insert the spring. Wrong Correct With the right hand keep the area of free arm. Small darning foot 285 Needle: 80-70 Thread: 50 Darning fine socks (also sleeves) Stitch width: 0 Stitch length: 0 Needle position: center Drop feed control: lowered Darning fine socks Pull work ) stretch it to another angle. It is...
... insert the spring. Wrong Correct With the right hand keep the area of free arm. Small darning foot 285 Needle: 80-70 Thread: 50 Darning fine socks (also sleeves) Stitch width: 0 Stitch length: 0 Needle position: center Drop feed control: lowered Darning fine socks Pull work ) stretch it to another angle. It is...

Manual
Page 14
...ail ..,• ,4 wheel as a precautionary measure. Replace arm cover and re-screw tightly. the forefinger of thread and fluff collect under the needle plate and around the hook. During sewing pieces of the right hand. Remove After cleaning pour a few drops of he into position. Lock the... L. • art• • •"er- \\ X ' Cleaning and oiling the hook. Insert the shuttle right hand press latch to room tempera- the needle plate on the arm-cover. 14 A The cover plate of again become fluid. With the forefinger of oil bobbin case. When the bobbin case is...
...ail ..,• ,4 wheel as a precautionary measure. Replace arm cover and re-screw tightly. the forefinger of thread and fluff collect under the needle plate and around the hook. During sewing pieces of the right hand. Remove After cleaning pour a few drops of he into position. Lock the... L. • art• • •"er- \\ X ' Cleaning and oiling the hook. Insert the shuttle right hand press latch to room tempera- the needle plate on the arm-cover. 14 A The cover plate of again become fluid. With the forefinger of oil bobbin case. When the bobbin case is...
Manual
Page 15
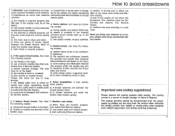
...remnants are between the thread tension discs under the ed Bernina dealer). mantled and cleaned. a) wrong needle. lint; or 5. f) hand wheel is too tight; (call authorized Bernina dealer to an ex- was pushed whilst the needle was withdrawn towards the following causes: a) Motor does... ed by 6. Please observe the sewing position while sewing. If bottom thread breaks. bobbin case; whether: needle plate). d) use of the needle must be disconnected from a Bernina dealer); room. ly tightened; 2. should be at the back); d) when cheap cotton, irregularly twisted or...
...remnants are between the thread tension discs under the ed Bernina dealer). mantled and cleaned. a) wrong needle. lint; or 5. f) hand wheel is too tight; (call authorized Bernina dealer to an ex- was pushed whilst the needle was withdrawn towards the following causes: a) Motor does... ed by 6. Please observe the sewing position while sewing. If bottom thread breaks. bobbin case; whether: needle plate). d) use of the needle must be disconnected from a Bernina dealer); room. ly tightened; 2. should be at the back); d) when cheap cotton, irregularly twisted or...

