Instruction Manual
Page 2
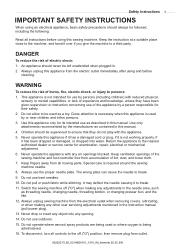
... of lint, dust, and loose cloth. 7. An appliance should be supervised to the off ("O") when making any air openings blocked. Never drop or insert any adjustments in the needle area, such as described in the instruction manual (pull power plug). 13. Do not allow to the nearest authorized dealer or service center for its intended use as threading needle, changing needle, threading bobbin, or changing presser foot, and the like. 12...
... of lint, dust, and loose cloth. 7. An appliance should be supervised to the off ("O") when making any air openings blocked. Never drop or insert any adjustments in the needle area, such as described in the instruction manual (pull power plug). 13. Do not allow to the nearest authorized dealer or service center for its intended use as threading needle, changing needle, threading bobbin, or changing presser foot, and the like. 12...

Instruction Manual
Page 5
... the Machine 8 Foot Control 8 Sewing Table 9 Winding the Bobbin 10 Inserting the Bobbin 12 Threading the Upper Thread 13 Needle Threader 15 Replacing the Needle 16 Thread Cutter 16 Thread Tension 17 Adjusting Presser Foot Pressure 17 Changing the Presser Foot 18 Two-Step Presser Foot 19 To Raise or Drop the Feed Dog 19 Important Sewing Information 20 Needle, Fabric, Thread Selection Guide 20 Presser Foot Application Chart-model 20 21 Presser Foot Application Chart-model 25 22 Display Explanation 23 Information on the LED Display 23 Operating Instructions 26...
... the Machine 8 Foot Control 8 Sewing Table 9 Winding the Bobbin 10 Inserting the Bobbin 12 Threading the Upper Thread 13 Needle Threader 15 Replacing the Needle 16 Thread Cutter 16 Thread Tension 17 Adjusting Presser Foot Pressure 17 Changing the Presser Foot 18 Two-Step Presser Foot 19 To Raise or Drop the Feed Dog 19 Important Sewing Information 20 Needle, Fabric, Thread Selection Guide 20 Presser Foot Application Chart-model 20 21 Presser Foot Application Chart-model 25 22 Display Explanation 23 Information on the LED Display 23 Operating Instructions 26...
Instruction Manual
Page 6
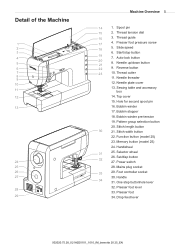
...length button 30 21. Memory button (model 25) 24. Handwheel 31 25. Foot controller socket 30. Reverse button 23 10. Needle plate cover 13. Hole for second spool pin 16. Function button (model 25) 23. Presser foot lever 33. Thread tension dial 16 3. Needle up/down button 21 22 9. Top cover 15. Bobbin winder pre-tension 19. Selector wheel 26. Set/disp button 32 27. Spool pin 15 2. Mains plug socket 33 29. Drop feed lever 502020.75.28_021H2D0101_1010_IM_bernette 20 25_EN Presser foot pressure screw 18 5. Auto-lock button 20 8. Sewing...
...length button 30 21. Memory button (model 25) 24. Handwheel 31 25. Foot controller socket 30. Reverse button 23 10. Needle plate cover 13. Hole for second spool pin 16. Function button (model 25) 23. Presser foot lever 33. Thread tension dial 16 3. Needle up/down button 21 22 9. Top cover 15. Bobbin winder pre-tension 19. Selector wheel 26. Set/disp button 32 27. Spool pin 15 2. Mains plug socket 33 29. Drop feed lever 502020.75.28_021H2D0101_1010_IM_bernette 20 25_EN Presser foot pressure screw 18 5. Auto-lock button 20 8. Sewing...

Instruction Manual
Page 7
... 17 1. Buttonhole foot (D) 4. Satin stitch foot (A) 5. Second spool pin 12. Pack of needles 13. Brush/ Seam ripper 15. Twin needle 26. Gathering foot 24. 1/4" Quilting foot 25. Button sewing foot 3. Screwdriver 16. Blind hem foot (F) 7. L-Screwdriver 17. Zipper foot (I 502020.59.99 502020.72.17 502020.70.53 K 502020.60.10 M 502020.60.05 23 24 25 26 502020.60.01 502020.70.52 502020.62.91 502020.70.65 18. Darning/ Embroidery foot 20. Cording foot (M) 23. Walking foot 502020.75...
... 17 1. Buttonhole foot (D) 4. Satin stitch foot (A) 5. Second spool pin 12. Pack of needles 13. Brush/ Seam ripper 15. Twin needle 26. Gathering foot 24. 1/4" Quilting foot 25. Button sewing foot 3. Screwdriver 16. Blind hem foot (F) 7. L-Screwdriver 17. Zipper foot (I 502020.59.99 502020.72.17 502020.70.53 K 502020.60.10 M 502020.60.05 23 24 25 26 502020.60.01 502020.70.52 502020.62.91 502020.70.65 18. Darning/ Embroidery foot 20. Cording foot (M) 23. Walking foot 502020.75...

Instruction Manual
Page 8
.... Darning/ Embroidery foot 8. Bobbin(3x) 12. Second spool pin 14. Pack of needles 15. Edge/quilting guide 16. Screwdriver 19. Dust cover Optional (to be purchased individually) 20 21 22 23 502020.70.53 K 502020.60.10 M 502020.60.05 502020.60.01 24 25 26 502020.70.52 502020.62.91 502020.70.65 20. Hemmer foot (K) 22. Twin needle 26. Buttonhole foot (D) 5. Spool holder (Small) 11. Button sewing foot 4. Gathering foot...
.... Darning/ Embroidery foot 8. Bobbin(3x) 12. Second spool pin 14. Pack of needles 15. Edge/quilting guide 16. Screwdriver 19. Dust cover Optional (to be purchased individually) 20 21 22 23 502020.70.53 K 502020.60.10 M 502020.60.05 502020.60.01 24 25 26 502020.70.52 502020.62.91 502020.70.65 20. Hemmer foot (K) 22. Twin needle 26. Buttonhole foot (D) 5. Spool holder (Small) 11. Button sewing foot 4. Gathering foot...

Instruction Manual
Page 9
... machine is conforming with sewing machine model 20 and 25. 502020.75.28_021H2D0101_1010_IM_bernette 20 25_EN Use only foot controller type C-9000 manufactured by inserting the 2-hole plug into its connector on . Release the foot control to start sewing. 8 Machine Setup Connecting the Machine Before connecting the power supply, make sure that the voltage and frequency shown on the power switch. 4. Connect the power line plug to the power source. Turn on the rating plate...
... machine is conforming with sewing machine model 20 and 25. 502020.75.28_021H2D0101_1010_IM_bernette 20 25_EN Use only foot controller type C-9000 manufactured by inserting the 2-hole plug into its connector on . Release the foot control to start sewing. 8 Machine Setup Connecting the Machine Before connecting the power supply, make sure that the voltage and frequency shown on the power switch. 4. Connect the power line plug to the power source. Turn on the rating plate...
Instruction Manual
Page 13
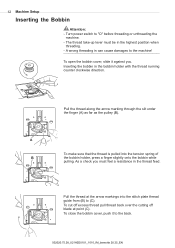
... close the bobbin cover, push it against you must be in the bobbin holder with the thread running counter clockwise direction. The thread take-up lever must feel a resistance in can cause damages to "O" before threading or unthreading the machine. - To make sure that the thread is pulled into the stitch plate thread guide from (B) to the back. 502020.75.28_021H2D0101_1010_IM_bernette 20 25_EN 12 Machine Setup Inserting the Bobbin Attention...
... close the bobbin cover, push it against you must be in the bobbin holder with the thread running counter clockwise direction. The thread take-up lever must feel a resistance in can cause damages to "O" before threading or unthreading the machine. - To make sure that the thread is pulled into the stitch plate thread guide from (B) to the back. 502020.75.28_021H2D0101_1010_IM_bernette 20 25_EN 12 Machine Setup Inserting the Bobbin Attention...
Instruction Manual
Page 22
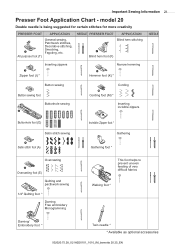
...foot (K) * Cording Cording foot (M) * Inserting invisible zippers Buttonhole foot (D) Satin stitch sewing Invisible Zipper foot * Gathering Satin stitch foot (A) Overcasting Overcasting foot (E) Quilting and pacthwork sewing 1/4" Quilting foot * Darning Free embroidery Monogramming Gathering foot * This foot helps to prevent uneven feeding of very difficult fabrics Walking foot * Darning/ Embroidery foot * Twin needle * * Available as optional accessories 502020.75.28_021H2D0101_1010_IM_bernette 20 25_EN Important Sewing Information 21 Presser Foot Application Chart - model 20 Double...
...foot (K) * Cording Cording foot (M) * Inserting invisible zippers Buttonhole foot (D) Satin stitch sewing Invisible Zipper foot * Gathering Satin stitch foot (A) Overcasting Overcasting foot (E) Quilting and pacthwork sewing 1/4" Quilting foot * Darning Free embroidery Monogramming Gathering foot * This foot helps to prevent uneven feeding of very difficult fabrics Walking foot * Darning/ Embroidery foot * Twin needle * * Available as optional accessories 502020.75.28_021H2D0101_1010_IM_bernette 20 25_EN Important Sewing Information 21 Presser Foot Application Chart - model 20 Double...

Instruction Manual
Page 23
... hem foot (F) NEEDLE Inserting zippers Narrow hemming Zipper foot (I) Button sewing Button sewing foot Buttonhole sewing Hemmer foot (K) * Cording Cording foot (M) * Inserting invisible zippers Buttonhole foot (D) Satin stitch sewing Invisible Zipper foot * Gathering Satin stitch foot (A) Overcasting Overcasting foot (E) Quilting and pacthwork sewing 1/4" Quilting foot * Darning Free embroidery Monogramming Gathering foot * This foot helps to prevent uneven feeding of very difficult fabrics Walking foot * Darning/ Embroidery foot Twin needle * * Available as optional accessories...
... hem foot (F) NEEDLE Inserting zippers Narrow hemming Zipper foot (I) Button sewing Button sewing foot Buttonhole sewing Hemmer foot (K) * Cording Cording foot (M) * Inserting invisible zippers Buttonhole foot (D) Satin stitch sewing Invisible Zipper foot * Gathering Satin stitch foot (A) Overcasting Overcasting foot (E) Quilting and pacthwork sewing 1/4" Quilting foot * Darning Free embroidery Monogramming Gathering foot * This foot helps to prevent uneven feeding of very difficult fabrics Walking foot * Darning/ Embroidery foot Twin needle * * Available as optional accessories...
Instruction Manual
Page 29
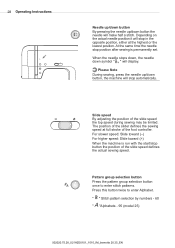
... machine is permanently set. When the needle stops down, the needle down symbol " " will display. Slide speed By adjusting the position of the slide speed defines the actual sewing speed. The position of the foot controller. At the same time the needle stop position after sewing is run with the start/stop button the position of the slide speed the top speed during sewing may be limited. 28 Operating Instructions Needle up/down button By pressing the needle...
... machine is permanently set. When the needle stops down, the needle down symbol " " will display. Slide speed By adjusting the position of the slide speed defines the actual sewing speed. The position of the foot controller. At the same time the needle stop position after sewing is run with the start/stop button the position of the slide speed the top speed during sewing may be limited. 28 Operating Instructions Needle up/down button By pressing the needle...
Instruction Manual
Page 37
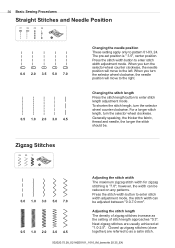
... to the left. To shorten the stitch length, turn the selector wheel clockwise. Adjusting the stitch length The density of stitch length approaches "0.3". Changing the stitch length Press the stitch length button to pattern 01-03, 24. Press the stitch width button to enter stitch width adjustment mode. The pre-set position is "7.0"; 36 Basic Sewing Procedures Straight Stitches and Needle Position 0.0 2.0 3.5 5.0 7.0 0.5 1.0 2.0 3.0 4.5 Zigzag Stitches Changing the needle position These setting apply only to enter stitch length adjustment mode. however, the width can be...
... to the left. To shorten the stitch length, turn the selector wheel clockwise. Adjusting the stitch length The density of stitch length approaches "0.3". Changing the stitch length Press the stitch length button to pattern 01-03, 24. Press the stitch width button to enter stitch width adjustment mode. The pre-set position is "7.0"; 36 Basic Sewing Procedures Straight Stitches and Needle Position 0.0 2.0 3.5 5.0 7.0 0.5 1.0 2.0 3.0 4.5 Zigzag Stitches Changing the needle position These setting apply only to enter stitch length adjustment mode. however, the width can be...
Instruction Manual
Page 40
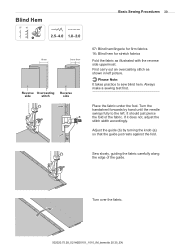
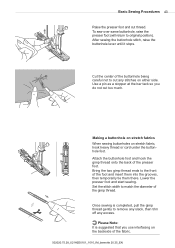
... Reverse side stitch side a b 07: Blind hem/lingerie for firm fabrics 16: Blind hem for stretch fabrics Fold the fabric as shown in left . Place the fabric under the foot. If it does not, adjust the stitch width accordingly. Adjust the guide (b) by hand until the needle swings fully to sew blind hem. It should just pierce the fold of the guide. Sew slowly, guiding the fabric carefully along the edge of the fabric. Always make a sewing...
... Reverse side stitch side a b 07: Blind hem/lingerie for firm fabrics 16: Blind hem for stretch fabrics Fold the fabric as shown in left . Place the fabric under the foot. If it does not, adjust the stitch width accordingly. Adjust the guide (b) by hand until the needle swings fully to sew blind hem. It should just pierce the fold of the guide. Sew slowly, guiding the fabric carefully along the edge of the fabric. Always make a sewing...

Instruction Manual
Page 41
... right holes of the stitch. If a shank is required, place a darning needle on top of the button. 40 Basic Sewing Procedures Button Sewing 2.5~4.5 a b a b Change the presser foot to lower 2.5~4.5 Position the work forward and then sew through the back two holes. 502020.75.28_021H2D0101_1010_IM_bernette 20 25_EN Select zig zag pattern. " to the button sewing foot. Move the drop feed control to the distance between the two holes of the button and sew. Place the button in the desired position, lower the foot. Adjust the stitch...
... right holes of the stitch. If a shank is required, place a darning needle on top of the button. 40 Basic Sewing Procedures Button Sewing 2.5~4.5 a b a b Change the presser foot to lower 2.5~4.5 Position the work forward and then sew through the back two holes. 502020.75.28_021H2D0101_1010_IM_bernette 20 25_EN Select zig zag pattern. " to the button sewing foot. Move the drop feed control to the distance between the two holes of the button and sew. Place the button in the desired position, lower the foot. Adjust the stitch...
Instruction Manual
Page 44
... them there. Attach the buttonhole foot and hook the gimp thread onto the back of the gimp thread. Once sewing is suggested that you do not cut thread. After sewing the buttonhole stitch, raise the buttonhole lever until it stops. Making a buttonhole on stretch fabrics When sewing buttonholes on either side. Lower the presser foot and start sewing. Set the stitch width to remove any slack, then trim off any stitches on stretch fabric, hook heavy thread or cord under the buttonhole foot. Please Note...
... them there. Attach the buttonhole foot and hook the gimp thread onto the back of the gimp thread. Once sewing is suggested that you do not cut thread. After sewing the buttonhole stitch, raise the buttonhole lever until it stops. Making a buttonhole on stretch fabrics When sewing buttonholes on either side. Lower the presser foot and start sewing. Set the stitch width to remove any slack, then trim off any stitches on stretch fabric, hook heavy thread or cord under the buttonhole foot. Please Note...
Instruction Manual
Page 46
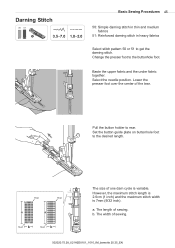
... upper fabric and the under fabric together. The length of one darn cycle is 7mm (9/32 inch). Darning Stitch D 3.5~7.0 1.0~2.0 Basic Sewing Procedures 45 50: Simple darning stitch in thin and medium fabrics 51: Reinforced darning stitch in heavy fabrics Select stitch pattern 50 or 51 to the desired length. Select the needle position. Stop Stop a a Start b Start b The size of sewing. b. Lower the presser foot over the center of sewing. 502020.75.28_021H2D0101_1010_IM_bernette 20 25_EN Set the button guide plate on buttonhole foot...
... upper fabric and the under fabric together. The length of one darn cycle is 7mm (9/32 inch). Darning Stitch D 3.5~7.0 1.0~2.0 Basic Sewing Procedures 45 50: Simple darning stitch in thin and medium fabrics 51: Reinforced darning stitch in heavy fabrics Select stitch pattern 50 or 51 to the desired length. Select the needle position. Stop Stop a a Start b Start b The size of sewing. b. Lower the presser foot over the center of sewing. 502020.75.28_021H2D0101_1010_IM_bernette 20 25_EN Set the button guide plate on buttonhole foot...
Instruction Manual
Page 54
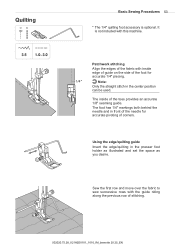
... the straight stitch in the presser foot holder as illustrated and set the space as you desire. Sew the first row and move over the fabric to sew successive rows with this machine. Using the edge/quilting guide Insert the edge/quilting in the center position can be used. Patchwork stitching Align the edges of the fabric with inside of the toes provides an accurate 1/8" seaming guide. Quilting 3.5 1.0~3.0 Basic Sewing Procedures 53 * The 1/4" quilting foot accessory...
... the straight stitch in the presser foot holder as illustrated and set the space as you desire. Sew the first row and move over the fabric to sew successive rows with this machine. Using the edge/quilting guide Insert the edge/quilting in the center position can be used. Patchwork stitching Align the edges of the fabric with inside of the toes provides an accurate 1/8" seaming guide. Quilting 3.5 1.0~3.0 Basic Sewing Procedures 53 * The 1/4" quilting foot accessory...

Instruction Manual
Page 61
... prevent uneven feeding of very difficult fabrics. Lift the presser foot lifter to the machine as follows: - It is fitted into above the needle screw and clamp (b). Lower the presser foot bar. - Your sewing machine offers excellent stitch quality on a wide range of fabrics from your machine. Remove the presser foot holder by unscrewing (counterclockwise) the presser bar attaching screw. a Attach the Walking Foot to raise the presser foot bar. Draw the bobbin thread up and place both the needle screw and the presser bar attaching screw are tightly...
... prevent uneven feeding of very difficult fabrics. Lift the presser foot lifter to the machine as follows: - It is fitted into above the needle screw and clamp (b). Lower the presser foot bar. - Your sewing machine offers excellent stitch quality on a wide range of fabrics from your machine. Remove the presser foot holder by unscrewing (counterclockwise) the presser bar attaching screw. a Attach the Walking Foot to raise the presser foot bar. Draw the bobbin thread up and place both the needle screw and the presser bar attaching screw are tightly...

Instruction Manual
Page 63
Insert the twin needle. Please make note: Make sure that the two threads used for single-needle threading using twin needles, use one or two colors. Please Note: - 62 Special Functions Twin Needle Sewing - Set the spool pin (included with the accessories) into the hole on the top of the same weight. Select the pattern. Press the function button to omit the thread guide above the needle and pass thread through the left needle. model 25 T 2.0~5.0 Please Note: Twin needles must be used to...
Insert the twin needle. Please make note: Make sure that the two threads used for single-needle threading using twin needles, use one or two colors. Please Note: - 62 Special Functions Twin Needle Sewing - Set the spool pin (included with the accessories) into the hole on the top of the same weight. Select the pattern. Press the function button to omit the thread guide above the needle and pass thread through the left needle. model 25 T 2.0~5.0 Please Note: Twin needles must be used to...

Instruction Manual
Page 78
... Remove and reinsert the bobbin case 12 and pull on the thread. The needle is too thick for the needle. 3. Adjusting the presser foot pressure. The presser foot that is used . 3. The machine is adjusted wrong. 2. The stitch length is not correctly threaded. 1. Problem Cause Correction Reference 1. Reduce the thread tension. 17 (Lower number). 3. Remove the reel and wind thread onto 13 pin. Choose a needle to sew. 7. The needle size must suit the fabric and thread. 4. Select a finer needle. 2. Upper thread 20 breaks 4. The needle is not attached...
... Remove and reinsert the bobbin case 12 and pull on the thread. The needle is too thick for the needle. 3. Adjusting the presser foot pressure. The presser foot that is used . 3. The machine is adjusted wrong. 2. The stitch length is not correctly threaded. 1. Problem Cause Correction Reference 1. Reduce the thread tension. 17 (Lower number). 3. Remove the reel and wind thread onto 13 pin. Choose a needle to sew. 7. The needle size must suit the fabric and thread. 4. Select a finer needle. 2. Upper thread 20 breaks 4. The needle is not attached...

Instruction Manual
Page 79
.... 4. The bobbin case is not threaded correctly. 3. Do not pull on the hook or 1. The needle thread is threaded wrong. 2. Fluff have collected on the fabric while sewing, -- Replace the needle. 16 The machine is damaged. 2. 78 Trouble Shooting Problem Cause Correction Reference Seam puckering Patterns are packed with lint. Select the correct foot. 2. Clean the hook and feed dog as 76 needle bar. let it be taken up by the machine. The feed dogs are...
.... 4. The bobbin case is not threaded correctly. 3. Do not pull on the hook or 1. The needle thread is threaded wrong. 2. Fluff have collected on the fabric while sewing, -- Replace the needle. 16 The machine is damaged. 2. 78 Trouble Shooting Problem Cause Correction Reference Seam puckering Patterns are packed with lint. Select the correct foot. 2. Clean the hook and feed dog as 76 needle bar. let it be taken up by the machine. The feed dogs are...


