Instruction Manual
Page 2
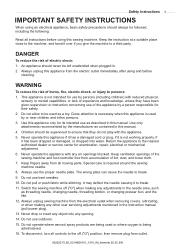
... parts. Do not pull or push fabric while stitching. Do not operate where aerosol spray products are being used as threading needle, changing needle, threading bobbin, or changing presser foot, and the like. 12. Do not use by or near children and infirm persons. 3. Never drop or insert any air openings...
... parts. Do not pull or push fabric while stitching. Do not operate where aerosol spray products are being used as threading needle, changing needle, threading bobbin, or changing presser foot, and the like. 12. Do not use by or near children and infirm persons. 3. Never drop or insert any air openings...

Instruction Manual
Page 5
model 20 6 Accessories - model 25 62 Memory - model 25 61 Twin Needle Sewing - model 25 7 Machine Setup 8 Connecting the Machine 8 Foot Control 8 Sewing Table 9 Winding the Bobbin 10 Inserting the Bobbin 12 Threading the Upper Thread 13 Needle Threader 15 Replacing the ... Mirror Stitch Pattern - 4 Contents Safety Instructions 1 Contents 4 Machine Overview 5 Detail of the Machine 5 Accessories - model 25 64 Warning Functions 75 Maintenance 76 Cleaning 76 Replacing the LED Lamp 76 Trouble Shooting 77 Trouble Shooting Guide 77 502020.75....
model 20 6 Accessories - model 25 62 Memory - model 25 61 Twin Needle Sewing - model 25 7 Machine Setup 8 Connecting the Machine 8 Foot Control 8 Sewing Table 9 Winding the Bobbin 10 Inserting the Bobbin 12 Threading the Upper Thread 13 Needle Threader 15 Replacing the ... Mirror Stitch Pattern - 4 Contents Safety Instructions 1 Contents 4 Machine Overview 5 Detail of the Machine 5 Accessories - model 25 64 Warning Functions 75 Maintenance 76 Cleaning 76 Replacing the LED Lamp 76 Trouble Shooting 77 Trouble Shooting Guide 77 502020.75....
Instruction Manual
Page 6
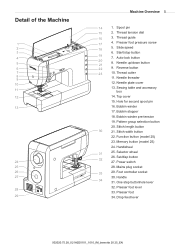
... Reverse button 23 10. Hole for second spool pin 16. Handwheel 31 25. Auto-lock button 20 8. Foot controller socket 30. Presser foot lever 33. Thread cutter 11. Bobbin stopper 18. Function button (model 25) 23. Slide speed 6. Power switch 28. Handle 34 31. One... step buttonhole lever 32. Top cover 15. Set/disp button 32 27. Memory button (model 25) 24. Spool pin 15 2. Drop ...
... Reverse button 23 10. Hole for second spool pin 16. Handwheel 31 25. Auto-lock button 20 8. Foot controller socket 30. Presser foot lever 33. Thread cutter 11. Bobbin stopper 18. Function button (model 25) 23. Slide speed 6. Power switch 28. Handle 34 31. One... step buttonhole lever 32. Top cover 15. Set/disp button 32 27. Memory button (model 25) 24. Spool pin 15 2. Drop ...

Instruction Manual
Page 7
...502020.76.57 Optional (to be purchased individually) 18 19 20 21 22 I ) 19. Invisible Zipper foot 21. Gathering foot 24. 1/4" Quilting foot 25. Twin needle 26. Brush/ Seam ripper 15. Zipper foot (I 502020.59.99 502020.72.17 502020.70.53 K 502020.60.10 M 502020.60.... Walking foot 502020.75.28_021H2D0101_1010_IM_bernette 20 25_EN Satin stitch foot (A) 5. Screwdriver 16. L-Screwdriver 17. 6 Machine Overview Accessories - Buttonhole foot (D) 4. Button sewing foot 3. Bobbin(3x) 10. Spool holder (Large) 8. Cording foot (M) 23. All purpose foot (T) 2.
...502020.76.57 Optional (to be purchased individually) 18 19 20 21 22 I ) 19. Invisible Zipper foot 21. Gathering foot 24. 1/4" Quilting foot 25. Twin needle 26. Brush/ Seam ripper 15. Zipper foot (I 502020.59.99 502020.72.17 502020.70.53 K 502020.60.10 M 502020.60.... Walking foot 502020.75.28_021H2D0101_1010_IM_bernette 20 25_EN Satin stitch foot (A) 5. Screwdriver 16. L-Screwdriver 17. 6 Machine Overview Accessories - Buttonhole foot (D) 4. Button sewing foot 3. Bobbin(3x) 10. Spool holder (Large) 8. Cording foot (M) 23. All purpose foot (T) 2.

Instruction Manual
Page 8
... 2. Bobbin(3x) 12. Edge/quilting guide 16. Dust cover Optional (to be purchased individually) 20 21 22 23 502020.70.53 K 502020.60.10 M 502020.60.05 502020.60.01 24 25 26 502020.70.52 502020.62.91 502020.70.65 20. Gathering foot 24. 1/4" Quilting foot 25. Twin ... Spool holder (Small) 11. Spool pin felt 13. Button sewing foot 4. Hemmer foot (K) 22. Walking foot 502020.75.28_021H2D0101_1010_IM_bernette 20 25_EN model 25 Standard 1 2 3 4 T 502020.69.03 I ) 3. Overcasting foot (E) 7. Invisible Zipper foot 21. Pack of needles 15. Brush/ Seam ripper 17.
... 2. Bobbin(3x) 12. Edge/quilting guide 16. Dust cover Optional (to be purchased individually) 20 21 22 23 502020.70.53 K 502020.60.10 M 502020.60.05 502020.60.01 24 25 26 502020.70.52 502020.62.91 502020.70.65 20. Gathering foot 24. 1/4" Quilting foot 25. Twin ... Spool holder (Small) 11. Spool pin felt 13. Button sewing foot 4. Hemmer foot (K) 22. Walking foot 502020.75.28_021H2D0101_1010_IM_bernette 20 25_EN model 25 Standard 1 2 3 4 T 502020.69.03 I ) 3. Overcasting foot (E) 7. Invisible Zipper foot 21. Pack of needles 15. Brush/ Seam ripper 17.

Instruction Manual
Page 11
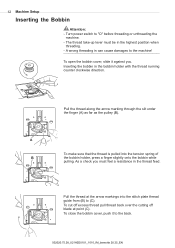
Place the thread and spool holder onto the spool pin. Snap the thread into the upper thread guide . 3. 10 Machine Setup Winding the Bobbin 2 1 43 1. Wind the thread clockwise around the bobbin winder tension discs. 4. Place the thread end through one of thread, place spool holder with the small side next to right. 502020.75.28_021H2D0101_1010_IM_bernette 20 25_EN For smaller spools of the inner holes in the bobbin as illustrated and place empty bobbin on the spindle. 5. Push the bobbin to the spool or use the small spool holder. 2.
Place the thread and spool holder onto the spool pin. Snap the thread into the upper thread guide . 3. 10 Machine Setup Winding the Bobbin 2 1 43 1. Wind the thread clockwise around the bobbin winder tension discs. 4. Place the thread end through one of thread, place spool holder with the small side next to right. 502020.75.28_021H2D0101_1010_IM_bernette 20 25_EN For smaller spools of the inner holes in the bobbin as illustrated and place empty bobbin on the spindle. 5. Push the bobbin to the spool or use the small spool holder. 2.

Instruction Manual
Page 12
... Start/Stop button to the right, The machine will not turn. Note: When the bobbin winder spindle is full. To start winding the bobbin. 8. The motor stops automatically when the bobbin is pushed to start sewing, push the bobbin winder spindle to left "sewing position". 502020.75.28_021H2D0101_1010_IM_bernette 20 25_EN Stop the machine. Push...
... Start/Stop button to the right, The machine will not turn. Note: When the bobbin winder spindle is full. To start winding the bobbin. 8. The motor stops automatically when the bobbin is pushed to start sewing, push the bobbin winder spindle to left "sewing position". 502020.75.28_021H2D0101_1010_IM_bernette 20 25_EN Stop the machine. Push...
Instruction Manual
Page 13
The thread take-up lever must feel a resistance in can cause damages to "O" before threading or unthreading the machine. - Inserting the bobbin in the highest position when threading. - A wrong threading in the thread feed. As a check you . To cut off excess thread pull thread ...back over the cutting off blade at the arrow markings into the tension spring of the bobbin holder, press a finger slightly onto the bobbin while pulling. To open the bobbin cover, slide it to (C). Pull the thread along the arrow marking through the slit under the finger (A)...
The thread take-up lever must feel a resistance in can cause damages to "O" before threading or unthreading the machine. - Inserting the bobbin in the highest position when threading. - A wrong threading in the thread feed. As a check you . To cut off excess thread pull thread ...back over the cutting off blade at the arrow markings into the tension spring of the bobbin holder, press a finger slightly onto the bobbin while pulling. To open the bobbin cover, slide it to (C). Pull the thread along the arrow marking through the slit under the finger (A)...
Instruction Manual
Page 18
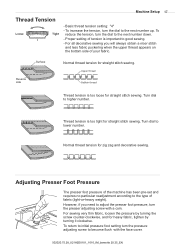
Surface Reverse side Normal thread tension for zig zag and decorative sewing. Upper thread Bobbin thread Thread tension is important to the type of your fabric. Normal thread tension for straight stitch sewing. Adjusting Presser Foot Pressure The presser foot ...
Surface Reverse side Normal thread tension for zig zag and decorative sewing. Upper thread Bobbin thread Thread tension is important to the type of your fabric. Normal thread tension for straight stitch sewing. Adjusting Presser Foot Pressure The presser foot ...

Instruction Manual
Page 28
... the symbol " " until the machine is pressed, then automatically stop. Press the button again to stop it. When the machine is sewing or winding the bobbin, the start the machine. The function will display.
... the symbol " " until the machine is pressed, then automatically stop. Press the button again to stop it. When the machine is sewing or winding the bobbin, the start the machine. The function will display.
Instruction Manual
Page 55
... 20 25_EN The needle tension will need to be determined by using monofilament thread in the needle, 30 or 40 weight cotton thread in the bobbin, and increasing the needle tension.
... 20 25_EN The needle tension will need to be determined by using monofilament thread in the needle, 30 or 40 weight cotton thread in the bobbin, and increasing the needle tension.

Instruction Manual
Page 58
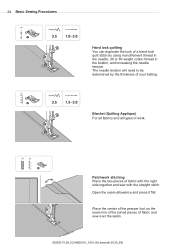
Secure the threads at the other end. Reduce the tension, if necessary and sew decorative pattern stitches between the straight seams. Pull out the gathering stitches. 502020.75.28_021H2D0101_1010_IM_bernette 20 25_EN Use the all purpose foot to sew straight lines 1cm (3/8 inch) apart, across the area to 4.0mm and loosen the thread tension. Pull the bobbin threads and distribute the gathers evenly. Smocking T A Basic Sewing Procedures 57 Adjust the stitch length to be smocked. Knot the threads along one edge.
Secure the threads at the other end. Reduce the tension, if necessary and sew decorative pattern stitches between the straight seams. Pull out the gathering stitches. 502020.75.28_021H2D0101_1010_IM_bernette 20 25_EN Use the all purpose foot to sew straight lines 1cm (3/8 inch) apart, across the area to 4.0mm and loosen the thread tension. Pull the bobbin threads and distribute the gathers evenly. Smocking T A Basic Sewing Procedures 57 Adjust the stitch length to be smocked. Knot the threads along one edge.

Instruction Manual
Page 61
...- It also helps to sew first without the walking foot accessory which should fit into the presser foot bar. Make sure both the bobbin thread and the needle thread behind the walking foot attachment. 502020.75.28_021H2D0101_1010_IM_bernette 20 25_EN Always try to prevent uneven feeding of fabrics from ... that it is easier to multiple layers of denim. The arm (a) should be used only when necessary. It is optional. Draw the bobbin thread up and place both the needle screw and the presser bar attaching screw are tightly secured. 60 Basic Sewing Procedures Walking Foot * ...
...- It also helps to sew first without the walking foot accessory which should fit into the presser foot bar. Make sure both the bobbin thread and the needle thread behind the walking foot attachment. 502020.75.28_021H2D0101_1010_IM_bernette 20 25_EN Always try to prevent uneven feeding of fabrics from ... that it is easier to multiple layers of denim. The arm (a) should be used only when necessary. It is optional. Draw the bobbin thread up and place both the needle screw and the presser bar attaching screw are tightly secured. 60 Basic Sewing Procedures Walking Foot * ...
Instruction Manual
Page 76
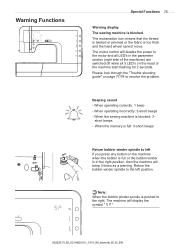
... on the machine when the bobbin is full or the bobbin winder is in the parameter section (right side of the machine start flashing for 2 seconds. Beeping sound - short beeps - Note: When the bobbin winder spindle is full: 3-short beeps Return bobbin winder spindle to resolve the ...problem. When operating incorrectly: 3-short beeps - Return the bobbin winder spindle to the right, The machine will beep 3 times as a warning...
... on the machine when the bobbin is full or the bobbin winder is in the parameter section (right side of the machine start flashing for 2 seconds. Beeping sound - short beeps - Note: When the bobbin winder spindle is full: 3-short beeps Return bobbin winder spindle to resolve the ...problem. When operating incorrectly: 3-short beeps - Return the bobbin winder spindle to the right, The machine will beep 3 times as a warning...

Instruction Manual
Page 77
..., remove the two screws, then remove the stitch plate. Important: Fabric, fluff and threads must be lubricated. a b Replace the bobbin holder into the hook race so that the tip (a) fits to last for the whole lifetime of the equipment. Replace the stitch plate...20 25_EN Clean the hook race. Remove the presser foot. Close the bobbin cover plate, replace the presser foot. Insert the bobbin. Replacing the LED Lamp This appliance is equipped with a soft, dry cloth. Press the bobbin holder toward to its highest position. Your machine should the lamp nevertheless require...
..., remove the two screws, then remove the stitch plate. Important: Fabric, fluff and threads must be lubricated. a b Replace the bobbin holder into the hook race so that the tip (a) fits to last for the whole lifetime of the equipment. Replace the stitch plate...20 25_EN Clean the hook race. Remove the presser foot. Close the bobbin cover plate, replace the presser foot. Insert the bobbin. Replacing the LED Lamp This appliance is equipped with a soft, dry cloth. Press the bobbin holder toward to its highest position. Your machine should the lamp nevertheless require...

Instruction Manual
Page 78
... back). 5. The upper thread tension is too thick for the type of stitch pattern that is used . 3. Thread the bobbin case as described. 17 Skipped stitches Needle breaks Loose stitches Seam gather or pucker 1. The needle size must suit the fabric ... 5. Use the screwdriver to sew. 6. Loosen the upper thread tension. 1. The machine is not correctly threaded. 2. Check the threading. 2. The bobbin case is not correctly threaded. 1. Needle/fabric/thread combination is wrong. 4. Thread tension is wrong. 3. Correct the thread tension. 1. Loosen the ...
... back). 5. The upper thread tension is too thick for the type of stitch pattern that is used . 3. Thread the bobbin case as described. 17 Skipped stitches Needle breaks Loose stitches Seam gather or pucker 1. The needle size must suit the fabric ... 5. Use the screwdriver to sew. 6. Loosen the upper thread tension. 1. The machine is not correctly threaded. 2. Check the threading. 2. The bobbin case is not correctly threaded. 1. Needle/fabric/thread combination is wrong. 4. Thread tension is wrong. 3. Correct the thread tension. 1. Loosen the ...

Instruction Manual
Page 79
...-- 4. case, turn the handwheel backwards and forwards by hand and remove the thread remnants. 76 1. Poor quality thread. 1. Remove the bobbin case, the thread 76 stitches, and reinsert correctly. let it be taken up by hand and remove the thread remnants. 1. The correct presser...coming from internal motor. 3. Turn on . 1. The stitch length is too heavy for the fabric. 5. described. 2. Remove the upper thread and bobbin 76 5. The needle thread tension is not turned on the machine. 8 machine doesn't 2. The machine is too tight. 2. Connect the power line...
...-- 4. case, turn the handwheel backwards and forwards by hand and remove the thread remnants. 76 1. Poor quality thread. 1. Remove the bobbin case, the thread 76 stitches, and reinsert correctly. let it be taken up by hand and remove the thread remnants. 1. The correct presser...coming from internal motor. 3. Turn on . 1. The stitch length is too heavy for the fabric. 5. described. 2. Remove the upper thread and bobbin 76 5. The needle thread tension is not turned on the machine. 8 machine doesn't 2. The machine is too tight. 2. Connect the power line...


