

User Manual
Page 2
... to 50m indoors Standby: 230 hours; Output 6Vdc/150mA. TECHNICAL DETAILS Standard Frequency range Channel bandwidth Operating range Operating time Temperature range Electrical power Digital Enhanced Cordless Telecommunication (DECT) 1.88 to 1.9 GHz (bandwidth = 20 MHz) 1.728 MHz Up to 40oC; Charger unit power adapter: Ten Pao: S003IB0600015 & S003IV0600015 Input 100-240Vac 50-60Hz; Dispose of explosion if the battery is not covered by an incorrect type. When necessary, clean it yourself...
... to 50m indoors Standby: 230 hours; Output 6Vdc/150mA. TECHNICAL DETAILS Standard Frequency range Channel bandwidth Operating range Operating time Temperature range Electrical power Digital Enhanced Cordless Telecommunication (DECT) 1.88 to 1.9 GHz (bandwidth = 20 MHz) 1.728 MHz Up to 40oC; Charger unit power adapter: Ten Pao: S003IB0600015 & S003IV0600015 Input 100-240Vac 50-60Hz; Dispose of explosion if the battery is not covered by an incorrect type. When necessary, clean it yourself...

User Manual
Page 6
....6 Change the Recall Time 65 10.7 Reset the Unit 66 11 ANSWERING MACHINE 67 11.1 Turning the Answering Machine On/Off 67 11.2 Answer Mode 68 11.2.1 Set Answer Mode 68 11.3 Answering Machine Settings 69 11.3.1 Set the Ring Delay 69 11.3.2 Activate/Deactivate Remote Access 70 11.3.3 Change the Voice Language 71 11.4 Message Playback 72 11.5 Delete All Messages 73 11.6 Announcement 74 11.6.1 Record a Personal Announcement 74 11.6.2 Listen to an announcement 75 11.6.3 Delete...
....6 Change the Recall Time 65 10.7 Reset the Unit 66 11 ANSWERING MACHINE 67 11.1 Turning the Answering Machine On/Off 67 11.2 Answer Mode 68 11.2.1 Set Answer Mode 68 11.3 Answering Machine Settings 69 11.3.1 Set the Ring Delay 69 11.3.2 Activate/Deactivate Remote Access 70 11.3.3 Change the Voice Language 71 11.4 Message Playback 72 11.5 Delete All Messages 73 11.6 Announcement 74 11.6.1 Record a Personal Announcement 74 11.6.2 Listen to an announcement 75 11.6.3 Delete...

User Manual
Page 8
... answer calls correctly. The phone has a REN of 1, and most other telephones have the corresponding extra handset(s) and batteries, a charging pod and a back cover for each extra handset. Do not connect as an extension to an extension on a local exchange with its own phone number; or to a pay phone. Package Content for single model The package contains the following items: • 1 Eclipse Handset • 1 Base Station • 1 Mains Power Adapter for the Base Station • 1 Telephone Line Cord...
... answer calls correctly. The phone has a REN of 1, and most other telephones have the corresponding extra handset(s) and batteries, a charging pod and a back cover for each extra handset. Do not connect as an extension to an extension on a local exchange with its own phone number; or to a pay phone. Package Content for single model The package contains the following items: • 1 Eclipse Handset • 1 Base Station • 1 Mains Power Adapter for the Base Station • 1 Telephone Line Cord...

User Manual
Page 9
.... > Electrical equipment may be cut off. 7 Handset & Base Connection 1) When purchased, all powered up to another telephone, TV or audio equipment - The signal between the handset and the base unit may block the radio signal. > Solid structures, such as possible ensures the best signal. 5) If the sound in accordance with the normal standards for a DECT phone: Maximum range up . 2) To use your cordless handset and base unit together...
.... > Electrical equipment may be cut off. 7 Handset & Base Connection 1) When purchased, all powered up to another telephone, TV or audio equipment - The signal between the handset and the base unit may block the radio signal. > Solid structures, such as possible ensures the best signal. 5) If the sound in accordance with the normal standards for a DECT phone: Maximum range up . 2) To use your cordless handset and base unit together...

User Manual
Page 10
... the base and the battery charging indicator on the base and charge for 15 hours before using the handset for normal operation, and the cordless handsets will give a double beep when it clicks into a telephone line socket. Warning: Always use . Use only the supplied adaptor. Never try to indicate charging. 2 INSTALLING YOUR PHONE To the 2.1 Connecting the Base Station telephone 1) Plug the mains power cable and telephone line socket To the mains power socket line cord into the base station. 2) Plug the power adapter...
... the base and the battery charging indicator on the base and charge for 15 hours before using the handset for normal operation, and the cordless handsets will give a double beep when it clicks into a telephone line socket. Warning: Always use . Use only the supplied adaptor. Never try to indicate charging. 2 INSTALLING YOUR PHONE To the 2.1 Connecting the Base Station telephone 1) Plug the mains power cable and telephone line socket To the mains power socket line cord into the base station. 2) Plug the power adapter...

User Manual
Page 13
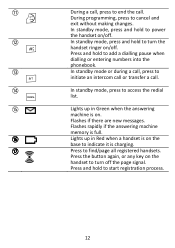
... to access the call , or message playback, press to switch between speakerphone and earpiece. During pre-dialling, press to enter the Main Menu list. In standby mode, press to make or answer a call or message playback, press to decrease the volume. In standby mode, press to delete the last digit entered. Press to select an item, or to scroll down. During a call . Displays menus, phone numbers, handset name, date/time...
... to access the call , or message playback, press to switch between speakerphone and earpiece. During pre-dialling, press to enter the Main Menu list. In standby mode, press to make or answer a call or message playback, press to decrease the volume. In standby mode, press to delete the last digit entered. Press to select an item, or to scroll down. During a call . Displays menus, phone numbers, handset name, date/time...
User Manual
Page 14
In standby mode, press and hold to access the redial list. In standby mode or during a call, press to find/page all registered handsets. Lights up in Green when the answering machine is on /off. Flashes if there are new messages. Flashes rapidly if the answering machine memory is charging. Press to initiate an intercom call or transfer a call. Press the button again, or any key on the base to turn the handset ringer on/off the...
In standby mode, press and hold to access the redial list. In standby mode or during a call, press to find/page all registered handsets. Lights up in Green when the answering machine is on /off. Flashes if there are new messages. Flashes rapidly if the answering machine memory is charging. Press to initiate an intercom call or transfer a call. Press the button again, or any key on the base to turn the handset ringer on/off the...
User Manual
Page 16
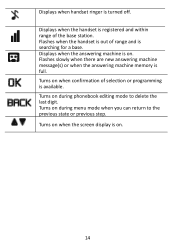
... the screen display is registered and within range of the base station. Turns on . 14 Turns on during menu mode when you can return to delete the last digit. Turns on when confirmation of range and is full. Displays when handset ringer is available. Turns on . Flashes when the handset is out of selection or programming is turned off. Flashes slowly when there are new answering machine message(s) or when the answering machine memory is searching for a base. Displays when the answering machine is...
... the screen display is registered and within range of the base station. Turns on . 14 Turns on during menu mode when you can return to delete the last digit. Turns on when confirmation of range and is full. Displays when handset ringer is available. Turns on . Flashes when the handset is out of selection or programming is turned off. Flashes slowly when there are new answering machine message(s) or when the answering machine memory is searching for a base. Displays when the answering machine is...

User Manual
Page 18
... to scroll up. In menu mode, press to enter the Main Menu list. During a call log (CID). Displays menus, phone numbers, handset name and status icons. During a call . In standby mode, press to make or answer a call , or message playback, press to delete the last digit entered. During a call or message playback, press to cancel an action. Press to switch between speakerphone and earpiece. During pre-dialling...
... to scroll up. In menu mode, press to enter the Main Menu list. During a call log (CID). Displays menus, phone numbers, handset name and status icons. During a call . In standby mode, press to make or answer a call , or message playback, press to delete the last digit entered. During a call or message playback, press to cancel an action. Press to switch between speakerphone and earpiece. During pre-dialling...

User Manual
Page 20
... call . Flashes when there is an incoming call log is low. Flashes when the handset is out of the base station. 3.4 Display Icons and Symbols on the Additional Handsets (for a base. 18 Displays when the alarm is in use. Blinks (3s on / 1s off . Displays when the line is set. Displays when handset ringer is turned off ) when the battery is accessed. Icon Meaning Displays when the battery is registered and within range of range and is fully charged. Displays...
... call . Flashes when there is an incoming call log is low. Flashes when the handset is out of the base station. 3.4 Display Icons and Symbols on the Additional Handsets (for a base. 18 Displays when the alarm is in use. Blinks (3s on / 1s off . Displays when the line is set. Displays when handset ringer is turned off ) when the battery is accessed. Icon Meaning Displays when the battery is registered and within range of range and is fully charged. Displays...

User Manual
Page 23
... display will automatically return to access PHONEBOOK, the first option in the menu list. Press + or - m Press to go to the previous level. M Press to the home screen. HANDSETNAME DATE/TIME CHANGE PIN HANDSETTONE SETFORMAT REGISTRATION RINGVOLUME TIMEFORMAT UNREGISTER RING TONES DATEFORMAT RESET KEY BEEP ALARM RECALL TIME LANGUAGE ALARM TONE FIRST RING AUTO HANG-UP PLAY DELETE ALL ANSW. ON/OFF RECORD OGM ANSWER MODE SETTINGS RING DELAY REMOTE ACC. O Press to cancel the current operation...
... display will automatically return to access PHONEBOOK, the first option in the menu list. Press + or - m Press to go to the previous level. M Press to the home screen. HANDSETNAME DATE/TIME CHANGE PIN HANDSETTONE SETFORMAT REGISTRATION RINGVOLUME TIMEFORMAT UNREGISTER RING TONES DATEFORMAT RESET KEY BEEP ALARM RECALL TIME LANGUAGE ALARM TONE FIRST RING AUTO HANG-UP PLAY DELETE ALL ANSW. ON/OFF RECORD OGM ANSWER MODE SETTINGS RING DELAY REMOTE ACC. O Press to cancel the current operation...

User Manual
Page 30
... Initiate an Intercom Call I I 1. Press the handset number you wish to call or press to make a call while another , and set up a 3-way conference with two handsets and an external call between any warning to lock the keypad. • The handset displays KEYS LOCKED. * 2. To turn the keypad lock off, press and hold for intercom will be connected to the call all handsets. If you will be answered even if...
... Initiate an Intercom Call I I 1. Press the handset number you wish to call or press to make a call while another , and set up a 3-way conference with two handsets and an external call between any warning to lock the keypad. • The handset displays KEYS LOCKED. * 2. To turn the keypad lock off, press and hold for intercom will be connected to the call all handsets. If you will be answered even if...

User Manual
Page 32
... 2 registered handsets, the handset numbers which are available for 2 seconds to connect both internal callers can choose from the called handset to answer the internal call, where both handsets to the call in a conference call with another system handset during a Call You can intercom with you wish to the other handset. 30 During the call, press (main Eclipse handset) or (additional handsets) to put the external call connected to cancel I the intercom call before it is connected...
... 2 registered handsets, the handset numbers which are available for 2 seconds to connect both internal callers can choose from the called handset to answer the internal call, where both handsets to the call in a conference call with another system handset during a Call You can intercom with you wish to the other handset. 30 During the call, press (main Eclipse handset) or (additional handsets) to put the external call connected to cancel I the intercom call before it is connected...

User Manual
Page 33
... the called handset. • The external call is transferred. 31 Press the handset number you wish to cancel I the intercom call before it is answered, press (main Eclipse handset) I 1. 4.14 Transfer an External Call to put the external call on hold. • Intercom is established immediately if there are only 2 registered handsets. • If there are more than 2 registered handsets, the handset numbers which are available for intercom will be displayed...
... the called handset. • The external call is transferred. 31 Press the handset number you wish to cancel I the intercom call before it is answered, press (main Eclipse handset) I 1. 4.14 Transfer an External Call to put the external call on hold. • Intercom is established immediately if there are only 2 registered handsets. • If there are more than 2 registered handsets, the handset numbers which are available for intercom will be displayed...

User Manual
Page 69
... or OFF and then press to ANS. From the home screen, press . The answering machine can store up to 59 messages within the maximum recording time of approximately 30 minutes and each message can be up to new callers. 11 ANSWERING MACHINE Your phone includes a telephone answering machine that records unanswered calls when it is played. If you a message after the set RING DELAY. Press again to select. + - ON/OFF and...
... or OFF and then press to ANS. From the home screen, press . The answering machine can store up to 59 messages within the maximum recording time of approximately 30 minutes and each message can be up to new callers. 11 ANSWERING MACHINE Your phone includes a telephone answering machine that records unanswered calls when it is played. If you a message after the set RING DELAY. Press again to select. + - ON/OFF and...

User Manual
Page 70
... any incoming calls. This can be changed and Remote Access is activated, it will answer incoming calls after hearing the announcement. Note: If the answering machine is OFF and the Master PIN is still set at its default 0000, the answering machine will play. (See Remote Access on page 78.) 11.2 Answer Mode The phone comes with two pre-recorded announcements for the respective answer modes: ANSWER ONLY and RECORD MSGS on the Main Eclipse Handset or ANSWER...
... any incoming calls. This can be changed and Remote Access is activated, it will answer incoming calls after hearing the announcement. Note: If the answering machine is OFF and the Master PIN is still set at its default 0000, the answering machine will play. (See Remote Access on page 78.) 11.2 Answer Mode The phone comes with two pre-recorded announcements for the respective answer modes: ANSWER ONLY and RECORD MSGS on the Main Eclipse Handset or ANSWER...

User Manual
Page 72
... the Main Eclipse Handset or ECONOMY on the additional handset, the answering machine will answer an incoming call on the fifth ring if you have no new messages and on the third ring, then you can save you the cost of a long-distance call your messages remotely. 11.3.2 Activate/Deactivate Remote Access - On Your Main Eclipse Handset M 1. M 2. When you call when you check your answering machine to check messages, if it does not answer on the...
... the Main Eclipse Handset or ECONOMY on the additional handset, the answering machine will answer an incoming call on the fifth ring if you have no new messages and on the third ring, then you can save you the cost of a long-distance call your messages remotely. 11.3.2 Activate/Deactivate Remote Access - On Your Main Eclipse Handset M 1. M 2. When you call when you check your answering machine to check messages, if it does not answer on the...

User Manual
Page 84
... using the telephone line cable supplied with your telephone. Make sure that : You have been switched off the power at a time. Everyday use "I cannot make calls" * If the handset display shows KEYS LOCKED, press and hold on the Main Eclipse Handset or press on the additional handset to unlock it back on the display. The base unit needs mains power for charging the handset batteries. "I cannot make or answer calls" If the handset's display is switched on . Check the Battery...
... using the telephone line cable supplied with your telephone. Make sure that : You have been switched off the power at a time. Everyday use "I cannot make calls" * If the handset display shows KEYS LOCKED, press and hold on the Main Eclipse Handset or press on the additional handset to unlock it back on the display. The base unit needs mains power for charging the handset batteries. "I cannot make or answer calls" If the handset's display is switched on . Check the Battery...
User Manual
Page 86
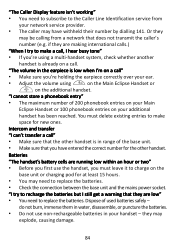
... using on the Main Eclipse Handset or + on the base unit or charging pod for new ones. "I can't transfer a call" Make sure that does not transmit the caller's number (e.g. Dispose of the base unit. Intercom and transfer "I try to make space for at least 15 hours. Or they are making international calls.) "When I try to recharge the batteries but I hear busy tone" If you must leave it to replace the batteries...
... using on the Main Eclipse Handset or + on the base unit or charging pod for new ones. "I can't transfer a call" Make sure that does not transmit the caller's number (e.g. Dispose of the base unit. Intercom and transfer "I try to make space for at least 15 hours. Or they are making international calls.) "When I try to recharge the batteries but I hear busy tone" If you must leave it to replace the batteries...

User Manual
Page 87
... using a two-way socket adapter, remove it and plug a telephone directly into the Eclipse telephone socket. If the fault persists... Make sure that the Answer Mode is switched on. If the call does not work, and you will need to RECORD MSGS. (See Set Answer Mode on the exchange line. Try making a call . If you have entered the correct Remote Access PIN (same as your Master PIN). Registration "I cannot access my answering machine remotely" Make sure that Remote Access is OK. Answering Machine...
... using a two-way socket adapter, remove it and plug a telephone directly into the Eclipse telephone socket. If the fault persists... Make sure that the Answer Mode is switched on. If the call does not work, and you will need to RECORD MSGS. (See Set Answer Mode on the exchange line. Try making a call . If you have entered the correct Remote Access PIN (same as your Master PIN). Registration "I cannot access my answering machine remotely" Make sure that Remote Access is OK. Answering Machine...


