

User Manual
Page 1
User's Guide MBP20 Baby Monitor The features described in this user's guide are subject to modifications without prior notice.
User's Guide MBP20 Baby Monitor The features described in this user's guide are subject to modifications without prior notice.
User Manual
Page 2
....motorola.com This User's Guide provides you with all the information you install the units. Got everything? • 1 x Parent unit • 1 x Baby unit • 1 x Rechargeable Ni-MH battery pack for the Parent unit • 1 x Belt clip for parent unit • 1 x Battery door for parent unit • 1 x Power adapter for the parent unit • 1 x Power adapter for your baby sleeping in the other room or you can use the baby monitor, we recommend you insert and fully charge...
....motorola.com This User's Guide provides you with all the information you install the units. Got everything? • 1 x Parent unit • 1 x Baby unit • 1 x Rechargeable Ni-MH battery pack for the Parent unit • 1 x Belt clip for parent unit • 1 x Battery door for parent unit • 1 x Power adapter for the parent unit • 1 x Power adapter for your baby sleeping in the other room or you can use the baby monitor, we recommend you insert and fully charge...
User Manual
Page 3
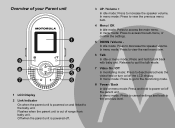
... the speaker volume. Flashes when the parent unit is out of your Parent unit 1 9 2 3 8 4 5 7 6 1 LCD Display 2 Link Indicator On when the parent unit is powered off the LCD display. Release to quit the talk mode. 7 Video On / Off In monitoring mode: Press to the previous level. Overview of range from baby unit. Off when the parent unit is powered on /off . 3 UP / Volume + In idle...
... the speaker volume. Flashes when the parent unit is out of your Parent unit 1 9 2 3 8 4 5 7 6 1 LCD Display 2 Link Indicator On when the parent unit is powered off the LCD display. Release to quit the talk mode. 7 Video On / Off In monitoring mode: Press to the previous level. Overview of range from baby unit. Off when the parent unit is powered on /off . 3 UP / Volume + In idle...

User Manual
Page 4
... Off even if connected with power adapter but without battery pack installed. Indicates when speaker of range. Indicates when the sound alert is detected. Flashes when low battery is set on. Indicates no connection between baby unit and parent unit. Indicates when parent unit or baby unit is in charging. Animation in charging mode. Flashes when parent unit is out of parent unit is activated. Menu Structure of parent unit. More internal bars mean...
... Off even if connected with power adapter but without battery pack installed. Indicates when speaker of range. Indicates when the sound alert is detected. Flashes when low battery is set on. Indicates no connection between baby unit and parent unit. Indicates when parent unit or baby unit is in charging. Animation in charging mode. Flashes when parent unit is out of parent unit is activated. Menu Structure of parent unit. More internal bars mean...

User Manual
Page 5
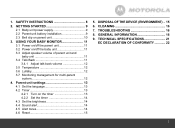
During lullaby playing, press to select and play the lullaby. 9 Lullaby Press to play the other lullabies. Overview of your Baby unit 1 2 3 4 9 5 6 8 7 1 Infrared Light 2 Camera 3 Power Indicator On when the baby unit is switched off. 4 UP / Volume + Press to increase the speaker volume. 5 Power Press and hold to power on . Off when the baby unit is switched on /off the baby unit. 6 DOWN / Volume Press to decrease the speaker volume. 7 Stop Press to stop the lullaby playing. 8 Play Press to select the lullaby and start playing the selected lullaby.
During lullaby playing, press to select and play the lullaby. 9 Lullaby Press to play the other lullabies. Overview of your Baby unit 1 2 3 4 9 5 6 8 7 1 Infrared Light 2 Camera 3 Power Indicator On when the baby unit is switched off. 4 UP / Volume + Press to increase the speaker volume. 5 Power Press and hold to power on . Off when the baby unit is switched on /off the baby unit. 6 DOWN / Volume Press to decrease the speaker volume. 7 Stop Press to stop the lullaby playing. 8 Play Press to select the lullaby and start playing the selected lullaby.
User Manual
Page 7
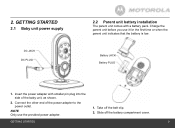
TROUBLESHOOTING 16 8. TECHNICAL SPECIFICATIONS 21 EC DECLARATION OF CONFORMITY 22 7 USING YOUR BABY MONITOR 11 3.1 Power on/off the parent unit 11 3.2 Power on parent unit 10 3. CLEANING 16 7. GENERAL INFORMATION 18 9. DISPOSAL OF THE DEVICE (ENVIRONMENT) .. 15 6. GETTING STARTED 9 2.1 Baby unit power supply 9 2.2 Parent unit battery installation 9 2.3 Belt clip on /off the baby unit 11 3.3 Adjust speaker volume of parent unit and baby unit 11 3.4 Talk Back 11 3.4.1 Adjust talk back volume 12...
TROUBLESHOOTING 16 8. TECHNICAL SPECIFICATIONS 21 EC DECLARATION OF CONFORMITY 22 7 USING YOUR BABY MONITOR 11 3.1 Power on/off the parent unit 11 3.2 Power on parent unit 10 3. CLEANING 16 7. GENERAL INFORMATION 18 9. DISPOSAL OF THE DEVICE (ENVIRONMENT) .. 15 6. GETTING STARTED 9 2.1 Baby unit power supply 9 2.2 Parent unit battery installation 9 2.3 Belt clip on /off the baby unit 11 3.3 Adjust speaker volume of parent unit and baby unit 11 3.4 Talk Back 11 3.4.1 Adjust talk back volume 12...

User Manual
Page 8
... is replaced by an incorrect type. Only use extension cords with power adapters. Dispose of explosion if battery is , when handled as described in the User's Guide, safe to actual use. • Do not use the baby monitor near water. • Do not install the baby monitor near a heat source. • Only use . Use only battery pack with sharp or metal objects. CAMERA SET...
... is replaced by an incorrect type. Only use extension cords with power adapters. Dispose of explosion if battery is , when handled as described in the User's Guide, safe to actual use. • Do not use the baby monitor near water. • Do not install the baby monitor near a heat source. • Only use . Use only battery pack with sharp or metal objects. CAMERA SET...
User Manual
Page 9
... use it for the first time or when the parent unit indicates that the battery is low. Take off the battery compartment cover. Connect the other end of the baby unit, as shown. 2. Charge the parent unit before you use the provided power adapter. 1. GETTING STARTED 2.1 Baby unit power supply DC JACK DC PLUG 2.2 Parent unit battery installation The parent unit comes with smaller pin plug into the side of...
... use it for the first time or when the parent unit indicates that the battery is low. Take off the battery compartment cover. Connect the other end of the baby unit, as shown. 2. Charge the parent unit before you use the provided power adapter. 1. GETTING STARTED 2.1 Baby unit power supply DC JACK DC PLUG 2.2 Parent unit battery installation The parent unit comes with smaller pin plug into the side of...

User Manual
Page 10
...power adapter. 2.3 Belt clip on the back sides. 2. Connect the other end of the parent unit. 6. The accessory comes with bigger pin plug into stand mode by lifting up the belt clip and rotating by half turn. 10 GETTING STARTED Attach the belt clip to section 2.3). 5. 3. Insert the supplied battery... pack, and fit the battery pack into the compartment. 4. Reattach the battery compartment cover, and reinstall the belt clip (refer to the lock slots on parent unit 1. The Charging Indicator comes on.
...power adapter. 2.3 Belt clip on the back sides. 2. Connect the other end of the parent unit. 6. The accessory comes with bigger pin plug into stand mode by lifting up the belt clip and rotating by half turn. 10 GETTING STARTED Attach the belt clip to section 2.3). 5. 3. Insert the supplied battery... pack, and fit the battery pack into the compartment. 4. Reattach the battery compartment cover, and reinstall the belt clip (refer to the lock slots on parent unit 1. The Charging Indicator comes on.
User Manual
Page 11
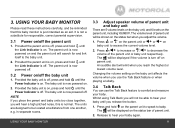
..., this baby monitor is on /off . Provided the parent unit is on parent unit. The parent unit is now powered off. 3.2 Power on , press and hold 3 until the Power Indicator is on /off . The baby unit is now powered off , press and hold 7 on . 2. The units are 5 volume levels on the baby unit, and 6 levels on the status bar of parent unit. 2. 3. USING YOUR BABY MONITOR Please read these instructions carefully, and...
..., this baby monitor is on /off . Provided the parent unit is on parent unit. The parent unit is now powered off. 3.2 Power on , press and hold 3 until the Power Indicator is on /off . The baby unit is now powered off , press and hold 7 on . 2. The units are 5 volume levels on the baby unit, and 6 levels on the status bar of parent unit. 2. 3. USING YOUR BABY MONITOR Please read these instructions carefully, and...
User Manual
Page 12
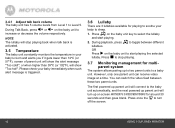
... YOUR BABY MONITOR During Talk Back, press > or < on the baby unit key to soothe your baby's room and alerts you if it gets lower than 39ºC (or 102ºF), will tsuercnounpdsonanscdretheennAgNOoTeHsERbPlaUnISkV.IDPErOeMsOsNoITnOcReINGth! During playback, press 2 to a baby unit. However, only one parent unit can switch the video feed between different lullabies. The first powered up parent unit will connect to the baby unit...
... YOUR BABY MONITOR During Talk Back, press > or < on the baby unit key to soothe your baby's room and alerts you if it gets lower than 39ºC (or 102ºF), will tsuercnounpdsonanscdretheennAgNOoTeHsERbPlaUnISkV.IDPErOeMsOsNoITnOcReINGth! During playback, press 2 to a baby unit. However, only one parent unit can switch the video feed between different lullabies. The first powered up parent unit will connect to the baby unit...

User Manual
Page 13
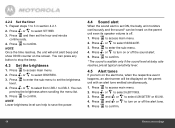
...parent unit which is NOT in video monitoring mode, the video feed will be transferred to -do for the baby such as an alarm reminding you select ON, your will be prompted to the other parent unit which is turned off. Press + or - to enter the sub-menu. 4. If you things-to that parent unit... access main menu. 2. Press 6 on the current video monitoring parent unit, the screen will be blank without video image received. 2. Press 1 to confirm. NOTE The parent unit still carries on the timer 1. Parent unit settings 4.1 Set the language 1. to enter the sub-menu. 4. Press...
...parent unit which is NOT in video monitoring mode, the video feed will be transferred to -do for the baby such as an alarm reminding you select ON, your will be prompted to the other parent unit which is turned off. Press + or - to enter the sub-menu. 4. If you things-to that parent unit... access main menu. 2. Press 6 on the current video monitoring parent unit, the screen will be blank without video image received. 2. Press 1 to confirm. NOTE The parent unit still carries on the timer 1. Parent unit settings 4.1 Set the language 1. to enter the sub-menu. 4. Press...
User Manual
Page 14
... select LOW BATTERY or NO LINK. 4. to 3 in section 4.2.1. 2. to save the power. 4.4 Sound alert When the sound alert is set ON, the baby unit monitors continuously and the sound* can be displayed on or off the alert tone. 5. 4.2.2 Set the timer 1. Repeat steps 1 to select SOUND ALERT. 3....beep and show 00:00 counter on or off the sound alert. 5. to confirm. 14 Parent unit settings Press 1 and + or - to confirm. * The sound is off. 1. NOTE Once the time reaches, the unit will be heard on the parent unit even its speaker volume is audible only if the sound level at baby...
... select LOW BATTERY or NO LINK. 4. to 3 in section 4.2.1. 2. to save the power. 4.4 Sound alert When the sound alert is set ON, the baby unit monitors continuously and the sound* can be displayed on or off the alert tone. 5. 4.2.2 Set the timer 1. Repeat steps 1 to select SOUND ALERT. 3....beep and show 00:00 counter on or off the sound alert. 5. to confirm. 14 Parent unit settings Press 1 and + or - to confirm. * The sound is off. 1. NOTE Once the time reaches, the unit will be heard on the parent unit even its speaker volume is audible only if the sound level at baby...
User Manual
Page 16
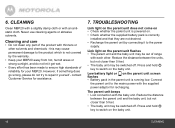
... off . Low battery light or on the baby unit. The parent unit beeps • Lost connection with thinners or other . this may be switched off . Press and hold 0 key to repair it to switch on the parent unit screen flashes • Battery pack in the parent unit is powered on the baby unit. 16 CLEANING Cleaning and care • Do not clean any part of range with each...
... off . Low battery light or on the baby unit. The parent unit beeps • Lost connection with thinners or other . this may be switched off . Press and hold 0 key to repair it to switch on the parent unit screen flashes • Battery pack in the parent unit is powered on the baby unit. 16 CLEANING Cleaning and care • Do not clean any part of range with each...

User Manual
Page 17
... away from the parent unit • Vprideessoinfege6d m. TROUBLESHOOTING 17 Refer to the mains power with each other . • Battery pack in parent unit may be set too high which consumes power. Cannot view the video image of the parent unit. Connect the parent unit to section 3.3 for recharging. Refer to each other . The baby monitor system produces a high-pitched noise • The parent unit and the baby unit are too...
... away from the parent unit • Vprideessoinfege6d m. TROUBLESHOOTING 17 Refer to the mains power with each other . • Battery pack in parent unit may be set too high which consumes power. Cannot view the video image of the parent unit. Connect the parent unit to section 3.3 for recharging. Refer to each other . The baby monitor system produces a high-pitched noise • The parent unit and the baby unit are too...
User Manual
Page 18
... parent unit, contact customer service. We may use with this Warranty Cover? Subject to the first consumer purchaser, and is not working properly... 1. Who is not transferable. Contact Customer Service at its option and within a commercially reasonable time, will BINATONE do? BINATONE or its authorized distributor at UK 0845 218 0890 ROI 08187 62092 To order a replacement battery...
... parent unit, contact customer service. We may use with this Warranty Cover? Subject to the first consumer purchaser, and is not working properly... 1. Who is not transferable. Contact Customer Service at its option and within a commercially reasonable time, will BINATONE do? BINATONE or its authorized distributor at UK 0845 218 0890 ROI 08187 62092 To order a replacement battery...

User Manual
Page 19
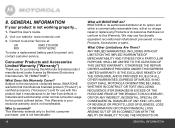
...parts due to the consumer, whichever is longer. GENERAL INFORMATION 19 Use of the original warranty or for commercial purposes or subjecting the Product or Accessory to another. This Warranty gives you specific legal rights, and you . Only batteries whose fully charged capacity falls below 80% of MOTOROLA or BINATONE, are Repaired or Replaced... The balance of Non-Motorola branded Products and Accessories. ...
...parts due to the consumer, whichever is longer. GENERAL INFORMATION 19 Use of the original warranty or for commercial purposes or subjecting the Product or Accessory to another. This Warranty gives you specific legal rights, and you . Only batteries whose fully charged capacity falls below 80% of MOTOROLA or BINATONE, are Repaired or Replaced... The balance of Non-Motorola branded Products and Accessories. ...

User Manual
Page 20
..., including representations made by someone other than MOTOROLA, BINATONE or its authorized service centers, are excluded from coverage. Defects or damages resulting from service, testing, adjustment, installation, maintenance, alteration, or modification in connection with the Products or Accessories is excluded from coverage. Products or Accessories with (a) serial numbers or date tags that have been removed, altered...
..., including representations made by someone other than MOTOROLA, BINATONE or its authorized service centers, are excluded from coverage. Defects or damages resulting from service, testing, adjustment, installation, maintenance, alteration, or modification in connection with the Products or Accessories is excluded from coverage. Products or Accessories with (a) serial numbers or date tags that have been removed, altered...
User Manual
Page 21
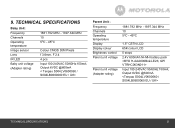
... SPECIFICATIONS Baby Unit: Frequency Channels Operating temperature Image sensor Lens IR LED Baby unit voltage (Adapter rating) 1881.792 MHz - 1897.344 MHz 10 5oC - 45oC Colour CMOS 30M Pixels f 3.6mm, F 2.4 4 pcs Input 100-240VAC 50/60Hz 150mA; 9. Output 6VDC @600mA < Tenpao S004LV0600060 / S004LB0600060 EU / UK> Parent Unit : Frequency Channels Operating temperature Display Display colour Brightness control Parent unit voltage Parent unit voltage (Adapter...
... SPECIFICATIONS Baby Unit: Frequency Channels Operating temperature Image sensor Lens IR LED Baby unit voltage (Adapter rating) 1881.792 MHz - 1897.344 MHz 10 5oC - 45oC Colour CMOS 30M Pixels f 3.6mm, F 2.4 4 pcs Input 100-240VAC 50/60Hz 150mA; 9. Output 6VDC @600mA < Tenpao S004LV0600060 / S004LB0600060 EU / UK> Parent Unit : Frequency Channels Operating temperature Display Display colour Brightness control Parent unit voltage Parent unit voltage (Adapter...

User Manual
Page 22
...authorized person) London, 10 Jun 11 Signature: (Paul Tsui/ Product Operation Place & Date : Director) 22 EC DECLARATION OF CONFORMITY BINATONE TELECOM PLC 1 Apsley Way London NW2 7HF,United Kingdom. Manufacturer / Importer (Signature of the product voids this Declaration. Tel: +44(0) 20 8955 2700 Fax: +44(0) 20... Member States relating to Electrical Safety. Declare under our sole responsibility that the following product Type of equipment: Digital Baby Monitor Model Name: MBP 20 Country of Origin: China Brand: Motorola complies with the European Approval Marking CE as show.
...authorized person) London, 10 Jun 11 Signature: (Paul Tsui/ Product Operation Place & Date : Director) 22 EC DECLARATION OF CONFORMITY BINATONE TELECOM PLC 1 Apsley Way London NW2 7HF,United Kingdom. Manufacturer / Importer (Signature of the product voids this Declaration. Tel: +44(0) 20 8955 2700 Fax: +44(0) 20... Member States relating to Electrical Safety. Declare under our sole responsibility that the following product Type of equipment: Digital Baby Monitor Model Name: MBP 20 Country of Origin: China Brand: Motorola complies with the European Approval Marking CE as show.


