
User Guide
Page 1
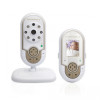
User's Guide MBP28, MBP28/2, MBP28/3, MBP28/4 MBP28 Twin, MBP28 Triple, MBP28 Quad Baby Monitor The features described in this user's guide are subject to modifications without prior notice.
User's Guide MBP28, MBP28/2, MBP28/3, MBP28/4 MBP28 Twin, MBP28 Triple, MBP28 Quad Baby Monitor The features described in this user's guide are subject to modifications without prior notice.
User Guide
Page 2
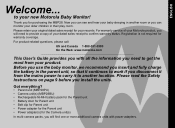
... Web: www.motorola.com This User's Guide provides you disconnect it from the mains power to carry it to get the most from your new Motorola Baby Monitor! Before you use the baby monitor, we recommend you insert and fully charge the battery in the parent unit, so that it continues to work if you with power adapters. Got everything? • Parent unit (MBP28PU) • Camera unit(s) (MBP28BU...
... Web: www.motorola.com This User's Guide provides you disconnect it from the mains power to carry it to get the most from your new Motorola Baby Monitor! Before you use the baby monitor, we recommend you insert and fully charge the battery in the parent unit, so that it continues to work if you with power adapters. Got everything? • Parent unit (MBP28PU) • Camera unit(s) (MBP28BU...
User Guide
Page 3
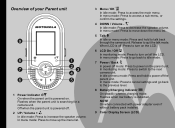
...parent unit. When LCD is powered off. 2 UP / Volume + + In idle mode: Press to access a sub-menu, or confirm the settings. 4 DOWN / Volume - - In menu mode: Press to cancel settings and go back to idle mode. 7 Power / Back 3 In power off : Press to turn on the LCD. 6 LCD On / Off 6 In monitoring mode: Press to the previous level. 8 Battery/Charging...to the next camera unit. Flashes when low battery is searching for a camera unit. NOTE On when connected with power adapter even if without battery pack installed. 9 Color Display Screen (LCD) Off when the parent unit is off mode:...
...parent unit. When LCD is powered off. 2 UP / Volume + + In idle mode: Press to access a sub-menu, or confirm the settings. 4 DOWN / Volume - - In menu mode: Press to cancel settings and go back to idle mode. 7 Power / Back 3 In power off : Press to turn on the LCD. 6 LCD On / Off 6 In monitoring mode: Press to the previous level. 8 Battery/Charging...to the next camera unit. Flashes when low battery is searching for a camera unit. NOTE On when connected with power adapter even if without battery pack installed. 9 Color Display Screen (LCD) Off when the parent unit is off mode:...
User Guide
Page 4
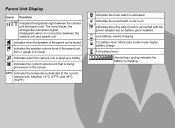
... (102oF). Indicates when the parent unit is connected with the power adapter but no connection between the camera unit and parent unit. Indicates the timer alarm is charging. More bars inside mean higher battery charge. Parent Unit Display Icons Function Indicates the signal strength between the camera unit and parent unit. Disappears when no battery pack installed. Internal bars cycling indicates the battery is activated. The more blocks...
... (102oF). Indicates when the parent unit is connected with the power adapter but no connection between the camera unit and parent unit. Indicates the timer alarm is charging. More bars inside mean higher battery charge. Parent Unit Display Icons Function Indicates the signal strength between the camera unit and parent unit. Disappears when no battery pack installed. Internal bars cycling indicates the battery is activated. The more blocks...
User Guide
Page 5
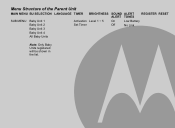
Menu Structure of the Parent Unit MAIN MENU BU SELECTION LANGUAGE TIMER BRIGHTNESS SOUND ALERT ALERT TONES REGISTER RESET SUB MENU Baby Unit 1 Activation Level 1 ~ 5 On Low Battery Baby Unit 2 Baby Unit 3 Set Timer Off No Link Baby Unit 4 All Baby Units Note: Only Baby Units registered will be shown in the list.
Menu Structure of the Parent Unit MAIN MENU BU SELECTION LANGUAGE TIMER BRIGHTNESS SOUND ALERT ALERT TONES REGISTER RESET SUB MENU Baby Unit 1 Activation Level 1 ~ 5 On Low Battery Baby Unit 2 Baby Unit 3 Set Timer Off No Link Baby Unit 4 All Baby Units Note: Only Baby Units registered will be shown in the list.
User Guide
Page 6
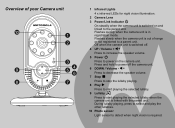
...volume. 5 Power 0 Press to power on and linked to the parent unit. During lullaby playing, press to select and play the other lullabies. 10 Photo sensor Light sensor to detect when night vision is linked with the parent unit. Off when the camera unit is in ...unit is required. Flashes slowly when the camera unit is switched on the camera unit. Overview of your Camera unit 10 1 2 3 9 4 5 6 8 7 1 Infrared Lights 4 x infra-red LEDs for night vision illumination. 2 Camera Lens 3 Power/Link Indicator 0 On steadily when the camera unit is out of range or not registered to a parent unit...
...volume. 5 Power 0 Press to power on and linked to the parent unit. During lullaby playing, press to select and play the other lullabies. 10 Photo sensor Light sensor to detect when night vision is linked with the parent unit. Off when the camera unit is in ...unit is required. Flashes slowly when the camera unit is switched on the camera unit. Overview of your Camera unit 10 1 2 3 9 4 5 6 8 7 1 Infrared Lights 4 x infra-red LEDs for night vision illumination. 2 Camera Lens 3 Power/Link Indicator 0 On steadily when the camera unit is out of range or not registered to a parent unit...
User Guide
Page 8
... 3.7 Switch monitoring camera unit 14 4. TROUBLESHOOTING 19 8. 1. USING YOUR BABY MONITOR 12 3.1 Power on/off the parent unit 12 3.2 Power on the timer 15 4.2.2 Set the timer 15 4.3 Set the brightness 15 4.4 Sound alert 16 4.5 Alert tones 16 4.6 Select camera unit 16 4.7 Register a camera unit 17 4.8 Reset 17 5. DISPOSAL OF THE DEVICE (ENVIRONMENT 18 6. GENERAL INFORMATION 20 9. GETTING STARTED 10 2.1 Camera unit power supply 10 2.2 Parent unit battery installation 11...
... 3.7 Switch monitoring camera unit 14 4. TROUBLESHOOTING 19 8. 1. USING YOUR BABY MONITOR 12 3.1 Power on/off the parent unit 12 3.2 Power on the timer 15 4.2.2 Set the timer 15 4.3 Set the brightness 15 4.4 Sound alert 16 4.5 Alert tones 16 4.6 Select camera unit 16 4.7 Register a camera unit 17 4.8 Reset 17 5. DISPOSAL OF THE DEVICE (ENVIRONMENT 18 6. GENERAL INFORMATION 20 9. GETTING STARTED 10 2.1 Camera unit power supply 10 2.2 Parent unit battery installation 11...
User Guide
Page 9
... a battery pack of your baby in the crib. • Place the baby monitor on a flat surface, such as described in the User's Guide, safe to use extension cords with sharp or metal objects. NEVER place the camera unit or its cord inside the crib or playpen. • Never immerse any part of the baby monitor in water or any other chargers or power adapters as...
... a battery pack of your baby in the crib. • Place the baby monitor on a flat surface, such as described in the User's Guide, safe to use extension cords with sharp or metal objects. NEVER place the camera unit or its cord inside the crib or playpen. • Never immerse any part of the baby monitor in water or any other chargers or power adapters as...
User Guide
Page 10
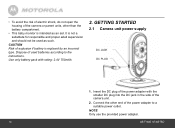
... than the battery compartment. • This baby monitor is not a substitute for responsible and proper adult supervision and should not be used batteries according to a suitable power outlet. • To avoid the risk of electric shock, do not open the housing of the camera or parent units, other end of the power adapter to the instructions. GETTING STARTED 2.1 Camera unit power supply...
... than the battery compartment. • This baby monitor is not a substitute for responsible and proper adult supervision and should not be used batteries according to a suitable power outlet. • To avoid the risk of electric shock, do not open the housing of the camera or parent units, other end of the power adapter to the instructions. GETTING STARTED 2.1 Camera unit power supply...
User Guide
Page 11
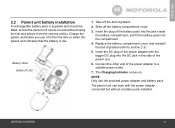
... Insert the plug of the parent unit. 6. The parent unit can be moved without a battery pack installed. Insert the DC plug of the power adapter with the power adapter connected but without losing the link and picture from the camera unit(s). Battery JACK Battery PLUG 1. ENGLISH 2.2 Parent unit battery installation A rechargeable battery pack is low. Charge the parent unit before you use the provided power adapter and battery pack. Take off the battery compartment cover. 3.
... Insert the plug of the parent unit. 6. The parent unit can be moved without a battery pack installed. Insert the DC plug of the power adapter with the power adapter connected but without losing the link and picture from the camera unit(s). Battery JACK Battery PLUG 1. ENGLISH 2.2 Parent unit battery installation A rechargeable battery pack is low. Charge the parent unit before you use the provided power adapter and battery pack. Take off the battery compartment cover. 3.
User Guide
Page 12
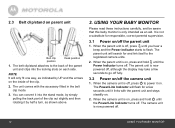
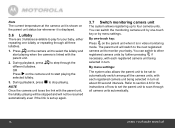
...unit 1. The parent unit is off, press 3 until the Power Indicator turns off , press 0 to power it on each side. When the camera unit is on, press and hold 3 until you hear a beep and the Power Indicator starts to the back of the parent unit and clips into the stand mode, by simply pulling the back part...fully. 3.2 Power on /off . 12 USING YOUR BABY MONITOR NOTE It will search for a few seconds to the registered camera units. 2. USING YOUR BABY MONITOR Please read these instructions carefully, and be aware that this baby monitor is now powered off the parent unit 1. 2.3...
...unit 1. The parent unit is off, press 3 until the Power Indicator turns off , press 0 to power it on each side. When the camera unit is on, press and hold 3 until you hear a beep and the Power Indicator starts to the back of the parent unit and clips into the stand mode, by simply pulling the back part...fully. 3.2 Power on /off . 12 USING YOUR BABY MONITOR NOTE It will search for a few seconds to the registered camera units. 2. USING YOUR BABY MONITOR Please read these instructions carefully, and be aware that this baby monitor is now powered off the parent unit 1. 2.3...
User Guide
Page 14
... will switch to the next registered camera unit to monitor your baby, either repeating one -touch key or by fbuartbhye.rYporuescsainngsw3itcihf to step through the different lullabies. During playback, press 2 to other necessary, with each registered camera unit being selected in video monitoring mode. The parent unit will not be set the parent unit to stop playing. During playback, press 9 to...
... will switch to the next registered camera unit to monitor your baby, either repeating one -touch key or by fbuartbhye.rYporuescsainngsw3itcihf to step through the different lullabies. During playback, press 2 to other necessary, with each registered camera unit being selected in video monitoring mode. The parent unit will not be set the parent unit to stop playing. During playback, press 9 to...
User Guide
Page 15
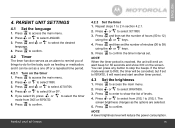
...Press 1 to enter to access the main menu. 2. 4. PARENT UNIT SETTINGS 4.1 Set the language 1. to confirm. Press 1 to select TIMER. 3. NOTE When the timer period is reached, the unit will emit an alert beep for the baby such as the options are selected. 5. If the timer mode... ON or OFF. 5. number of levels. 4. Press using t1he +andotrh-en set to LEVEL 5. Press + or - Press 1 to 12) 4. Press 1 to stop the beeps. You can be cancelled, but if set the keys. to select the desired language. 4. PARENT UNIT SETTINGS 4.2.2 Set the timer 1. Press 1...
...Press 1 to enter to access the main menu. 2. 4. PARENT UNIT SETTINGS 4.1 Set the language 1. to confirm. Press 1 to select TIMER. 3. NOTE When the timer period is reached, the unit will emit an alert beep for the baby such as the options are selected. 5. If the timer mode... ON or OFF. 5. number of levels. 4. Press using t1he +andotrh-en set to LEVEL 5. Press + or - Press 1 to 12) 4. Press 1 to stop the beeps. You can be cancelled, but if set the keys. to select the desired language. 4. PARENT UNIT SETTINGS 4.2.2 Set the timer 1. Press 1...
User Guide
Page 16
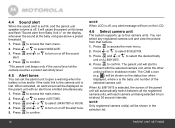
... 1 and + or - The parent unit will be shown on the LCD. 4.6 Select camera unit The system supports up to four camera units. Press + or - Press 1 to connect with an alert tone emitted simultaneously. 1. to select the desired baby unit or ALL BABY UNITS. 4. to select LOW BATTERY or NO LINK. 4. 4.4 Sound alert When the sound alert is set the parent unit to give a warning when...
... 1 and + or - The parent unit will be shown on the LCD. 4.6 Select camera unit The system supports up to four camera units. Press + or - Press 1 to connect with an alert tone emitted simultaneously. 1. to select the desired baby unit or ALL BABY UNITS. 4. to select LOW BATTERY or NO LINK. 4. 4.4 Sound alert When the sound alert is set the parent unit to give a warning when...
User Guide
Page 17
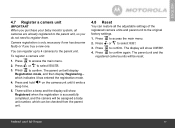
... register them. Press and hold > on the camera unit until it has entered the registration mode. 4. PARENT UNIT SETTINGS 17 ENGLISH 4.7 Register a camera unit IMPORTANT When you purchase your baby monitor system, all the adjustable settings of the registered camera units and parent unit to the original factory settings. 1. Press + or - to the parent unit. Camera registration is successfully completed, and the camera will...
... register them. Press and hold > on the camera unit until it has entered the registration mode. 4. PARENT UNIT SETTINGS 17 ENGLISH 4.7 Register a camera unit IMPORTANT When you purchase your baby monitor system, all the adjustable settings of the registered camera units and parent unit to the original factory settings. 1. Press + or - to the parent unit. Camera registration is successfully completed, and the camera will...
User Guide
Page 18
...the warranty. • Keep your MBP28 away from used if you make an important contribution to ensure high standards of the battery pack in an environmentally-friendly manner ... recycling point. By reusing some parts or raw materials from hot, humid areas or strong sunlight, and do not try to repair it get wet. • ...part of the environment. this product to your MBP28 with a slightly damp cloth or with thinners or other solvents and chemicals - contact Customer Service for the recycling of the product lifecycle, you need more information on the product, user's guide...
...the warranty. • Keep your MBP28 away from used if you make an important contribution to ensure high standards of the battery pack in an environmentally-friendly manner ... recycling point. By reusing some parts or raw materials from hot, humid areas or strong sunlight, and do not try to repair it get wet. • ...part of the environment. this product to your MBP28 with a slightly damp cloth or with thinners or other solvents and chemicals - contact Customer Service for the recycling of the product lifecycle, you need more information on the product, user's guide...
User Guide
Page 19
... settings. • The parent unit and the monitoring camera unit may have lost connection with each other . Cannot hear sound or baby cry from the parent unit • LpCreDssminagy6be.turned off . Reduce the distance between the units, but not closer than 5 feet. The parent unit beeps • The parent unit may be out of range with each other . Refer to the power supply. ENGLISH 7. TROUBLESHOOTING Power Indicator on the parent unit...
... settings. • The parent unit and the monitoring camera unit may have lost connection with each other . Cannot hear sound or baby cry from the parent unit • LpCreDssminagy6be.turned off . Reduce the distance between the units, but not closer than 5 feet. The parent unit beeps • The parent unit may be out of range with each other . Refer to the power supply. ENGLISH 7. TROUBLESHOOTING Power Indicator on the parent unit...
User Guide
Page 20
The baby monitor system produces a highpitched noise • The parent unit and the camera unit may be set too high. Make sure the parent unit and camera unit is at least 5 feet away from defects in the parent unit is loud enough at US and Canada 1-888-331-3383 To order a replacement battery pack for parent unit, contact customer service. Try to section 3.3 for details. • The...
The baby monitor system produces a highpitched noise • The parent unit and the camera unit may be set too high. Make sure the parent unit and camera unit is at least 5 feet away from defects in the parent unit is loud enough at US and Canada 1-888-331-3383 To order a replacement battery pack for parent unit, contact customer service. Try to section 3.3 for details. • The...
User Guide
Page 22
Exclusions Normal Wear and Tear. Periodic maintenance, repair and replacement of their rated capacity and batteries that leak are excluded from coverage. Only batteries whose fully charged capacity falls below 80% of parts due to normal wear and tear are covered by someone other peripheral equipment are excluded from service, testing, adjustment, installation, maintenance, alteration, or modification in any...
Exclusions Normal Wear and Tear. Periodic maintenance, repair and replacement of their rated capacity and batteries that leak are excluded from coverage. Only batteries whose fully charged capacity falls below 80% of parts due to normal wear and tear are covered by someone other peripheral equipment are excluded from service, testing, adjustment, installation, maintenance, alteration, or modification in any...
User Guide
Page 23
... Accessories purchased by the party responsible for a Class B digital device, pursuant to a BINATONE Authorized Repair Center. To obtain service or information, please call: US and Canada 1-888-331-3383 You will receive instructions on , the user is no guarantee that may cause harmful interference to ship ...the equipment. and, most importantly; (e) your expense and risk, to Part 15 of purchase (receipt) which can radiate radio frequency energy and, if not installed and used in connection with the instructions, may have been made in accordance with the said purchase. How to...
... Accessories purchased by the party responsible for a Class B digital device, pursuant to a BINATONE Authorized Repair Center. To obtain service or information, please call: US and Canada 1-888-331-3383 You will receive instructions on , the user is no guarantee that may cause harmful interference to ship ...the equipment. and, most importantly; (e) your expense and risk, to Part 15 of purchase (receipt) which can radiate radio frequency energy and, if not installed and used in connection with the instructions, may have been made in accordance with the said purchase. How to...


