

User Guide
Page 2
... This User's Guide provides you disconnect it from another location. Registration is up to confirm warranty status. Before you can use your new Digital Video Pet Monitor, we recommend that you can monitor your Motorola product, you will allow it to continue to work even if you with power adapter units. This will need to get the most out of your records...
... This User's Guide provides you disconnect it from another location. Registration is up to confirm warranty status. Before you can use your new Digital Video Pet Monitor, we recommend that you can monitor your Motorola product, you will allow it to continue to work even if you with power adapter units. This will need to get the most out of your records...

User Guide
Page 3
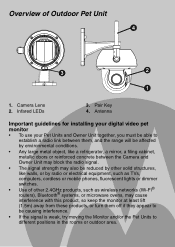
... to open the Menu options 7. Stand 18. Power Adapter Socket Display (LCD screen) 2. Menu Key M Press to your pet 10. Audio Level LED (Green, Orange, Red, Red) 13. Microphone 14. Speaker 19. Left Key < Normal Mode: Pan Left Menu Mode: Left 5. Down Key - Power Adapter / Battery LED BLUE when mains adapter power on. RED when battery low. 11. Antenna Lift the antenna for optimal reception 16. USB connector Connection...
... to open the Menu options 7. Stand 18. Power Adapter Socket Display (LCD screen) 2. Menu Key M Press to your pet 10. Audio Level LED (Green, Orange, Red, Red) 13. Microphone 14. Speaker 19. Left Key < Normal Mode: Pan Left Menu Mode: Left 5. Down Key - Power Adapter / Battery LED BLUE when mains adapter power on. RED when battery low. 11. Antenna Lift the antenna for optimal reception 16. USB connector Connection...
User Guide
Page 4
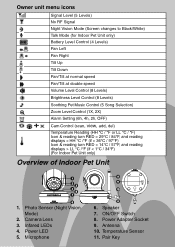
Camera Lens 3. Microphone 6. Antenna 10. Photo Sensor (Night Vision Mode) 2. Power LED 5. Speaker 7. Temperature Sensor 11. Power Adapter Socket 9. Pair Key Owner unit menu icons 1 Signal Level (5 Levels) No RF Signal Night Vision Mode (Screen changes to Black/White) T Talk Mode (for Indoor Pet Unit only) Battery Level Control (4 Levels) Pan Left Pan Right Tilt Up Tilt Down Pan/Tilt at normal speed Pan/Tilt at double speed Volume Level...
Camera Lens 3. Microphone 6. Antenna 10. Photo Sensor (Night Vision Mode) 2. Power LED 5. Speaker 7. Temperature Sensor 11. Power Adapter Socket 9. Pair Key Owner unit menu icons 1 Signal Level (5 Levels) No RF Signal Night Vision Mode (Screen changes to Black/White) T Talk Mode (for Indoor Pet Unit only) Battery Level Control (4 Levels) Pan Left Pan Right Tilt Up Tilt Down Pan/Tilt at normal speed Pan/Tilt at double speed Volume Level...
User Guide
Page 5
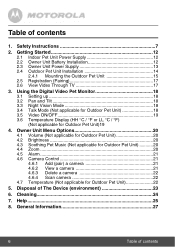
... by radio or electrical equipment, such as wireless networks (Wi-Fi® routers), Bluetooth® systems, or microwave ovens, may cause interference with this product, so keep the monitor at least 5ft (1.5m) away from these products, or turn them , and the range will be affected..., computers, cordless or mobile phones, fluorescent lights or dimmer switches. • Use of Outdoor Pet Unit 1. Antenna Important guidelines for installing your digital video pet monitor • To use your Pet Units and Owner Unit together, you must be able to establish a radio link between them off if they ...
... by radio or electrical equipment, such as wireless networks (Wi-Fi® routers), Bluetooth® systems, or microwave ovens, may cause interference with this product, so keep the monitor at least 5ft (1.5m) away from these products, or turn them , and the range will be affected..., computers, cordless or mobile phones, fluorescent lights or dimmer switches. • Use of Outdoor Pet Unit 1. Antenna Important guidelines for installing your digital video pet monitor • To use your Pet Units and Owner Unit together, you must be able to establish a radio link between them off if they ...
User Guide
Page 6
... Outdoor Pet Unit 20 4.4 Zoom 20 4.5 Alarm 21 4.6 Camera Control 21 4.6.1 Add (pair) a camera 21 4.6.2 View a camera 21 4.6.3 Delete a camera 22 4.6.4 Scan camera 22 4.7 Temperature (Not applicable for Outdoor Pet Unit)19 4. Getting Started 12 2.1 Indoor Pet Unit Power Supply 12 2.2 Owner Unit Battery Installation 12 2.3 Owner Unit Power Supply 13 2.4 Outdoor Pet Unit Installation 14 2.4.1 Mounting the Outdoor Pet Unit 15 2.5 Registration (Pairing 17 2.6 View Video Through TV 17 3.
... Outdoor Pet Unit 20 4.4 Zoom 20 4.5 Alarm 21 4.6 Camera Control 21 4.6.1 Add (pair) a camera 21 4.6.2 View a camera 21 4.6.3 Delete a camera 22 4.6.4 Scan camera 22 4.7 Temperature (Not applicable for Outdoor Pet Unit)19 4. Getting Started 12 2.1 Indoor Pet Unit Power Supply 12 2.2 Owner Unit Battery Installation 12 2.3 Owner Unit Power Supply 13 2.4 Outdoor Pet Unit Installation 14 2.4.1 Mounting the Outdoor Pet Unit 15 2.5 Registration (Pairing 17 2.6 View Video Through TV 17 3.

User Guide
Page 7
... NO USER SERVICEABLE PARTS INSIDE. If your pet in the literature accompanying the unit. Safety Instructions This symbol indicates that dangerous voltage constituting a risk of electric shock is being used to monitor infants or children, keep this and all other electrical devices out of its area of their reach. In case this unit. CAMERA SET UP & USE: ● Determine a location...
... NO USER SERVICEABLE PARTS INSIDE. If your pet in the literature accompanying the unit. Safety Instructions This symbol indicates that dangerous voltage constituting a risk of electric shock is being used to monitor infants or children, keep this and all other electrical devices out of its area of their reach. In case this unit. CAMERA SET UP & USE: ● Determine a location...
User Guide
Page 8
... parts away from children and pet(s) when assembling. • This product is required. Please dispose of explosion if battery is replaced by an incorrect type. Do not use other chargers or power adapters as described in the User's Guide, safe to use the chargers and power adapters provided. Do not allow children or pet(s) to play with it prior to the instructions...
... parts away from children and pet(s) when assembling. • This product is required. Please dispose of explosion if battery is replaced by an incorrect type. Do not use other chargers or power adapters as described in the User's Guide, safe to use the chargers and power adapters provided. Do not allow children or pet(s) to play with it prior to the instructions...
User Guide
Page 10
... ensure reliable operation of a power outage. • Surge Protectors - Surge protectors should bear the UL listing mark or CSA certification mark. Do not use receivers or video monitors near or over a radiator or heat register. Slots and openings on the accessory itself and should not be blocked or covered. This product should not be connected to protect...
... ensure reliable operation of a power outage. • Surge Protectors - Surge protectors should bear the UL listing mark or CSA certification mark. Do not use receivers or video monitors near or over a radiator or heat register. Slots and openings on the accessory itself and should not be blocked or covered. This product should not be connected to protect...
User Guide
Page 12
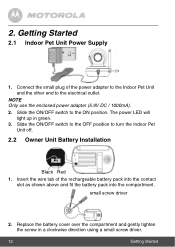
... of the power adapter to the Indoor Pet Unit and the other end to the electrical outlet. The power LED will light up in a clockwise direction using a small screw driver. 12 Getting Started Slide the ON/OFF switch to the OFF position to the ON position. Replace the battery cover over the compartment and gently tighten the screw in green. 3. Connect the small...
... of the power adapter to the Indoor Pet Unit and the other end to the electrical outlet. The power LED will light up in a clockwise direction using a small screw driver. 12 Getting Started Slide the ON/OFF switch to the OFF position to the ON position. Replace the battery cover over the compartment and gently tighten the screw in green. 3. Connect the small...
User Guide
Page 13
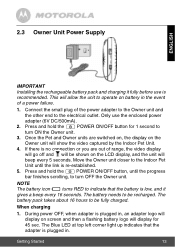
..., and it fully before use the enclosed power adapter (6V DC/500mA). 2. This will show the video captured by the Indoor Pet Unit. 4. Connect the small plug of a power failure. 1. The battery needs to turn ON the Owner unit. 3. The Blue LED at top left corner light up indicates that the battery is plugged in. 2.3 Owner Unit Power Supply ENGLISH IMPORTANT Installing the rechargeable battery pack...
..., and it fully before use the enclosed power adapter (6V DC/500mA). 2. This will show the video captured by the Indoor Pet Unit. 4. Connect the small plug of a power failure. 1. The battery needs to turn ON the Owner unit. 3. The Blue LED at top left corner light up indicates that the battery is plugged in. 2.3 Owner Unit Power Supply ENGLISH IMPORTANT Installing the rechargeable battery pack...

User Guide
Page 14
... the camera and the owner unit. • Avoid installing in water. During power ON, when the adapter is plugged in, the battery icon on a monitor when the Pet Unit is positioned in the same location/position where it is not intended for submersion in a location which requires the wireless signal to rain or snow. • Determine a location for the camera that the adapter is...
... the camera and the owner unit. • Avoid installing in water. During power ON, when the adapter is plugged in, the battery icon on a monitor when the Pet Unit is positioned in the same location/position where it is not intended for submersion in a location which requires the wireless signal to rain or snow. • Determine a location for the camera that the adapter is...

User Guide
Page 17
... the Indoor Pet Unit picture is connected, the Indoor Pet Unit's controls cannot be turned ON and CAM preselected before connecting the AV cable. NOTE The Indoor Pet Unit's power button must be activated. The green audio level LED will pop up . ...button underneath the Indoor Pet Unit until is an optional accessory available for a pet unit. Getting Started 17 You do not need to register it again unless the Indoor Pet Unit loses its link with the Owner Unit. Press the < LEFT button or > RIGHT button until the Owner unit finds the camera, beeps and the video from the camera...
... the Indoor Pet Unit picture is connected, the Indoor Pet Unit's controls cannot be turned ON and CAM preselected before connecting the AV cable. NOTE The Indoor Pet Unit's power button must be activated. The green audio level LED will pop up . ...button underneath the Indoor Pet Unit until is an optional accessory available for a pet unit. Getting Started 17 You do not need to register it again unless the Indoor Pet Unit loses its link with the Owner Unit. Press the < LEFT button or > RIGHT button until the Owner unit finds the camera, beeps and the video from the camera...
User Guide
Page 18
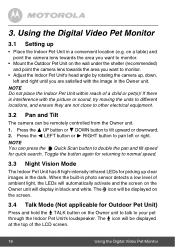
... be displayed on the Owner unit to talk to double the pan and tilt speed for Outdoor Pet Unit) Press and hold the T TALK button on the screen. 3.4 Talk Mode (Not applicable for quick search. Toggle the button again for returning to tilt upward or downward. 2. 3. Using the Digital Video Pet Monitor 3.1 Setting up clear images in the Owner unit. Press the + UP...
... be displayed on the Owner unit to talk to double the pan and tilt speed for Outdoor Pet Unit) Press and hold the T TALK button on the screen. 3.4 Talk Mode (Not applicable for quick search. Toggle the button again for returning to tilt upward or downward. 2. 3. Using the Digital Video Pet Monitor 3.1 Setting up clear images in the Owner unit. Press the + UP...
User Guide
Page 21
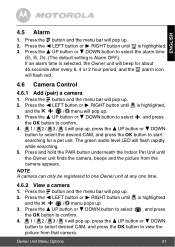
... green audio level LED will pop up. 2. Owner Unit Menu Options 21 Press the < LEFT button or > RIGHT button until is highlighted. 3. Press the < LEFT button or > RIGHT button until is highlighted, and the / / / menu will pop up . 2. DOWN button to select , and press the OK button to one Owner unit at any one time. 4.6.2 View a camera 1. Press the < LEFT button or > RIGHT button until the Owner...
... green audio level LED will pop up. 2. Owner Unit Menu Options 21 Press the < LEFT button or > RIGHT button until is highlighted. 3. Press the < LEFT button or > RIGHT button until is highlighted, and the / / / menu will pop up . 2. DOWN button to select , and press the OK button to one Owner unit at any one time. 4.6.2 View a camera 1. Press the < LEFT button or > RIGHT button until the Owner...
User Guide
Page 25
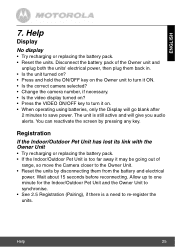
... re-register the units. Help 25 Help Display No display • Try recharging or replacing the battery pack. • Reset the units. Disconnect the battery pack of range, so move the Camera closer to turn it on. • When operating using batteries, only the Display will give you audio alerts. You can reactivate the screen by disconnecting them back in...
... re-register the units. Help 25 Help Display No display • Try recharging or replacing the battery pack. • Reset the units. Disconnect the battery pack of range, so move the Camera closer to turn it on. • When operating using batteries, only the Display will give you audio alerts. You can reactivate the screen by disconnecting them back in...
User Guide
Page 26
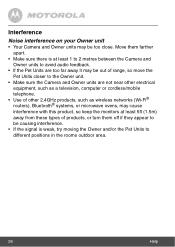
...Owner and/or the Pet Units to different positions in the rooms outdoor area. 26 Help Interference Noise interference on your Owner unit • Your Camera and Owner units may cause interference with this product, so keep the monitors at least 5ft (1.5m) away from these types of products, or turn... Pet Units closer to the Owner unit. • Make sure the Camera and Owner units are not near other electrical equipment, such as a television, computer or cordless/mobile telephone. • Use of other 2.4GHz products, such as wireless networks (Wi-Fi® routers), Bluetooth® systems, or...
...Owner and/or the Pet Units to different positions in the rooms outdoor area. 26 Help Interference Noise interference on your Owner unit • Your Camera and Owner units may cause interference with this product, so keep the monitors at least 5ft (1.5m) away from these types of products, or turn... Pet Units closer to the Owner unit. • Make sure the Camera and Owner units are not near other electrical equipment, such as a television, computer or cordless/mobile telephone. • Use of other 2.4GHz products, such as wireless networks (Wi-Fi® routers), Bluetooth® systems, or...

User Guide
Page 27
... manufactured to be free from defects in Europe Email: [email protected] To order a replacement battery pack, contact customer service. General Information 27 This Warranty extends only to this Warranty. BINATONE or its option and within a commercially reasonable time, will BINATONE do? Subject to the exclusions contained below . We may use with this User's Guide or the Quick Start Guide. 2. Consumer Products...
... manufactured to be free from defects in Europe Email: [email protected] To order a replacement battery pack, contact customer service. General Information 27 This Warranty extends only to this Warranty. BINATONE or its option and within a commercially reasonable time, will BINATONE do? Subject to the exclusions contained below . We may use with this User's Guide or the Quick Start Guide. 2. Consumer Products...

User Guide
Page 28
...specific legal rights, and you may not apply to another. 28 General Information ANY IMPLIED WARRANTIES, INCLUDING WITHOUT LIMITATION THE IMPLIED WARRANTIES OF MERCHANTABILITY AND FITNESS FOR A PARTICULAR PURPOSE, SHALL BE LIMITED TO THE DURATION OF THIS LIMITED WARRANTY, OTHERWISE THE REPAIR OR REPLACEMENT...rights that vary from one jurisdiction to you. IN NO EVENT SHALL MOTOROLA OR BINATONE BE LIABLE, WHETHER IN CONTRACT OR TORT (INCLUDING NEGLIGENCE... OTHER FINANCIAL LOSS ARISING OUT OF OR IN CONNECTION WITH THE ABILITY OR INABILITY TO USE THE PRODUCTS OR ACCESSORIES TO THE FULL EXTENT ...
...specific legal rights, and you may not apply to another. 28 General Information ANY IMPLIED WARRANTIES, INCLUDING WITHOUT LIMITATION THE IMPLIED WARRANTIES OF MERCHANTABILITY AND FITNESS FOR A PARTICULAR PURPOSE, SHALL BE LIMITED TO THE DURATION OF THIS LIMITED WARRANTY, OTHERWISE THE REPAIR OR REPLACEMENT...rights that vary from one jurisdiction to you. IN NO EVENT SHALL MOTOROLA OR BINATONE BE LIABLE, WHETHER IN CONTRACT OR TORT (INCLUDING NEGLIGENCE... OTHER FINANCIAL LOSS ARISING OUT OF OR IN CONNECTION WITH THE ABILITY OR INABILITY TO USE THE PRODUCTS OR ACCESSORIES TO THE FULL EXTENT ...

User Guide
Page 30
... seller of tampering; (c) mismatched board serial numbers; Unauthorised Service or Modification. Communication Services. and, most importantly; (e) your box, a completed warranty card showing the serial number of the Product; (d) a written description of BINATONE, that show evidence of the Product; (c) if a warranty card was included in Europe Email: [email protected] You will receive instructions on how to ship the Products...
... seller of tampering; (c) mismatched board serial numbers; Unauthorised Service or Modification. Communication Services. and, most importantly; (e) your box, a completed warranty card showing the serial number of the Product; (d) a written description of BINATONE, that show evidence of the Product; (c) if a warranty card was included in Europe Email: [email protected] You will receive instructions on how to ship the Products...
User Guide
Page 33
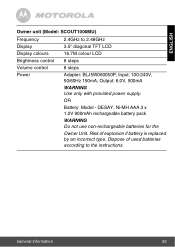
... 2.48GHz Display 3.5" diagonal TFT LCD Display colours 16.7M colour LCD Brightness control 8 steps Volume control 8 steps Power Adapter: BLJ5W060050P; Input: 100-240V, 50/60Hz 150mA; OR Battery: Model - General Information 33 Dispose of explosion if battery is replaced by an incorrect type. Output: 6.0V, 500mA WARNING Use only with provided power supply. ENGLISH Owner unit (Model: SCOUT1000MU) Frequency 2.4GHz to the instructions.
... 2.48GHz Display 3.5" diagonal TFT LCD Display colours 16.7M colour LCD Brightness control 8 steps Volume control 8 steps Power Adapter: BLJ5W060050P; Input: 100-240V, 50/60Hz 150mA; OR Battery: Model - General Information 33 Dispose of explosion if battery is replaced by an incorrect type. Output: 6.0V, 500mA WARNING Use only with provided power supply. ENGLISH Owner unit (Model: SCOUT1000MU) Frequency 2.4GHz to the instructions.