
User Guide
Page 2
... installation. Now you fully charge the battery of your new Motorola Digital Video Pet Monitor with all the information you will allow it to continue to another location. For product related questions, please call: US and Canada 1-888-331-3383 Email: [email protected] This User's Guide provides you with Indoor & Outdoor Camera Units! For warranty service of your records...
... installation. Now you fully charge the battery of your new Motorola Digital Video Pet Monitor with all the information you will allow it to continue to another location. For product related questions, please call: US and Canada 1-888-331-3383 Email: [email protected] This User's Guide provides you with Indoor & Outdoor Camera Units! For warranty service of your records...
User Guide
Page 3
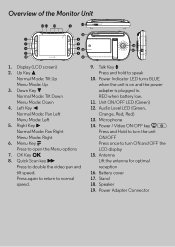
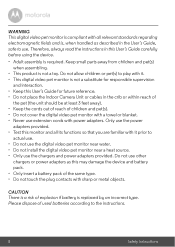
.... OK Key O 8. Talk Key T Press and hold to open the Menu options 7. Power Indicator LED turns BLUE when the unit is on and the power adapter is plugged in. Microphone 14. Stand 18. Display (LCD screen) 2. Battery cover 17. Power Adapter Connector Right Key > Normal Mode: Pan Right Menu Mode: Right 6. Press again to return to turn ON and OFF the LCD display 15. RED...
.... OK Key O 8. Talk Key T Press and hold to open the Menu options 7. Power Indicator LED turns BLUE when the unit is on and the power adapter is plugged in. Microphone 14. Stand 18. Display (LCD screen) 2. Battery cover 17. Power Adapter Connector Right Key > Normal Mode: Pan Right Menu Mode: Right 6. Press again to return to turn ON and OFF the LCD display 15. RED...
User Guide
Page 4
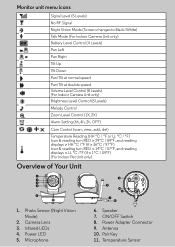
... LEDs 4. Power Adapter Connector 9. Camera Lens 3. Pair Key 11. Speaker 7. Antenna 10. Photo Sensor (Night Vision Mode) 2. ON/OFF Switch 8. Microphone 6. Monitor unit menu icons 1 Signal Level (5 Levels) No RF Signal Night Vision Mode (Screen changes to Black/White) T Talk Mode (For Indoor Camera Unit only) Battery Level Control (4 Levels) Pan Left Pan Right Tilt Up Tilt Down Pan/Tilt at normal speed Pan/Tilt at double speed Volume Level Control...
... LEDs 4. Power Adapter Connector 9. Camera Lens 3. Pair Key 11. Speaker 7. Antenna 10. Photo Sensor (Night Vision Mode) 2. ON/OFF Switch 8. Microphone 6. Monitor unit menu icons 1 Signal Level (5 Levels) No RF Signal Night Vision Mode (Screen changes to Black/White) T Talk Mode (For Indoor Camera Unit only) Battery Level Control (4 Levels) Pan Left Pan Right Tilt Up Tilt Down Pan/Tilt at normal speed Pan/Tilt at double speed Volume Level Control...

User Guide
Page 5
... guidelines for installing your digital video pet monitor • To use your Camera Units and Monitor Unit together, you must be able to establish a radio link between them, and the range will be affected by environmental conditions. • Any large metal object, like walls, or by radio or electrical equipment, such as wireless networks (Wi-Fi® routers), Bluetooth®...
... guidelines for installing your digital video pet monitor • To use your Camera Units and Monitor Unit together, you must be able to establish a radio link between them, and the range will be affected by environmental conditions. • Any large metal object, like walls, or by radio or electrical equipment, such as wireless networks (Wi-Fi® routers), Bluetooth®...
User Guide
Page 6
... Started 12 2.1 Indoor Camera Unit Power Supply 12 2.2 Monitor Unit Battery Installation 12 2.3 Monitor Unit Power Supply 13 2.4 Outdoor Camera Unit Installation 14 2.4.1 Mounting the Outdoor Camera Unit 15 2.5 Registration (Pairing 17 3. General Information 27 6 Table of contents 1. Monitor Unit Menu Options 20 4.1 Volume (For Indoor Camera Unit only 20 4.2 Brightness 20 4.3 Melody (For Indoor Camera Unit only 20 4.4 Zoom ...20 4.5 Alarm ...21 4.6 Camera Control 21 4.6.1 Add (pair) a camera 21 4.6.2 View a camera...
... Started 12 2.1 Indoor Camera Unit Power Supply 12 2.2 Monitor Unit Battery Installation 12 2.3 Monitor Unit Power Supply 13 2.4 Outdoor Camera Unit Installation 14 2.4.1 Mounting the Outdoor Camera Unit 15 2.5 Registration (Pairing 17 3. General Information 27 6 Table of contents 1. Monitor Unit Menu Options 20 4.1 Volume (For Indoor Camera Unit only 20 4.2 Brightness 20 4.3 Melody (For Indoor Camera Unit only 20 4.4 Zoom ...20 4.5 Alarm ...21 4.6 Camera Control 21 4.6.1 Add (pair) a camera 21 4.6.2 View a camera...
User Guide
Page 7
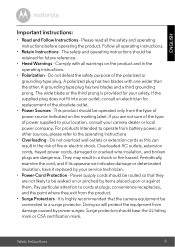
... exercised until your pet is being used to chewing, we strongly recommend you the best view of your pet is present within a crib or near a bed. Safety Instructions 7 Never use the AC Adapters provided. CAMERA SET UP & USE: ● Determine a location for the CAMERA that dangerous voltage constituting a risk of electric shock is prone to monitor infants or children, keep this...
... exercised until your pet is being used to chewing, we strongly recommend you the best view of your pet is present within a crib or near a bed. Safety Instructions 7 Never use the AC Adapters provided. CAMERA SET UP & USE: ● Determine a location for the CAMERA that dangerous voltage constituting a risk of electric shock is prone to monitor infants or children, keep this...
User Guide
Page 8
... read the instructions in this User's Guide carefully before using the device. • Adult assembly is not a toy. Do not allow children or pet(s) to actual use. • Do not use the digital video pet monitor near water. • Do not install the digital video pet monitor near a heat source. • Only use extension cords with power adapters. Only use the power adapters provided. • Test this monitor and...
... read the instructions in this User's Guide carefully before using the device. • Adult assembly is not a toy. Do not allow children or pet(s) to actual use. • Do not use the digital video pet monitor near water. • Do not install the digital video pet monitor near a heat source. • Only use extension cords with power adapters. Only use the power adapters provided. • Test this monitor and...
User Guide
Page 9
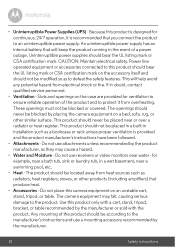
... should be connected to operate from the type of the obsolete outlet. • Power Sources - Overloaded AC outlets, extension cords, frayed power cords, damaged or cracked wire insulation, and broken plugs are not sure of the type of the polarized or grounding-type plug. It is provided for your camera dealer or local power company. Safety Instructions 9 ENGLISH Important instructions: •...
... should be connected to operate from the type of the obsolete outlet. • Power Sources - Overloaded AC outlets, extension cords, frayed power cords, damaged or cracked wire insulation, and broken plugs are not sure of the type of the polarized or grounding-type plug. It is provided for your camera dealer or local power company. Safety Instructions 9 ENGLISH Important instructions: •...
User Guide
Page 10
... product to defeat the safety features. Uninterruptible power supplies should be blocked or covered. These openings must not be located away from heat sources such as they may fall, causing serious damage to the manufacturer's instructions and use receivers or video monitors near water - If in installation such as to an uninterruptible power supply. This product should bear the UL listing...
... product to defeat the safety features. Uninterruptible power supplies should be blocked or covered. These openings must not be located away from heat sources such as they may fall, causing serious damage to the manufacturer's instructions and use receivers or video monitors near water - If in installation such as to an uninterruptible power supply. This product should bear the UL listing...
User Guide
Page 12
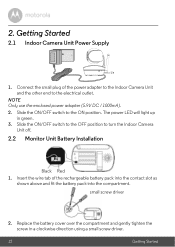
... screw driver 2. NOTE Only use the enclosed power adapter (5.9V DC / 1000mA). 2. Slide the ON/OFF switch to turn the Indoor Camera Unit off. 2.2 Monitor Unit Battery Installation Black Red 1. Connect the small plug of the rechargeable battery pack into the contact slot as shown above and fit the battery pack into the compartment. 2. Getting Started 2.1 Indoor Camera Unit Power Supply 1. The power LED will light up...
... screw driver 2. NOTE Only use the enclosed power adapter (5.9V DC / 1000mA). 2. Slide the ON/OFF switch to turn the Indoor Camera Unit off. 2.2 Monitor Unit Battery Installation Black Red 1. Connect the small plug of the rechargeable battery pack into the contact slot as shown above and fit the battery pack into the compartment. 2. Getting Started 2.1 Indoor Camera Unit Power Supply 1. The power LED will light up...
User Guide
Page 13
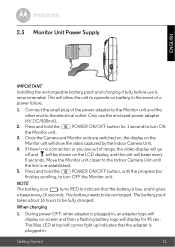
... turns RED to be fully charged. Press and hold the P POWER ON/OFF button for 45 sec. The battery needs to indicate that the adapter is no connection or you are switched on, the display on the LCD display, and the unit will show the video captured by the Indoor Camera Unit. 4. The Blue LED at top left corner light...
... turns RED to be fully charged. Press and hold the P POWER ON/OFF button for 45 sec. The battery needs to indicate that the adapter is no connection or you are switched on, the display on the LCD display, and the unit will show the video captured by the Indoor Camera Unit. 4. The Blue LED at top left corner light...
User Guide
Page 14
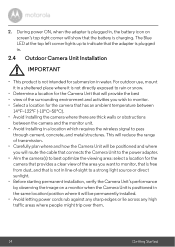
... a location which requires the wireless signal to pass through cement, concrete, and metal structures. The Blue LED at the top left corner lights up to a strong light source or direct sunlight. • Before starting permanent installation, verify the Camera Unit's performance by observing the image on screen's top right corner will route the cable that connects the Camera Unit to the power adapter. •...
... a location which requires the wireless signal to pass through cement, concrete, and metal structures. The Blue LED at the top left corner lights up to a strong light source or direct sunlight. • Before starting permanent installation, verify the Camera Unit's performance by observing the image on screen's top right corner will route the cable that connects the Camera Unit to the power adapter. •...
User Guide
Page 17
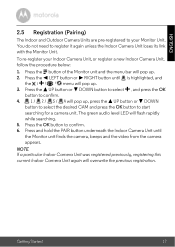
... button or - DOWN button to select the desired CAM and press the OK button to register it again unless the Indoor Camera Unit loses its link with the Monitor Unit. NOTE If a particular Indoor Camera Unit was registered previously, registering this current Indoor Camera Unit again will flash rapidly while searching. 5. You do not need to start searching for a camera unit. The green audio level LED...
... button or - DOWN button to select the desired CAM and press the OK button to register it again unless the Indoor Camera Unit loses its link with the Monitor Unit. NOTE If a particular Indoor Camera Unit was registered previously, registering this current Indoor Camera Unit again will flash rapidly while searching. 5. You do not need to start searching for a camera unit. The green audio level LED...
User Guide
Page 18
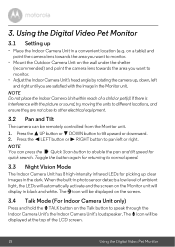
.... 3.3 Night Vision Mode The Indoor Camera Unit has 8 high-intensity infrared LEDs for quick search. NOTE Do not place the Indoor Camera Unit within reach of ambient light, the LEDs will automatically activate and the screen on the Talk button to tilt upward or downward. 2. When the built-in the dark. Using the Digital Video Pet Monitor 3.1 Setting up clear images in photo sensor detects a low...
.... 3.3 Night Vision Mode The Indoor Camera Unit has 8 high-intensity infrared LEDs for quick search. NOTE Do not place the Indoor Camera Unit within reach of ambient light, the LEDs will automatically activate and the screen on the Talk button to tilt upward or downward. 2. When the built-in the dark. Using the Digital Video Pet Monitor 3.1 Setting up clear images in photo sensor detects a low...
User Guide
Page 21
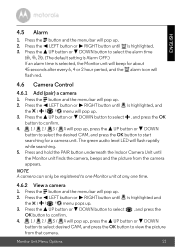
... start searching for about 45 seconds after every 6, 4 or 2 hour period, and the alarm icon will flash red. 4.6 Camera Control 4.6.1 Add (pair) a camera 1. Press and hold the PAIR button underneath the Indoor Camera Unit until is selected, the Monitor unit will pop up . 2. Press the M button and the menu bar will flash rapidly while searching. 5. Press the + UP button or - The green audio level LED...
... start searching for about 45 seconds after every 6, 4 or 2 hour period, and the alarm icon will flash red. 4.6 Camera Control 4.6.1 Add (pair) a camera 1. Press and hold the PAIR button underneath the Indoor Camera Unit until is selected, the Monitor unit will pop up . 2. Press the M button and the menu bar will flash rapidly while searching. 5. Press the + UP button or - The green audio level LED...

User Guide
Page 25
... 15 seconds before reconnecting. Change the camera number, if necessary. • Is the video display turned on . • When operating using batteries, only the Display will give you audio alerts. The unit is still active and will go blank after 2 minutes to save power. Help Display No display • Try recharging or replacing the battery pack. • Reset the units. Press and hold...
... 15 seconds before reconnecting. Change the camera number, if necessary. • Is the video display turned on . • When operating using batteries, only the Display will give you audio alerts. The unit is still active and will go blank after 2 minutes to save power. Help Display No display • Try recharging or replacing the battery pack. • Reset the units. Press and hold...

User Guide
Page 27
... 1-888-331-3383 Email: [email protected] To order a replacement battery pack, contact customer service. Subject to the exclusions contained below . What will at no charge repair or replace any Products or Accessories that this Motorola branded product ("Product") or certified accessory ("Accessory") sold for purchasing this Warranty. What Does this User's Guide or the Quick Start Guide. 2. ENGLISH 8. This...
... 1-888-331-3383 Email: [email protected] To order a replacement battery pack, contact customer service. Subject to the exclusions contained below . What will at no charge repair or replace any Products or Accessories that this Motorola branded product ("Product") or certified accessory ("Accessory") sold for purchasing this Warranty. What Does this User's Guide or the Quick Start Guide. 2. ENGLISH 8. This...

User Guide
Page 28
...THE DURATION OF THIS LIMITED WARRANTY, OTHERWISE THE REPAIR OR REPLACEMENT PROVIDED UNDER THIS EXPRESS LIMITED WARRANTY IS THE EXCLUSIVE REMEDY OF THE CONSUMER, AND IS PROVIDED IN LIEU OF ALL OTHER WARRANTIES, EXPRESS OF IMPLIED. IN NO EVENT SHALL MOTOROLA OR BINATONE BE LIABLE, WHETHER IN CONTRACT OR TORT (... OF INFORMATION OR OTHER FINANCIAL LOSS ARISING OUT OF OR IN CONNECTION WITH THE ABILITY OR INABILITY TO USE THE PRODUCTS OR ACCESSORIES TO THE FULL EXTENT THESE DAMAGES MAY BE DISCLAIMED BY LAW. This Warranty gives you specific legal rights, and you . Some jurisdictions do not allow the...
...THE DURATION OF THIS LIMITED WARRANTY, OTHERWISE THE REPAIR OR REPLACEMENT PROVIDED UNDER THIS EXPRESS LIMITED WARRANTY IS THE EXCLUSIVE REMEDY OF THE CONSUMER, AND IS PROVIDED IN LIEU OF ALL OTHER WARRANTIES, EXPRESS OF IMPLIED. IN NO EVENT SHALL MOTOROLA OR BINATONE BE LIABLE, WHETHER IN CONTRACT OR TORT (... OF INFORMATION OR OTHER FINANCIAL LOSS ARISING OUT OF OR IN CONNECTION WITH THE ABILITY OR INABILITY TO USE THE PRODUCTS OR ACCESSORIES TO THE FULL EXTENT THESE DAMAGES MAY BE DISCLAIMED BY LAW. This Warranty gives you specific legal rights, and you . Some jurisdictions do not allow the...

User Guide
Page 30
... failure of BINATONE, that show evidence of the problem; Products or Accessories with the Products or Accessories is excluded from service, testing, adjustment, installation, maintenance, alteration, or modification in connection with the said purchase. 30 General Information To obtain service or information, please call: US and Canada 1-888-331-3383 Email: [email protected] You will receive instructions on...
... failure of BINATONE, that show evidence of the problem; Products or Accessories with the Products or Accessories is excluded from service, testing, adjustment, installation, maintenance, alteration, or modification in connection with the said purchase. 30 General Information To obtain service or information, please call: US and Canada 1-888-331-3383 Email: [email protected] You will receive instructions on...
User Guide
Page 31
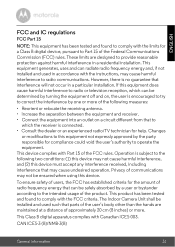
... to try to correct the interference by turning the equipment off and on, the user is connected. • Consult the dealer or an experienced radio/TV technician for help. This product has been tested and found to comply with the limits ...instructions, may cause harmful interference to operate the equipment. Operation is subject to which can be ensured when using this equipment not expressly approved by a user or bystander according to Part 15 of the Federal Communications Commission (FCC) rules. The Indoor Camera Unit shall be installed and used in a particular installation...
... to try to correct the interference by turning the equipment off and on, the user is connected. • Consult the dealer or an experienced radio/TV technician for help. This product has been tested and found to comply with the limits ...instructions, may cause harmful interference to operate the equipment. Operation is subject to which can be ensured when using this equipment not expressly approved by a user or bystander according to Part 15 of the Federal Communications Commission (FCC) rules. The Indoor Camera Unit shall be installed and used in a particular installation...