
User Guide
Page 1
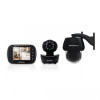
User's Guide Digital Video Pet Monitor with Indoor and Outdoor Camera Units Model: SCOUT2360 The features described in this User's Guide are subject to modifications without prior notice.
User's Guide Digital Video Pet Monitor with Indoor and Outdoor Camera Units Model: SCOUT2360 The features described in this User's Guide are subject to modifications without prior notice.

User Guide
Page 2
... • 1 x Rechargeable Ni-MH Battery Pack for the Monitor Unit • 1 x Power adapter for the Monitor Unit • 1 x Power adapter for the Outdoor Pet Unit • 4 x Mounting Screws and Dry Wall Plugs • 1 x Tamper-proof Screw • 1 x Metal Bracket • 1 x Wrench Key In multi-...you disconnect it from the power supply to carry it in the monitor unit. For warranty service of your new Digital Video Pet Monitor with connector for the Indoor Pet Unit • 1 x Power adapter with Indoor and Outdoor camera units. Welcome... Now you for warranty coverage. Thank you...
... • 1 x Rechargeable Ni-MH Battery Pack for the Monitor Unit • 1 x Power adapter for the Monitor Unit • 1 x Power adapter for the Outdoor Pet Unit • 4 x Mounting Screws and Dry Wall Plugs • 1 x Tamper-proof Screw • 1 x Metal Bracket • 1 x Wrench Key In multi-...you disconnect it from the power supply to carry it in the monitor unit. For warranty service of your new Digital Video Pet Monitor with connector for the Indoor Pet Unit • 1 x Power adapter with Indoor and Outdoor camera units. Welcome... Now you for warranty coverage. Thank you...
User Guide
Page 4
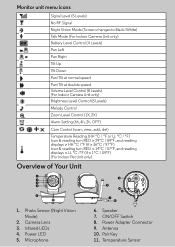
...;F (if > 36°C / 97°F) Icon & reading turn RED < 14°C / 57°F, and reading displays < LL °C /°F (if < 1°C / 34°F) (For Indoor Pet Unit only) Overview of Your Unit 1 6 2 3 4 9 10 8 5 7 11 1.
...;F (if > 36°C / 97°F) Icon & reading turn RED < 14°C / 57°F, and reading displays < LL °C /°F (if < 1°C / 34°F) (For Indoor Pet Unit only) Overview of Your Unit 1 6 2 3 4 9 10 8 5 7 11 1.

User Guide
Page 5
Infared LEDs 3. Antenna Important guidelines for installing your digital video pet monitor • To use your Camera Units and Monitor Unit together, you must be able to establish a radio link between them, and the range will ...
Infared LEDs 3. Antenna Important guidelines for installing your digital video pet monitor • To use your Camera Units and Monitor Unit together, you must be able to establish a radio link between them, and the range will ...
User Guide
Page 6
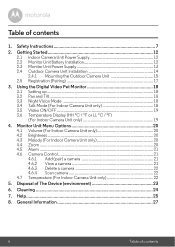
... Installation 12 2.3 Monitor Unit Power Supply 13 2.4 Outdoor Camera Unit Installation 14 2.4.1 Mounting the Outdoor Camera Unit 15 2.5 Registration (Pairing 17 3. Using the Digital Video Pet Monitor 18 3.1 Setting up 18 3.2 Pan and Tilt 18 3.3 Night Vision Mode 18 3.4 Talk Mode (For Indoor Camera Unit only 18 3.5 Video ON/OFF 19...
... Installation 12 2.3 Monitor Unit Power Supply 13 2.4 Outdoor Camera Unit Installation 14 2.4.1 Mounting the Outdoor Camera Unit 15 2.5 Registration (Pairing 17 3. Using the Digital Video Pet Monitor 18 3.1 Setting up 18 3.2 Pan and Tilt 18 3.3 Night Vision Mode 18 3.4 Talk Mode (For Indoor Camera Unit only 18 3.5 Video ON/OFF 19...
User Guide
Page 7
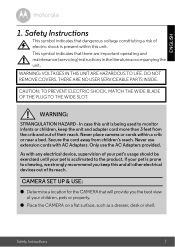
ENGLISH 1. This symbol indicates that dangerous voltage constituting a risk of its reach. Secure the cord away from the crib and out of your children, pets or property. ● Place the CAMERA on a flat surface, such as a dresser, desk or shelf. CAMERA SET UP & USE: ● Determine a location for ...: VOLTAGES IN THIS UNIT ARE HAZARDOUS TO LIFE. In case this unit is being used to monitor infants or children, keep this unit. If your pet is present within a crib or near a bed. CAUTION: TO PREVENT ELECTRIC SHOCK, MATCH THE WIDE BLADE OF THE PLUG TO THE WIDE SLOT WARNING...
ENGLISH 1. This symbol indicates that dangerous voltage constituting a risk of its reach. Secure the cord away from the crib and out of your children, pets or property. ● Place the CAMERA on a flat surface, such as a dresser, desk or shelf. CAMERA SET UP & USE: ● Determine a location for ...: VOLTAGES IN THIS UNIT ARE HAZARDOUS TO LIFE. In case this unit is being used to monitor infants or children, keep this unit. If your pet is present within a crib or near a bed. CAUTION: TO PREVENT ELECTRIC SHOCK, MATCH THE WIDE BLADE OF THE PLUG TO THE WIDE SLOT WARNING...
User Guide
Page 8
... Do not use other chargers or power adapters as described in the User's Guide, safe to use. Please dispose of children and pet(s). • Do not cover the digital video pet monitor with a towel or blanket. • Never use extension cords with power adapters. Only use the power adapters provided. •...; Keep this User's Guide for future reference. • Do not place the Indoor Camera Unit or cables in the crib or within reach of the pet (the unit should be at least 3 feet away). • Keep the cords out of reach of used batteries according to the instructions. 8 Safety ...
... Do not use other chargers or power adapters as described in the User's Guide, safe to use. Please dispose of children and pet(s). • Do not cover the digital video pet monitor with a towel or blanket. • Never use extension cords with power adapters. Only use the power adapters provided. •...; Keep this User's Guide for future reference. • Do not place the Indoor Camera Unit or cables in the crib or within reach of the pet (the unit should be at least 3 feet away). • Keep the cords out of reach of used batteries according to the instructions. 8 Safety ...
User Guide
Page 18
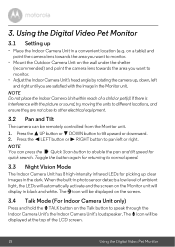
...-intensity infrared LEDs for quick search. NOTE Do not place the Indoor Camera Unit within reach of the LCD screen. 18 Using the Digital Video Pet Monitor If there is interference with the image in black and white. Press the < LEFT button or > RIGHT button to pan left and right...Camera Unit's head angle by rotating the camera up clear images in a convenient location (e.g. NOTE You can be displayed at the top of a child or pet(s)! The icon will be remotely controlled from the Monitor unit. 1. on a table) and point the camera lens towards the area you want to tilt ...
...-intensity infrared LEDs for quick search. NOTE Do not place the Indoor Camera Unit within reach of the LCD screen. 18 Using the Digital Video Pet Monitor If there is interference with the image in black and white. Press the < LEFT button or > RIGHT button to pan left and right...Camera Unit's head angle by rotating the camera up clear images in a convenient location (e.g. NOTE You can be displayed at the top of a child or pet(s)! The icon will be remotely controlled from the Monitor unit. 1. on a table) and point the camera lens towards the area you want to tilt ...
User Guide
Page 19
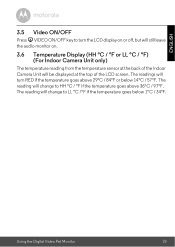
... below 14°C / 57°F. The reading will change to turn RED if the temperature goes above 36°C / 97°F. Using the Digital Video Pet Monitor 19 The readings will be displayed at the back of the Indoor Camera Unit will turn the LCD display on or off, but will...
... below 14°C / 57°F. The reading will change to turn RED if the temperature goes above 36°C / 97°F. Using the Digital Video Pet Monitor 19 The readings will be displayed at the back of the Indoor Camera Unit will turn the LCD display on or off, but will...
User Guide
Page 24
... for assistance. 24 Cleaning this may cause permanent damage to the product which is not covered by the warranty. • Keep your Digital Video Pet Monitor away from hot, humid areas or strong sunlight, and don't let it get wet. • Every effort has been made to repair... it yourself -- contact Customer Service for your Digital Video Pet Monitor with a slightly damp cloth or with thinners or other solvents and chemicals -- Never use cleaning agents or abrasive solvents. However, if something does...
... for assistance. 24 Cleaning this may cause permanent damage to the product which is not covered by the warranty. • Keep your Digital Video Pet Monitor away from hot, humid areas or strong sunlight, and don't let it get wet. • Every effort has been made to repair... it yourself -- contact Customer Service for your Digital Video Pet Monitor with a slightly damp cloth or with thinners or other solvents and chemicals -- Never use cleaning agents or abrasive solvents. However, if something does...