Setup Manual
Page 2
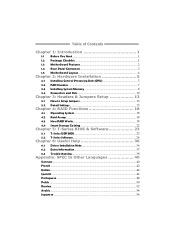
... 3.2 Detail Settings 13 Chapter 4: RAID Functions 18 4.1 Operating System 18 4.2 Raid Arrays 18 4.3 How RAID Works 18 4.4 Smart Storage Caching 22 Chapter 5: T-Series BIOS & Software 23 5.1 T-Series UEFI BIOS 23 5.2 T-Series Software 26 Chapter 6: Useful Help 36 6.1 Driver Installation Note 36 6.2 Extra Information 37 6.3 Troubleshooting 38 Appendix: SPEC In Other Languages 40...
... 3.2 Detail Settings 13 Chapter 4: RAID Functions 18 4.1 Operating System 18 4.2 Raid Arrays 18 4.3 How RAID Works 18 4.4 Smart Storage Caching 22 Chapter 5: T-Series BIOS & Software 23 5.1 T-Series UEFI BIOS 23 5.2 T-Series Software 26 Chapter 6: Useful Help 36 6.1 Driver Installation Note 36 6.2 Extra Information 37 6.3 Troubleshooting 38 Appendix: SPEC In Other Languages 40...
Setup Manual
Page 6
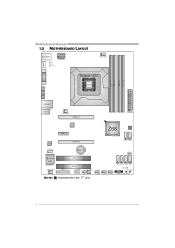
F_USB3 F_USB2 F_USB1 PANEL1 SW_PWR1 4 Motherboard Manual 1.5 MOTHERBOARD LAYOUT HDMI1 U SB_KBMS1 PHS PH3 PH2 PH1 VTT _LED1 ATXPW R2 C PU_FAN1 DVI1 Socket 1155 CPU1 DDR3 _A1 DDR3 _A2 DDR3 _B1 DDR3 _B2 VGA1 RJ45USB 1 AUDIO1 SY S_FA N2 PEX16_1 ATXP WR1 LAN PEX1_1 Z68 BIOS CODEC PEX16_2 SATA2 SATA1 F_AU DIO1 BAT1 J CMOS1 Super I/O JSP DI FOUT1 J_PRINT1 PCI1 PCI2 J_C OM1 SY S_FA N1 SATA6 SATA5 SATA4 SATA3 LED_D2 LED_D1 SW_R ST1 CIR1 Note: ■ represents the 1st pin.
F_USB3 F_USB2 F_USB1 PANEL1 SW_PWR1 4 Motherboard Manual 1.5 MOTHERBOARD LAYOUT HDMI1 U SB_KBMS1 PHS PH3 PH2 PH1 VTT _LED1 ATXPW R2 C PU_FAN1 DVI1 Socket 1155 CPU1 DDR3 _A1 DDR3 _A2 DDR3 _B1 DDR3 _B2 VGA1 RJ45USB 1 AUDIO1 SY S_FA N2 PEX16_1 ATXP WR1 LAN PEX1_1 Z68 BIOS CODEC PEX16_2 SATA2 SATA1 F_AU DIO1 BAT1 J CMOS1 Super I/O JSP DI FOUT1 J_PRINT1 PCI1 PCI2 J_C OM1 SY S_FA N1 SATA6 SATA5 SATA4 SATA3 LED_D2 LED_D1 SW_R ST1 CIR1 Note: ■ represents the 1st pin.
Setup Manual
Page 17
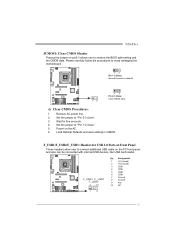
.... 13 Pin 1-2 Close: Normal Operation (default). 13 13 Pin 2-3 Close: Clear CMOS data. ※ Clear CMOS Procedures: 1. Please carefully follow the procedures to restore the BIOS safe setting and the CMOS data. Set the jumper to "Pin 2-3 close ". 5. Set the jumper to "Pin 1-2 close ". 3. Power on the PC front panel, and...
.... 13 Pin 1-2 Close: Normal Operation (default). 13 13 Pin 2-3 Close: Clear CMOS data. ※ Clear CMOS Procedures: 1. Please carefully follow the procedures to restore the BIOS safe setting and the CMOS data. Set the jumper to "Pin 2-3 close ". 5. Set the jumper to "Pin 1-2 close ". 3. Power on the PC front panel, and...

Setup Manual
Page 24
... CD to open the main windows. 5. Double click it to the optical drive, and Install all processes finish, reboot the system. 4. Activate RAID mode from BIOS, and install operating system. 3. Motherboard Manual 4.4 SMART STORAGE CACHING With Intel(R) Rapid Storage Technology, the performance of accelerated device has been enabled accelerated. 22 Intel...
... CD to open the main windows. 5. Double click it to the optical drive, and Install all processes finish, reboot the system. 4. Activate RAID mode from BIOS, and install operating system. 3. Motherboard Manual 4.4 SMART STORAGE CACHING With Intel(R) Rapid Storage Technology, the performance of accelerated device has been enabled accelerated. 22 Intel...

Setup Manual
Page 25
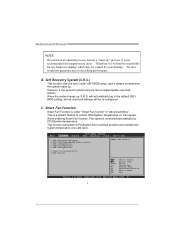
...: Please Clear CMOS if system no display after overclocking Start Page [Page - Main] You can set the entrance Page when you enter UEFI BIOS Setup ====Manual CPU system==== Fixed CPU Ratio CPU Ratio CPU Core Current Max(Amp) Power Limit 1 Value (Watt) Power Limit 2 Switch ...Item Select Change Opt. General Help Optimized Defaults Save & Reset Exit Version x.xx.xxxx. Notice: Not all types of setting up the UEFI BIOS, please refer to customize personal overclock settings: Manual CPU System, Manual Memory System, Manual PWM System, and Manual Voltage System. Overclocking Navigator Engine...
...: Please Clear CMOS if system no display after overclocking Start Page [Page - Main] You can set the entrance Page when you enter UEFI BIOS Setup ====Manual CPU system==== Fixed CPU Ratio CPU Ratio CPU Core Current Max(Amp) Power Limit 1 Value (Watt) Power Limit 2 Switch ...Item Select Change Opt. General Help Optimized Defaults Save & Reset Exit Version x.xx.xxxx. Notice: Not all types of setting up the UEFI BIOS, please refer to customize personal overclock settings: Manual CPU System, Manual Memory System, Manual PWM System, and Manual Voltage System. Overclocking Navigator Engine...
Setup Manual
Page 26
... We also would not guarantee any hardware damage which may be seen under "Smart Fan Control" in the default UEFI BIOS setting, and all overclock settings will protect CPU/System from overheat problem and maintain the system temperature at a safe level. Main... BIOS SETUP UTILITY Advanced Chipset Boot Security O.N.E Save & Exit > PCI Subsystem Settings > ACPI Settings/WakeUp Event control > CPU Configuration > SATA Configuration > USB ...
... We also would not guarantee any hardware damage which may be seen under "Smart Fan Control" in the default UEFI BIOS setting, and all overclock settings will protect CPU/System from overheat problem and maintain the system temperature at a safe level. Main... BIOS SETUP UTILITY Advanced Chipset Boot Security O.N.E Save & Exit > PCI Subsystem Settings > ACPI Settings/WakeUp Event control > CPU Configuration > SATA Configuration > USB ...
Setup Manual
Page 27
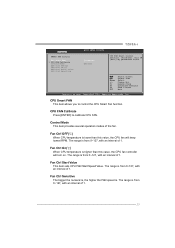
... FAN Control CPU Smart FAN > CPU FAN Calibrate Control Mode FAN Ctrl OFF(oC) FAN Ctrl ON(oC) FAN Ctrl Start value FAN Ctrl Sensitive BIOS SETUP UTILITY [Disabled] [Manual] CPU FAN Smart control function. [Disabled]: Full ON [Auto]:By parameters below. General Help Optimized Defaults Save & Reset Exit Version x.xx...
... FAN Control CPU Smart FAN > CPU FAN Calibrate Control Mode FAN Ctrl OFF(oC) FAN Ctrl ON(oC) FAN Ctrl Start value FAN Ctrl Sensitive BIOS SETUP UTILITY [Disabled] [Manual] CPU FAN Smart control function. [Disabled]: Full ON [Auto]:By parameters below. General Help Optimized Defaults Save & Reset Exit Version x.xx...

Setup Manual
Page 34
... saved .txt file, you may need to save the system information to a .txt file and send the file to provide your system information including motherboard/BIOS/CPU/video/ device/OS information. Your system information will not share customer's data with any other third parties, so please feel free to our tech...
... saved .txt file, you may need to save the system information to a .txt file and send the file to provide your system information including motherboard/BIOS/CPU/video/ device/OS information. Your system information will not share customer's data with any other third parties, so please feel free to our tech...

Setup Manual
Page 35
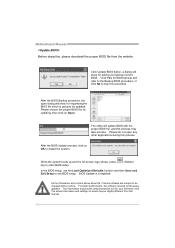
Show current BIOS information Update BIOS from the Internet Update BIOS with a BIOS file Once click on this button, the saving dialog will show. Save current BIOS to update your motherboard BIOS under Windows system. TZ68A+ BIOS Update BIOS Update is a convenient utility which allows you to a .bin file 33 Choose the position to save file and enter file name. (We recommend that the file name should be English/number and no longer than 7 characters.) Then click Save.
Show current BIOS information Update BIOS from the Internet Update BIOS with a BIOS file Once click on this button, the saving dialog will show. Save current BIOS to update your motherboard BIOS under Windows system. TZ68A+ BIOS Update BIOS Update is a convenient utility which allows you to a .bin file 33 Choose the position to save file and enter file name. (We recommend that the file name should be English/number and no longer than 7 characters.) Then click Save.
Setup Manual
Page 36
... software is completed. Please do not open dialog will show for asking you backup current BIOS. In the BIOS setup, use the Load Optimized Defaults function and then Save and Exit Setup to enter BIOS setup. The actual information and settings on board may take minutes. While the system boots... up and the full screen logo shows, press key to exit BIOS setup. All the information and content above are subject to be updated. The utility will show for updating, then click on OK to the...
... software is completed. Please do not open dialog will show for asking you backup current BIOS. In the BIOS setup, use the Load Optimized Defaults function and then Save and Exit Setup to enter BIOS setup. The actual information and settings on board may take minutes. While the system boots... up and the full screen logo shows, press key to exit BIOS setup. All the information and content above are subject to be updated. The utility will show for updating, then click on OK to the...

Setup Manual
Page 37
You can choose JPG or BMP as your boot logo so as the boot logo. 2. TZ68A+ BIOScreen Utility (Optional) This utility allows you to personalize your computer. Please follow the following instructions to complete the update. 35 Update Bios:Write the picture to BIOS Memory to update boo logo: 1. Load Image:Choose the picture as to customize your boot logo easily. Transform:Transform the picture for BIOS and preview the result. 3.
You can choose JPG or BMP as your boot logo so as the boot logo. 2. TZ68A+ BIOScreen Utility (Optional) This utility allows you to personalize your computer. Please follow the following instructions to complete the update. 35 Update Bios:Write the picture to BIOS Memory to update boo logo: 1. Load Image:Choose the picture as to customize your boot logo easily. Transform:Transform the picture for BIOS and preview the result. 3.

Bios Manual
Page 2
...or chipset fine-tuning options are also included in the ACPI specification, developed by Microsoft, Intel and Toshiba. PCI Bus Support This AMI UEFI BIOS also supports Version 2.3 of the booting process, loading and executing the operating system. The rest of this manual will to NVRAM. This ...system controls most of the input and output devices such as defined in UEFI BIOS. BIOS activates at the first stage of the Intel PCI (Peripheral Component Interconnect) local bus specification. It provides ASL code for power management and...
...or chipset fine-tuning options are also included in the ACPI specification, developed by Microsoft, Intel and Toshiba. PCI Bus Support This AMI UEFI BIOS also supports Version 2.3 of the booting process, loading and executing the operating system. The rest of this manual will to NVRAM. This ...system controls most of the input and output devices such as defined in UEFI BIOS. BIOS activates at the first stage of the Intel PCI (Peripheral Component Interconnect) local bus specification. It provides ASL code for power management and...

Bios Manual
Page 3
...z The content of this manual is subject to be slightly different from this manual. TZ68A+ UEFI BIOS Manual Supported CPUs This AMI UEFI BIOS supports the Intel CPU. The actual UEFI BIOS information and settings on board may be responsible for your reference only. Using Setup When starting up the...caused by wrong-settings. 2 Notice z The default UEFI BIOS settings apply for that may be changed without notice. In the UEFI BIOS setup utility, you can use these keys to enter the UEFI BIOS setup utility. The UEFI BIOS information described in this manual is for any mistakes found ...
...z The content of this manual is subject to be slightly different from this manual. TZ68A+ UEFI BIOS Manual Supported CPUs This AMI UEFI BIOS supports the Intel CPU. The actual UEFI BIOS information and settings on board may be responsible for your reference only. Using Setup When starting up the...caused by wrong-settings. 2 Notice z The default UEFI BIOS settings apply for that may be changed without notice. In the UEFI BIOS setup utility, you can use these keys to enter the UEFI BIOS setup utility. The UEFI BIOS information described in this manual is for any mistakes found ...

Bios Manual
Page 4
TZ68A+ UEFI BIOS Manual 1 Main Menu Once you set the date. BIOS Information Shows system information including UEFI BIOS version, model name, marketing name, built date, etc. Note that the 'Day' automatically changes when you enter AMI UEFI BIOS Setup Utility, the Main Menu will be excluded. Total Memory Shows system memory size, VGA shard memory will appear on the screen providing an overview of current user. 3 System Date Set the system date. Access Level Shows the access level of the basic system information. System Time Set the system internal clock.
TZ68A+ UEFI BIOS Manual 1 Main Menu Once you set the date. BIOS Information Shows system information including UEFI BIOS version, model name, marketing name, built date, etc. Note that the 'Day' automatically changes when you enter AMI UEFI BIOS Setup Utility, the Main Menu will be excluded. Total Memory Shows system memory size, VGA shard memory will appear on the screen providing an overview of current user. 3 System Date Set the system date. Access Level Shows the access level of the basic system information. System Time Set the system internal clock.

Bios Manual
Page 5
PCI Subsystem Settings 4 TZ68A+ UEFI BIOS Manual 2 Advanced Menu The Advanced Menu allows you to malfunction. Notice z Beware of that setting inappropriate values in items of this menu may cause system to configure the settings of CPU, Super I/O, Power Management, and other system devices.
PCI Subsystem Settings 4 TZ68A+ UEFI BIOS Manual 2 Advanced Menu The Advanced Menu allows you to malfunction. Notice z Beware of that setting inappropriate values in items of this menu may cause system to configure the settings of CPU, Super I/O, Power Management, and other system devices.

Bios Manual
Page 6
... PCI Express Device No Snoop option. Options: Disabled (Default) / Enabled ASPM Support This item sets the ASPM Level: Force LO - Auto - TZ68A+ UEFI BIOS Manual PCI ROM Priority In case of multiple option ROMs (Legacy and EFI Compatible), this item specifies what PCI Option ROM to launch Options: Legacy... ROM (Default) / EFI Compatible ROM PCI Latency Timer This item sets the value to LO State; BIOS auto configures; Options: 32 PCI Bus Clocks (Default) / 64 PCI Bus Clocks / 96 PCI Bus Clocks / 128 PCI Bus Clocks / 160 PCI Bus ...
... PCI Express Device No Snoop option. Options: Disabled (Default) / Enabled ASPM Support This item sets the ASPM Level: Force LO - Auto - TZ68A+ UEFI BIOS Manual PCI ROM Priority In case of multiple option ROMs (Legacy and EFI Compatible), this item specifies what PCI Option ROM to launch Options: Legacy... ROM (Default) / EFI Compatible ROM PCI Latency Timer This item sets the value to LO State; BIOS auto configures; Options: 32 PCI Bus Clocks (Default) / 64 PCI Bus Clocks / 96 PCI Bus Clocks / 128 PCI Bus Clocks / 160 PCI Bus ...

Bios Manual
Page 7
Options: Disabled (Default) / Enabled PME Wake up from S5 using PME event. Options: Disabled (Default) / Enabled 6 TZ68A+ UEFI BIOS Manual ACPI Settings/WakeUp Event control EuP Control When EuP is enabled, the system will enter when the SUSPEND button is pressed. Options: S1 (CPU ...
Options: Disabled (Default) / Enabled PME Wake up from S5 using PME event. Options: Disabled (Default) / Enabled 6 TZ68A+ UEFI BIOS Manual ACPI Settings/WakeUp Event control EuP Control When EuP is enabled, the system will enter when the SUSPEND button is pressed. Options: S1 (CPU ...

Bios Manual
Page 8
TZ68A+ UEFI BIOS Manual Wake system with Fixed Time This item enables or disables the system to wake on the hr::min::sec specified. Wake up hour / Wake ...
TZ68A+ UEFI BIOS Manual Wake system with Fixed Time This item enables or disables the system to wake on the hr::min::sec specified. Wake up hour / Wake ...

Bios Manual
Page 9
...: Disabled (Default) / Enabled CPU Configuration Active Processor Cores This item sets number of cores to find out the highest input value CPUID recognizes. TZ68A+ UEFI BIOS Manual USB Device Wakeup from S3/S4 function. Options: All (Default) / 1 / 2 / 3 Limit CPUID Maximum When the computer is booted up, the operating system executes the...
...: Disabled (Default) / Enabled CPU Configuration Active Processor Cores This item sets number of cores to find out the highest input value CPUID recognizes. TZ68A+ UEFI BIOS Manual USB Device Wakeup from S3/S4 function. Options: All (Default) / 1 / 2 / 3 Limit CPUID Maximum When the computer is booted up, the operating system executes the...

Bios Manual
Page 10
...) / C0 / C1 / C6 / C7 9 Options: Disabled (Default) / ACPI C-2 / ACPI C-3 CPU C6 Report This item enables/disables CPU C6 (ACPI C3) report to OS. TZ68A+ UEFI BIOS Manual Hardware Prefetcher The processor has a hardware prefetcher that automatically analyzes its requirements and prefetches data and instructions from the memory into several parts, thus...
...) / C0 / C1 / C6 / C7 9 Options: Disabled (Default) / ACPI C-2 / ACPI C-3 CPU C6 Report This item enables/disables CPU C6 (ACPI C3) report to OS. TZ68A+ UEFI BIOS Manual Hardware Prefetcher The processor has a hardware prefetcher that automatically analyzes its requirements and prefetches data and instructions from the memory into several parts, thus...


