
2 Year Limited Warranty
Page 1
... maintenance components such as described below. ET Saturday 10 a.m. - 8 p.m. is not covered. See information below , upon receipt of the product BISSELL will not exceed the purchase price of purchase by the original purchaser, for personal, and not commercial or rental service. Damage or malfunction caused by E -mail, telephone, or regular mail as lters, bags, belts, or brushes. This warranty...
... maintenance components such as described below. ET Saturday 10 a.m. - 8 p.m. is not covered. See information below , upon receipt of the product BISSELL will not exceed the purchase price of purchase by the original purchaser, for personal, and not commercial or rental service. Damage or malfunction caused by E -mail, telephone, or regular mail as lters, bags, belts, or brushes. This warranty...

User Guide
Page 2
... has been designed for a specific voltage. A charger that stated on the rating plate. grasp the plug and pull to disconnect from 8 years and above and persons with another charger. • Before use of any objects including dust, lint, clothing, fingers (and all parts of the body). • Particularly keep openings free of any accessory or attachment other than those recommended...
... has been designed for a specific voltage. A charger that stated on the rating plate. grasp the plug and pull to disconnect from 8 years and above and persons with another charger. • Before use of any objects including dust, lint, clothing, fingers (and all parts of the body). • Particularly keep openings free of any accessory or attachment other than those recommended...

User Guide
Page 3
... are loose threads. Battery safety: • This appliance includes Li-Ion batteries; If the liquid gets into the eyes, flush them immediately with relevant safety regulations. Before vacuuming flooring, rugs or carpets, check the flooring manufacturer's recommended cleaning instructions. • May damage delicate fabrics or upholstery. Service: • Before using the supplied plug in accordance with clean water for signs of floor surfaces without the...
... are loose threads. Battery safety: • This appliance includes Li-Ion batteries; If the liquid gets into the eyes, flush them immediately with relevant safety regulations. Before vacuuming flooring, rugs or carpets, check the flooring manufacturer's recommended cleaning instructions. • May damage delicate fabrics or upholstery. Service: • Before using the supplied plug in accordance with clean water for signs of floor surfaces without the...
User Guide
Page 4
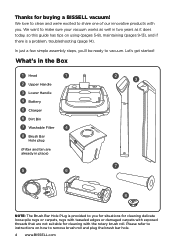
... damaged carpets with exposed threads that are already in two years as it does today, so this guide has tips on how to remove brush roll and plug the brush bar hole. 4 www.BISSELL.com Please refer to you . Let's get started! We love to clean and we're excited to vacuum. What's in the Box 1 Head 1 2 Upper Handle 3 Lower Handle 4 Battery 5 Charger 6 Dirt Bin 7 Washable Filter 4 8 Brush Bar Hole plug (Filter...
... damaged carpets with exposed threads that are already in two years as it does today, so this guide has tips on how to remove brush roll and plug the brush bar hole. 4 www.BISSELL.com Please refer to you . Let's get started! We love to clean and we're excited to vacuum. What's in the Box 1 Head 1 2 Upper Handle 3 Lower Handle 4 Battery 5 Charger 6 Dirt Bin 7 Washable Filter 4 8 Brush Bar Hole plug (Filter...
User Guide
Page 5
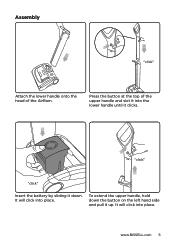
To extend the upper handle, hold down . It will click into place. "click" "click" Insert the battery by sliding it down the button on the left hand side and pull it clicks. www.BISSELL.com 5 It will click into place. Assembly "click" Attach the lower handle onto the head of the upper handle and slot it into the lower handle until it up. Press the button at the top of the AirRam.
To extend the upper handle, hold down . It will click into place. "click" "click" Insert the battery by sliding it down the button on the left hand side and pull it clicks. www.BISSELL.com 5 It will click into place. Assembly "click" Attach the lower handle onto the head of the upper handle and slot it into the lower handle until it up. Press the button at the top of the AirRam.
User Guide
Page 6
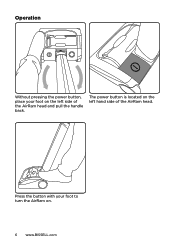
The power button is located on the left side of the AirRam head. Press the button with your foot on the left hand side of the AirRam head and pull the handle back. Operation Without pressing the power button, place your foot to turn the AirRam on. 6 www.BISSELL.com
The power button is located on the left side of the AirRam head. Press the button with your foot on the left hand side of the AirRam head and pull the handle back. Operation Without pressing the power button, place your foot to turn the AirRam on. 6 www.BISSELL.com

User Guide
Page 7
Storing Your AirRam To stow the upper handle, simply The handle will now be fully retracted press the button on the left hand side and the AirRam can be conveniently and push the handle down. www.BISSELL.com 7 stored.
Storing Your AirRam To stow the upper handle, simply The handle will now be fully retracted press the button on the left hand side and the AirRam can be conveniently and push the handle down. www.BISSELL.com 7 stored.

User Guide
Page 8
It is charged. To remove the battery, squeeze the latch underneath and pull upwards. 4 hours Plug the charger in and connect it is OK to charge for 1 hour for a burst of charge indicator starts to the battery. The battery can be charged from flat in the AirRam, or when it's off the product. The state of charge indicator will show 4 green lights when it to flash one green LED, recharge the battery. Battery Charging When the state of cleaning. 8 www.BISSELL.com The battery can be charged whilst it's in 4 hours.
It is charged. To remove the battery, squeeze the latch underneath and pull upwards. 4 hours Plug the charger in and connect it is OK to charge for 1 hour for a burst of charge indicator starts to the battery. The battery can be charged from flat in the AirRam, or when it's off the product. The state of charge indicator will show 4 green lights when it to flash one green LED, recharge the battery. Battery Charging When the state of cleaning. 8 www.BISSELL.com The battery can be charged whilst it's in 4 hours.

User Guide
Page 9
www.BISSELL.com 9 Hold the AirRam's dirt bin over a waste basket and push the green lever towards the bottom of the AirRam. Close the dirt bin lid and reinsert into the AirRam. Pull the green lever back towards the open the bin lid. NOTE: The green lever must be back in its original position to empty. Release the latch with one hand and pull the dirt bin handle and lift the dirt bin our of the dirt bin. Emptying the Dirt Bin Firmly hold the AirRam with the green arrow, to pull open lid to properly close the lid and insert into the AirRam.
www.BISSELL.com 9 Hold the AirRam's dirt bin over a waste basket and push the green lever towards the bottom of the AirRam. Close the dirt bin lid and reinsert into the AirRam. Pull the green lever back towards the open the bin lid. NOTE: The green lever must be back in its original position to empty. Release the latch with one hand and pull the dirt bin handle and lift the dirt bin our of the dirt bin. Emptying the Dirt Bin Firmly hold the AirRam with the green arrow, to pull open lid to properly close the lid and insert into the AirRam.
User Guide
Page 10
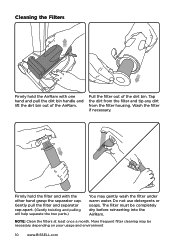
... apart. (Gently twisting and pulling will help separate the two parts.) You may be completely dry before reinserting into the AirRam. Firmly hold the AirRam with the other hand grasp the separator cap. Cleaning the Filters Firmly hold the filter and with one hand and pull the dirt bin handle and lift the dirt bin out of the dirt bin. More frequent filter cleaning may gently wash the filter...
... apart. (Gently twisting and pulling will help separate the two parts.) You may be completely dry before reinserting into the AirRam. Firmly hold the AirRam with the other hand grasp the separator cap. Cleaning the Filters Firmly hold the filter and with one hand and pull the dirt bin handle and lift the dirt bin out of the dirt bin. More frequent filter cleaning may gently wash the filter...
User Guide
Page 11
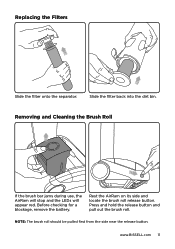
Replacing the Filters Slide the filter onto the separator. Press and hold the release button and pull out the brush roll. www.BISSELL.com 11 Before checking for a blockage, remove the battery. Rest the AirRam on its side and locate the brush roll release button. Removing and Cleaning the Brush Roll If the brush bar jams during use, the AirRam will stop and the LEDs will appear red. NOTE: The brush roll should be pulled first from the side near the release button. Slide the filter back into the dirt bin.
Replacing the Filters Slide the filter onto the separator. Press and hold the release button and pull out the brush roll. www.BISSELL.com 11 Before checking for a blockage, remove the battery. Rest the AirRam on its side and locate the brush roll release button. Removing and Cleaning the Brush Roll If the brush bar jams during use, the AirRam will stop and the LEDs will appear red. NOTE: The brush roll should be pulled first from the side near the release button. Slide the filter back into the dirt bin.
User Guide
Page 12
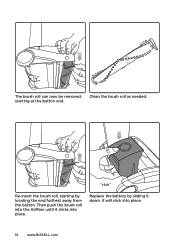
It will click into place. Clean the brush roll as needed. Replace the battery by locating the end furthest away from the button. The brush roll can now be removed, starting by sliding it clicks into place. 12 www.BISSELL.com "click" Re-insert the brush roll, starting at the button end. Then push the brush roll into the AirRam until it down.
It will click into place. Clean the brush roll as needed. Replace the battery by locating the end furthest away from the button. The brush roll can now be removed, starting by sliding it clicks into place. 12 www.BISSELL.com "click" Re-insert the brush roll, starting at the button end. Then push the brush roll into the AirRam until it down.

User Guide
Page 13
www.BISSELL.com 13 You will not re-start until the red LED lights go out. It should take approximately 10 seconds for the red lights to clean it. The AirRam will need to remove the battery first, and then remove the brush roll to turn off after the brush roll has been removed, cleaned, and the jam is cleared. Replacing the Filters 10 seconds If the brush roll jams during use, the AirRam will stop working and the LED's will appear red.
www.BISSELL.com 13 You will not re-start until the red LED lights go out. It should take approximately 10 seconds for the red lights to clean it. The AirRam will need to remove the battery first, and then remove the brush roll to turn off after the brush roll has been removed, cleaned, and the jam is cleared. Replacing the Filters 10 seconds If the brush roll jams during use, the AirRam will stop working and the LED's will appear red.

User Guide
Page 14
... the filter. Problem Air Ram stopped or won't work Possible causes Battery isn't fully charged Brush roll obstruction Dirt bin is full Dirt bin is not installed properly AirRam is not cleaning well Filters need cleaning Filters need much maintenance: keep the filters clean, keep the brush bar tangle-free and charge the battery. Trouble Shooting WARNING To reduce the risk of electric shock, turn power switch off and disconnect plug from the brush bar Empty dirt bin Position bin correctly and snap firmly into place Follow filter cleaning instructions...
... the filter. Problem Air Ram stopped or won't work Possible causes Battery isn't fully charged Brush roll obstruction Dirt bin is full Dirt bin is not installed properly AirRam is not cleaning well Filters need cleaning Filters need much maintenance: keep the filters clean, keep the brush bar tangle-free and charge the battery. Trouble Shooting WARNING To reduce the risk of electric shock, turn power switch off and disconnect plug from the brush bar Empty dirt bin Position bin correctly and snap firmly into place Follow filter cleaning instructions...

User Guide
Page 15
..., or regular mail as filters, belts, or brushes. For any other rights which may also have questions about repairs or replacement parts, or if you . BISSELL IS NOT LIABLE FOR INCIDENTAL OR CONSEQUENTIAL DAMAGES OF ANY NATURE ASSOCIATED WITH THE USE OF THIS PRODUCT. ANY IMPLIED WARRANTIES WHICH MAY ARISE BY OPERATION OF LAW, INCLUDING THE IMPLIED WARRANTIES OF MERCHANTABILITY AND FITNESS...
..., or regular mail as filters, belts, or brushes. For any other rights which may also have questions about repairs or replacement parts, or if you . BISSELL IS NOT LIABLE FOR INCIDENTAL OR CONSEQUENTIAL DAMAGES OF ANY NATURE ASSOCIATED WITH THE USE OF THIS PRODUCT. ANY IMPLIED WARRANTIES WHICH MAY ARISE BY OPERATION OF LAW, INCLUDING THE IMPLIED WARRANTIES OF MERCHANTABILITY AND FITNESS...

User Guide
Page 16
... you need to www.BISSELL.com and enter your model number in China Part Number 160-9789 04/16 Visit our website at: www.BISSELL.com Rate this product and let us (and millions of your product. Faster Service Supplying your product today! Visit the BISSELL website: www.BISSELL.com When contacting BISSELL, have model number of a warranty claim. See Warranty on page 15 for discounts and free shipping...
... you need to www.BISSELL.com and enter your model number in China Part Number 160-9789 04/16 Visit our website at: www.BISSELL.com Rate this product and let us (and millions of your product. Faster Service Supplying your product today! Visit the BISSELL website: www.BISSELL.com When contacting BISSELL, have model number of a warranty claim. See Warranty on page 15 for discounts and free shipping...


