
User Manual
Page 3
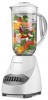
...keep one hand on countertop or work surface. 2. Blending jar: BL2010WG: Glass, 42 oz. / 5 cups (Part # Bl2010WG-03) BL2010WP: Plastic, 48 oz. / 6 cups (Part # Bl2010WP-03) † 5. Jar base (Part # Bl2010WG-08) 8. Place jar base onto jar and rotate clockwise until it is illustrated. &#... storage area under the base. Lid cap (Part # Bl2010WG-01) † 2. Lid (Part # Bl2010WG-02) 3. Gasket (Part # Bl2010WG-05) † 6. Plug power cord into bottom opening of blade assembly. Handle † 4. dry thoroughly. Turn assembled jar right side up. 5. Blender is ...
...keep one hand on countertop or work surface. 2. Blending jar: BL2010WG: Glass, 42 oz. / 5 cups (Part # Bl2010WG-03) BL2010WP: Plastic, 48 oz. / 6 cups (Part # Bl2010WP-03) † 5. Jar base (Part # Bl2010WG-08) 8. Place jar base onto jar and rotate clockwise until it is illustrated. &#... storage area under the base. Lid cap (Part # Bl2010WG-01) † 2. Lid (Part # Bl2010WG-02) 3. Gasket (Part # Bl2010WG-05) † 6. Plug power cord into bottom opening of blade assembly. Handle † 4. dry thoroughly. Turn assembled jar right side up. 5. Blender is ...