
User Manual
Page 3
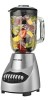
... the pulse (P) button for use. Product may vary slightly from what is off (0). 2. Lid (Part # BL2010WG-02) † 3. 5-cup (42 oz.) glass blending jar (Part # BL2010WG-03) 4. dry thoroughly. Note: When in place. 4. Measuring cup lid insert (Part # BL2010WG-01) † 2. Blade assembly (Part # ... blending process. make sure measuring cup lid insert is press firmly into bottom opening of the base (C). 8. Plug power cord into jar, liquid first. 3. When using hard foods, such as smoothies, power drinks and milkshakes press the pulse (P) button several times to...
... the pulse (P) button for use. Product may vary slightly from what is off (0). 2. Lid (Part # BL2010WG-02) † 3. 5-cup (42 oz.) glass blending jar (Part # BL2010WG-03) 4. dry thoroughly. Note: When in place. 4. Measuring cup lid insert (Part # BL2010WG-01) † 2. Blade assembly (Part # ... blending process. make sure measuring cup lid insert is press firmly into bottom opening of the base (C). 8. Plug power cord into jar, liquid first. 3. When using hard foods, such as smoothies, power drinks and milkshakes press the pulse (P) button several times to...
User Manual
Page 5
... Damage from misuse, abuse or neglect • Products that is a registered trademark of The Black & Decker Corporation, Towson, Maryland, USA Made in People's Republic of product. What does your receipt as...or any way • Products used or serviced outside the country of purchase • Glass parts and other rights that vary from the date of original purchase with the replacement ..., handle carefully. 5. NEED HELP? Before cleaning, turn off power base. 3. Lift blending jar by turning counterclockwise until loose. 4. Wash removable parts by rubbing with damp cloth and dry...
... Damage from misuse, abuse or neglect • Products that is a registered trademark of The Black & Decker Corporation, Towson, Maryland, USA Made in People's Republic of product. What does your receipt as...or any way • Products used or serviced outside the country of purchase • Glass parts and other rights that vary from the date of original purchase with the replacement ..., handle carefully. 5. NEED HELP? Before cleaning, turn off power base. 3. Lift blending jar by turning counterclockwise until loose. 4. Wash removable parts by rubbing with damp cloth and dry...

