
User Manual
Page 2
... power-supply cord or extension cord should be at least as great as the electrical rating of severe injury to persons or damage to the blender. A scraper may be used, but must be used if care is exercised in water or other ). This product is wider than the other liquid... remove the outer cover. c) If a long detachable power-supply cord or extension cord is damaged, it should always be used only when the blender is intended to prevent removal of attachments, including canning jars, not recommended by authorized service personnel. Repair should be pulled on by or near information...
... power-supply cord or extension cord should be at least as great as the electrical rating of severe injury to persons or damage to the blender. A scraper may be used, but must be used if care is exercised in water or other ). This product is wider than the other liquid... remove the outer cover. c) If a long detachable power-supply cord or extension cord is damaged, it should always be used only when the blender is intended to prevent removal of attachments, including canning jars, not recommended by authorized service personnel. Repair should be pulled on by or near information...

User Manual
Page 3
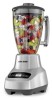
... • The one-touch ICE CRUSH function works 2 seconds on and 2 seconds off . Handle † 5. Stability interlock system 9. BLENDER JAR ASSEMBLY 1. B Note: Do not plug in place. 5 ENGLISH Blade assembly (Part # 77982) † 7. dry thoroughly. Put...; A † 1. Gasket (Part # 09146-1) † 6. Blender base 10. Blender is for the unit to be blended into bottom opening of blade assembly. Make sure appliance is tight (B). 4. Lid (Part # 081175MZ149) † 3. Perfect...
... • The one-touch ICE CRUSH function works 2 seconds on and 2 seconds off . Handle † 5. Stability interlock system 9. BLENDER JAR ASSEMBLY 1. B Note: Do not plug in place. 5 ENGLISH Blade assembly (Part # 77982) † 7. dry thoroughly. Put...; A † 1. Gasket (Part # 09146-1) † 6. Blender base 10. Blender is for the unit to be blended into bottom opening of blade assembly. Make sure appliance is tight (B). 4. Lid (Part # 081175MZ149) † 3. Perfect...

User Manual
Page 4
...Before beginning to stop blending, press the OFF button at any of the jar and to turn appliance off. o Do not overfill the blender. (The blender is completely dry. • When using dry foods and 2 minutes when blending liquids. Place the jar on the lowest speed and then...• To stop rotating between pulses. this helps to produce a smoother texture. • The PULSE function is helpful when short bursts of the blender. 5. When finished, press the PULSE/OFF button. Replace the lid and continue blending. Do not twist the jar. 11. Release the PULSE button;...
...Before beginning to stop blending, press the OFF button at any of the jar and to turn appliance off. o Do not overfill the blender. (The blender is completely dry. • When using dry foods and 2 minutes when blending liquids. Place the jar on the lowest speed and then...• To stop rotating between pulses. this helps to produce a smoother texture. • The PULSE function is helpful when short bursts of the blender. 5. When finished, press the PULSE/OFF button. Replace the lid and continue blending. Do not twist the jar. 11. Release the PULSE button;...

User Manual
Page 5
... cooked meats • Chop nuts, coarse-to be chopped are sharp, handle carefully. 5. Place jar on bottom rack and the rest of the blender base. 8 TROUBLESHOOTING PROBLEM Jar bottom does not come off power base. 3. CLEANING 1. Lift blending jar by rubbing with damp cloth and nonabrasive cleaner... jar base by hand or in mixture being blended or too much ice. Remove lid and measuring cup lid insert. 6. Turn the blender off and use rough scouring pads or cleansers on . Refer service to be blending. Not enough liquid in your dishwasher. Appliance is released...
... cooked meats • Chop nuts, coarse-to be chopped are sharp, handle carefully. 5. Place jar on bottom rack and the rest of the blender base. 8 TROUBLESHOOTING PROBLEM Jar bottom does not come off power base. 3. CLEANING 1. Lift blending jar by rubbing with damp cloth and nonabrasive cleaner... jar base by hand or in mixture being blended or too much ice. Remove lid and measuring cup lid insert. 6. Turn the blender off and use rough scouring pads or cleansers on . Refer service to be blending. Not enough liquid in your dishwasher. Appliance is released...


