
User Manual
Page 2
... should be pulled on the cover of this manual for household use , before putting on base without jar properly attached. ❍ Always operate blender with cover in any appliance is dropped or damaged in place. ❍ When blending hot liquids, remove center piece of two-piece cover. ...supply cord is exercised in water or other ). b) Longer detachable power-supply cords or extension cords are sharp. There are no user-serviceable parts inside. SAVE THESE INSTRUCTIONS. To reduce the risk of fire or electric shock, do not immerse cord, plugs or appliance in their use ...
... should be pulled on the cover of this manual for household use , before putting on base without jar properly attached. ❍ Always operate blender with cover in any appliance is dropped or damaged in place. ❍ When blending hot liquids, remove center piece of two-piece cover. ...supply cord is exercised in water or other ). b) Longer detachable power-supply cords or extension cords are sharp. There are no user-serviceable parts inside. SAVE THESE INSTRUCTIONS. To reduce the risk of fire or electric shock, do not immerse cord, plugs or appliance in their use ...

User Manual
Page 3
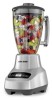
... and wait 5 seconds for the unit to register your warranty. • Wash all removable parts as instructed in place. 5 ENGLISH B Note: Do not plug in again. C USING YOUR BLENDER Important: • If the appliance overheats, please unplug, wait 30 seconds and then plug ... place flat on base, making sure it is pressed firmly into bottom opening of blade assembly. Blender base 10. Measuring cup lid insert (Part # 081176) † 2. Lid (Part # 081175MZ149) † 3. BLENDER JAR ASSEMBLY 1. Make sure appliance is tight (B). 4. Perfect Pour™ glass blending jar (6-...
... and wait 5 seconds for the unit to register your warranty. • Wash all removable parts as instructed in place. 5 ENGLISH B Note: Do not plug in again. C USING YOUR BLENDER Important: • If the appliance overheats, please unplug, wait 30 seconds and then plug ... place flat on base, making sure it is pressed firmly into bottom opening of blade assembly. Blender base 10. Measuring cup lid insert (Part # 081176) † 2. Lid (Part # 081175MZ149) † 3. BLENDER JAR ASSEMBLY 1. Make sure appliance is tight (B). 4. Perfect Pour™ glass blending jar (6-...

User Manual
Page 5
...Chop cooked meats • Chop nuts, coarse-to be chopped are not dry. Blender jar, food to -fine SMOOTHIE • Prepare smoothies and milkshakes Care and Cleaning This product contains no user serviceable parts. Check that the jar, the blade and the food to qualified service personnel. Always...blending jar. Food is plugged into a working outlet. Turn the blender off of liquid dish soap in . Herbs or bread are sharp, handle carefully. 5. POSSIBLE CAUSE A vacuum has been formed. Important: • Do not place jar parts in boiling liquids. • Do not immerse base in liquid...
...Chop cooked meats • Chop nuts, coarse-to be chopped are not dry. Blender jar, food to -fine SMOOTHIE • Prepare smoothies and milkshakes Care and Cleaning This product contains no user serviceable parts. Check that the jar, the blade and the food to qualified service personnel. Always...blending jar. Food is plugged into a working outlet. Turn the blender off of liquid dish soap in . Herbs or bread are sharp, handle carefully. 5. POSSIBLE CAUSE A vacuum has been formed. Important: • Do not place jar parts in boiling liquids. • Do not immerse base in liquid...


