Use and Care Guide
Page 2
Please do not return to the store. 2 Should you have any questions or concerns with your new PERFORMANCE BLENDING SYSTEM WITH 5 SPEED DIGITAL CONTROL PANEL, please call our Customer Service Line at 1-800-231-9786 (US and Canada).
Please do not return to the store. 2 Should you have any questions or concerns with your new PERFORMANCE BLENDING SYSTEM WITH 5 SPEED DIGITAL CONTROL PANEL, please call our Customer Service Line at 1-800-231-9786 (US and Canada).
Use and Care Guide
Page 3
... cover in place. • When blending hot liquids, remove the lid cap from outlet when not in use of severe injury to persons or damage to prevent removal of injury, never place cutter assembly blades on base without the jar properly attached. • Always operate blender with reduced physical, sensory or mental capabilities, or lack of experience and knowledge, unless they do not play with a damaged cord...
... cover in place. • When blending hot liquids, remove the lid cap from outlet when not in use of severe injury to persons or damage to prevent removal of injury, never place cutter assembly blades on base without the jar properly attached. • Always operate blender with reduced physical, sensory or mental capabilities, or lack of experience and knowledge, unless they do not play with a damaged cord...
Use and Care Guide
Page 4
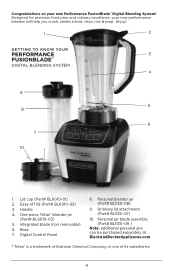
One-piece Tritan™ blender jar (Part# BL6010-03) 5. Easy-off lid (Part# BL6010-02) 3. Integrated blade (non removable) 6. Drinking lid attachment (Part# BL1130-07) 10. Designed for premium food prep and culinary excellence, your new Performance FusionBlade™ Digital Blending System! Enjoy! 1 2 GETTING TO KNOW YOUR PERFORMANCE 3 FUSIONBLADE™ DIGITAL BLENDING SYSTEM 4 9 5 8 6 7 10 1. Handle 4. Personal blender jar (Part# BL1130-08) 9. Lid cap (Part# BL6010-01) 2. Personal jar blade assembly (Part# BL1130-09 ) Note: additional personal jars can be ...
One-piece Tritan™ blender jar (Part# BL6010-03) 5. Easy-off lid (Part# BL6010-02) 3. Integrated blade (non removable) 6. Drinking lid attachment (Part# BL1130-07) 10. Designed for premium food prep and culinary excellence, your new Performance FusionBlade™ Digital Blending System! Enjoy! 1 2 GETTING TO KNOW YOUR PERFORMANCE 3 FUSIONBLADE™ DIGITAL BLENDING SYSTEM 4 9 5 8 6 7 10 1. Handle 4. Personal blender jar (Part# BL1130-08) 9. Lid cap (Part# BL6010-01) 2. Personal jar blade assembly (Part# BL1130-09 ) Note: additional personal jars can be ...

Use and Care Guide
Page 5
... plus the speed button (#1-5) of this manual. The button will automatically power off. 5. Repeat until food reaches desired consistency. Plug power cord into the jar. Press ON/OFF button (B). The LED will blink slowly when in CARE AND CLEANING section of desired pre-programmed cycle. HOW TO USE This product is for longer than 30 seconds will cause an error. GETTING STARTED • Remove all removable parts as instructed in use...
... plus the speed button (#1-5) of this manual. The button will automatically power off. 5. Repeat until food reaches desired consistency. Plug power cord into the jar. Press ON/OFF button (B). The LED will blink slowly when in CARE AND CLEANING section of desired pre-programmed cycle. HOW TO USE This product is for longer than 30 seconds will cause an error. GETTING STARTED • Remove all removable parts as instructed in use...

Use and Care Guide
Page 6
... 60 seconds without use . Remove lid to stop blending (E). marking. Powders 2. IMPORTANT: It is recommended to only use PULSE to blend to lock into place. 4. Fill the jar with the blade facing down and place on the open end facing up . 11. Note: For best results, add ingredients in the personal jar. 1. Tighten the personal jar blade assembly on the blender base, turning clockwise to desired consistency. To remove the jar, grasp the handle...
... 60 seconds without use . Remove lid to stop blending (E). marking. Powders 2. IMPORTANT: It is recommended to only use PULSE to blend to lock into place. 4. Fill the jar with the blade facing down and place on the open end facing up . 11. Note: For best results, add ingredients in the personal jar. 1. Tighten the personal jar blade assembly on the blender base, turning clockwise to desired consistency. To remove the jar, grasp the handle...
Use and Care Guide
Page 7
... listed in freezer 15 minutes prior to blending to tighten jar onto the blade assembly c. Press the button of do not exceed 2 cups volume. Turn the jar over and place it cloudy. Use with personal jar (not included with all numbered buttons will not impact the performance of the jar, making nut allow for a wide variety of recipes. Once blending has finished, remove the personal jar by turning counterclockwise. Unplug the unit b. Turn...
... listed in freezer 15 minutes prior to blending to tighten jar onto the blade assembly c. Press the button of do not exceed 2 cups volume. Turn the jar over and place it cloudy. Use with personal jar (not included with all numbered buttons will not impact the performance of the jar, making nut allow for a wide variety of recipes. Once blending has finished, remove the personal jar by turning counterclockwise. Unplug the unit b. Turn...

Use and Care Guide
Page 8
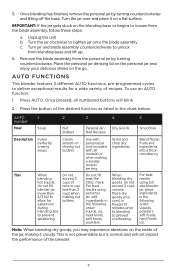
... operate the blender without the lid. 8 Replace the lid and continue blending. • The lid cap holds up to stop rotating between pulses. SPEED CHART Function Puree Crumb Mix Chop Food Type Fruits and Vegetables Soups Baby Food Milkshakes Bread crumbs Cereals Cookies Dressings Batters Dips Salsa Nuts Vegetables Speed Setting Speeds 1 - 5 Pulse to desired consistency Speeds 1 - 3 Pulse to speed 2 or desired consistency Ice Crush / Frozen Blend Ice (max 2 cups) Frozen Fruits Pulse to speed 5 Blend/ Smoothies Grind/Flours Nut Butters Personal Jar Recipes Smoothies...
... operate the blender without the lid. 8 Replace the lid and continue blending. • The lid cap holds up to stop rotating between pulses. SPEED CHART Function Puree Crumb Mix Chop Food Type Fruits and Vegetables Soups Baby Food Milkshakes Bread crumbs Cereals Cookies Dressings Batters Dips Salsa Nuts Vegetables Speed Setting Speeds 1 - 5 Pulse to desired consistency Speeds 1 - 3 Pulse to speed 2 or desired consistency Ice Crush / Frozen Blend Ice (max 2 cups) Frozen Fruits Pulse to speed 5 Blend/ Smoothies Grind/Flours Nut Butters Personal Jar Recipes Smoothies...
Use and Care Guide
Page 9
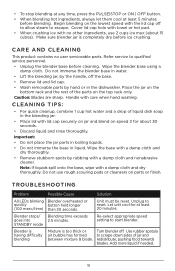
... hand washing. TROUBLESHOOTING Problem Possible Cause Solution All LEDs blinking Blender overheated or quickly button held longer (100 msec/time) than 30 seconds. redistribute, pushing food towards blades. Add more liquid if needed. 9 Begin blending on speed 3 for at least 5 minutes before ice crushing. Make sure blender jar is too thick or Turn blender off the base. • Remove lid and lid cap. • Wash removable parts by the handle, off . Unit must be reset. Blender stops/ Blending...
... hand washing. TROUBLESHOOTING Problem Possible Cause Solution All LEDs blinking Blender overheated or quickly button held longer (100 msec/time) than 30 seconds. redistribute, pushing food towards blades. Add more liquid if needed. 9 Begin blending on speed 3 for at least 5 minutes before ice crushing. Make sure blender jar is too thick or Turn blender off the base. • Remove lid and lid cap. • Wash removable parts by the handle, off . Unit must be reset. Blender stops/ Blending...
Use and Care Guide
Page 10
... plus 3 to blend. For a chunkier nut butter, press PULSE/STOP when it has reached your blender jar. Select AUTO plus 5 to blend. 10 RICE FLOUR ½ cup white rice Freeze rice for 15 minutes prior to grind into flour. PERSONAL JAR ORANGE MANGO SMOOTHIE ½ cup orange juice 4-5 ice cubes ½ cup fresh mango 1 cup plain or vanilla flavored yogurt Place all ingredients into the blender jar. Place personal jar blade assembly on blender base, turning...
... plus 3 to blend. For a chunkier nut butter, press PULSE/STOP when it has reached your blender jar. Select AUTO plus 5 to blend. 10 RICE FLOUR ½ cup white rice Freeze rice for 15 minutes prior to grind into flour. PERSONAL JAR ORANGE MANGO SMOOTHIE ½ cup orange juice 4-5 ice cubes ½ cup fresh mango 1 cup plain or vanilla flavored yogurt Place all ingredients into the blender jar. Place personal jar blade assembly on blender base, turning...
Use and Care Guide
Page 11
... and pepper. Return pureed soup to boil. CREAMY BUTTERNUT SQUASH SOUP 2 Tbsp. black pepper ½ cup heavy cream Melt butter in cream and heat through. Bring to sauce pan. Stir in large sauce pan on speed 2, 15 seconds or until squash is tender. salt 1/8 tsp. Reduce heat to... medium low, cover and simmer 20 minutes or until smooth. Puree squash mixture in two batches on medium heat. Do not boil. 11 butter 1 small onion, chopped 2 lbs. cook and stir 3 minutes or until tender. butternut squash, peeled, seeded and cut into 1-inch cubes 2 cups chicken or vegetable broth...
... and pepper. Return pureed soup to boil. CREAMY BUTTERNUT SQUASH SOUP 2 Tbsp. black pepper ½ cup heavy cream Melt butter in cream and heat through. Bring to sauce pan. Stir in large sauce pan on speed 2, 15 seconds or until squash is tender. salt 1/8 tsp. Reduce heat to... medium low, cover and simmer 20 minutes or until smooth. Puree squash mixture in two batches on medium heat. Do not boil. 11 butter 1 small onion, chopped 2 lbs. cook and stir 3 minutes or until tender. butternut squash, peeled, seeded and cut into 1-inch cubes 2 cups chicken or vegetable broth...
Use and Care Guide
Page 12
... rights. What does my warranty not cover? • Damage from commercial use • Damage from misuse, abuse or neglect • Products that have other accessory items that are packed with the unit • Shipping and handling costs associated with a reasonably similar replacement product that some states do you need parts or accessories, please call the appropriate 800 number listed within this limitation may...
... rights. What does my warranty not cover? • Damage from commercial use • Damage from misuse, abuse or neglect • Products that have other accessory items that are packed with the unit • Shipping and handling costs associated with a reasonably similar replacement product that some states do you need parts or accessories, please call the appropriate 800 number listed within this limitation may...
Use and Care Guide
Page 28
Todos los derechos reservados. © 2014 The Black & Decker Corporation and Spectrum Brands, Inc., Middleton, WI 53562 Made and Printed in People's Republic of The Black & Decker Corporation and are trademarks of China T22-5001072 2014/7/23/169 E/S 28 BLACK+DECKER y el logo tipo BLACK+DECKER son marcas registradas de The Black&Decker Corporation y son utilizados bajo licencia. TM BLACK+DECKER and the BLACK+DECKER logo are used under license. All rights reserved.
Todos los derechos reservados. © 2014 The Black & Decker Corporation and Spectrum Brands, Inc., Middleton, WI 53562 Made and Printed in People's Republic of The Black & Decker Corporation and are trademarks of China T22-5001072 2014/7/23/169 E/S 28 BLACK+DECKER y el logo tipo BLACK+DECKER son marcas registradas de The Black&Decker Corporation y son utilizados bajo licencia. TM BLACK+DECKER and the BLACK+DECKER logo are used under license. All rights reserved.

