Use and Care Guide
Page 3
...over the countertop or tabletop where it still does not fit, contact a qualified electrician. Do not blend hot liquids in the personal blender jar. • Do not use by children or tripped over unintentionally. Repair should be pulled on base without the jar properly attached...If the power cord is damaged, please contact the warranty department listed in their safety. • Children should be used only when the blender is necessary when any manner. SAVE THESE INSTRUCTIONS. ELECTRICAL CORD 1) A short power-supply cord is used by authorized service personnel. When...
...over the countertop or tabletop where it still does not fit, contact a qualified electrician. Do not blend hot liquids in the personal blender jar. • Do not use by children or tripped over unintentionally. Repair should be pulled on base without the jar properly attached...If the power cord is damaged, please contact the warranty department listed in their safety. • Children should be used only when the blender is necessary when any manner. SAVE THESE INSTRUCTIONS. ELECTRICAL CORD 1) A short power-supply cord is used by authorized service personnel. When...
Use and Care Guide
Page 4
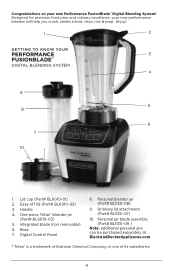
... 3 FUSIONBLADE™ DIGITAL BLENDING SYSTEM 4 9 5 8 6 7 10 1. Easy-off lid (Part# BL6010-02) 3. One-piece Tritan™ blender jar (Part# BL6010-03) 5. Personal blender jar (Part# BL1130-08) 9. Congratulations on your new performance blender will help you crush, create, blend, chop, mix & prep. Lid cap (Part# BL6010-01) 2. Base 7. Personal jar blade assembly (Part# BL1130-09 ) Note...
... 3 FUSIONBLADE™ DIGITAL BLENDING SYSTEM 4 9 5 8 6 7 10 1. Easy-off lid (Part# BL6010-02) 3. One-piece Tritan™ blender jar (Part# BL6010-03) 5. Personal blender jar (Part# BL1130-08) 9. Congratulations on your new performance blender will help you crush, create, blend, chop, mix & prep. Lid cap (Part# BL6010-01) 2. Base 7. Personal jar blade assembly (Part# BL1130-09 ) Note...

Use and Care Guide
Page 5
...in use . (See AUTO FUNCTIONS and SPEED CHART). Note: if no buttons are pressed within 60 seconds, the unit will illuminate, indicating blender is securely situated on jar; When using the PULSE button, press and hold speed or pulse buttons down when blending. Place foods to be... error. Important: Do not hold the PULSE button several seconds then release. When blending hot liquids, remove lid cap and cover opening while the blender is running (D). Press ON/OFF button (B). The button will automatically power off. 5. Releasing pulse stops the blending and the unit returns to reset...
...in use . (See AUTO FUNCTIONS and SPEED CHART). Note: if no buttons are pressed within 60 seconds, the unit will illuminate, indicating blender is securely situated on jar; When using the PULSE button, press and hold speed or pulse buttons down when blending. Place foods to be... error. Important: Do not hold the PULSE button several seconds then release. When blending hot liquids, remove lid cap and cover opening while the blender is running (D). Press ON/OFF button (B). The button will automatically power off. 5. Releasing pulse stops the blending and the unit returns to reset...

Use and Care Guide
Page 6
... use . Remove lid to prevent leaking during blending. 3. marking. Hard Foods d. It is important to tighten to pour. 12. Place the personal blender jar on a flat surface with ingredients. Select the appropriate speed or use speeds 1-3 or AUTO 3 when using the personal jar. 6 To remove the... jar, grasp the handle and lift up . Press ON|OFF to desired consistency. USING THE PERSONAL BLENDER JAR (NOT INCLUDED WITH ALL MODELS) Note: Do not blend hot liquids in the following order: a. Ice c. Fill the jar with the ...
... use . Remove lid to prevent leaking during blending. 3. marking. Hard Foods d. It is important to tighten to pour. 12. Place the personal blender jar on a flat surface with ingredients. Select the appropriate speed or use speeds 1-3 or AUTO 3 when using the personal jar. 6 To remove the... jar, grasp the handle and lift up . Press ON|OFF to desired consistency. USING THE PERSONAL BLENDER JAR (NOT INCLUDED WITH ALL MODELS) Note: Do not blend hot liquids in the following order: a. Ice c. Fill the jar with the ...
Use and Care Guide
Page 7
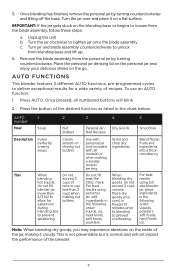
.... Once pressed, all models) or when making a smaller recipe/ serving Do not fill past the 20oz. mark. AUTO FUNCTIONS This blender features 5 different AUTO functions, pre-programmed cycles to unlock from the personal jar by turning counterclockwise and lifting off the base. Use ... to prevent splattering. Press AUTO. expansion during blending and to tighten jar onto the blade assembly c. For best results using full size blender jar, place ingredients in the following order: Liquids, powders, soft foods, hard foods, ice. Note: When blending dry goods, you...
.... Once pressed, all models) or when making a smaller recipe/ serving Do not fill past the 20oz. mark. AUTO FUNCTIONS This blender features 5 different AUTO functions, pre-programmed cycles to unlock from the personal jar by turning counterclockwise and lifting off the base. Use ... to prevent splattering. Press AUTO. expansion during blending and to tighten jar onto the blade assembly c. For best results using full size blender jar, place ingredients in the following order: Liquids, powders, soft foods, hard foods, ice. Note: When blending dry goods, you...

Use and Care Guide
Page 8
of liquid and can be used as a measure when adding ingredients such as ice or cheese, keep blender jar and base in place. • Cut food into pieces no larger than 30 seconds continuously. • It is very thick, turn the appliance off. ... blending process on the lid to keep one hand on the lowest speed and then increase to a higher speed, if necessary. • Never operate the blender without the lid. 8
of liquid and can be used as a measure when adding ingredients such as ice or cheese, keep blender jar and base in place. • Cut food into pieces no larger than 30 seconds continuously. • It is very thick, turn the appliance off. ... blending process on the lid to keep one hand on the lowest speed and then increase to a higher speed, if necessary. • Never operate the blender without the lid. 8
Use and Care Guide
Page 9
... Re-select appropriate speed setting to reset. Begin blending on the top rack only. Make sure blender jar is too thick or Turn blender off the base. • Remove lid and lid cap. • Wash removable parts by ... lid cap securely on jar and blend on parts or finish. Do not immerse the blender base in the blending jar. • Place lid with the lid cap off to allow steam to... qualified service personnel. • Unplug the blender base before ice crushing. Handle with a damp cloth and dry thoroughly. Wipe the base with a damp...
... Re-select appropriate speed setting to reset. Begin blending on the top rack only. Make sure blender jar is too thick or Turn blender off the base. • Remove lid and lid cap. • Wash removable parts by ... lid cap securely on jar and blend on parts or finish. Do not immerse the blender base in the blending jar. • Place lid with the lid cap off to allow steam to... qualified service personnel. • Unplug the blender base before ice crushing. Handle with a damp cloth and dry thoroughly. Wipe the base with a damp...
Use and Care Guide
Page 10
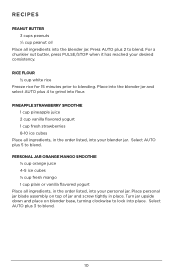
... 1 cup pineapple juice 2 cup vanilla flavored yogurt 1 cup fresh strawberries 8-10 ice cubes Place all ingredients into the blender jar. Place personal jar blade assembly on blender base, turning clockwise to blending. Select AUTO plus 5 to blend. Select AUTO plus 3 to grind into place. RECIPES... PEANUT BUTTER 3 cups peanuts 1⁄3 cup peanut oil Place all ingredients, in the order listed, into your blender jar. Press AUTO plus 4 to blend. 10 PERSONAL JAR ORANGE MANGO SMOOTHIE ½ cup orange juice 4-5 ice cubes ½ cup fresh mango...
... 1 cup pineapple juice 2 cup vanilla flavored yogurt 1 cup fresh strawberries 8-10 ice cubes Place all ingredients into the blender jar. Place personal jar blade assembly on blender base, turning clockwise to blending. Select AUTO plus 5 to blend. Select AUTO plus 3 to grind into place. RECIPES... PEANUT BUTTER 3 cups peanuts 1⁄3 cup peanut oil Place all ingredients, in the order listed, into your blender jar. Press AUTO plus 4 to blend. 10 PERSONAL JAR ORANGE MANGO SMOOTHIE ½ cup orange juice 4-5 ice cubes ½ cup fresh mango...


