

Instruction Manual
Page 1
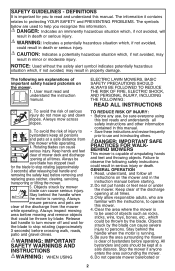
... have access to starting and during operation. Please read before returning this manual for any reason. 40v Max* Lithium Cordless Mower INSTRUCTION MANUAL Catalog Number CM2040 Thank you call 1-800-544-6986 from 8 a.m. To register your mower after each use (a deck with your Black+Decker purchase, go to http://www.blackanddecker.com/instantanswers If you should know: • Do not operate mower unless handle is clear...
... have access to starting and during operation. Please read before returning this manual for any reason. 40v Max* Lithium Cordless Mower INSTRUCTION MANUAL Catalog Number CM2040 Thank you call 1-800-544-6986 from 8 a.m. To register your mower after each use (a deck with your Black+Decker purchase, go to http://www.blackanddecker.com/instantanswers If you should know: • Do not operate mower unless handle is clear...
Instruction Manual
Page 2
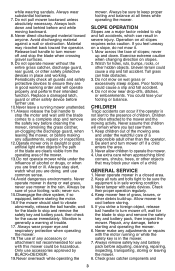
...: Important Safety Warnings and Instructions WARNING: When using this manual. GENERAL OPERATION 1. Read, understand, and follow all times. 3. Keep clear of mower deck and discharge opening at a safe distance from the mower while operating. Stay behind the handle when the motor is capable of the discharge from the mower while operating. 4. To avoid the risk of bystanders before crossing walk, roads, patio and gravel drives. Only allow...
...: Important Safety Warnings and Instructions WARNING: When using this manual. GENERAL OPERATION 1. Read, understand, and follow all times. 3. Keep clear of mower deck and discharge opening at a safe distance from the mower while operating. Stay behind the handle when the motor is capable of the discharge from the mower while operating. 4. To avoid the risk of bystanders before crossing walk, roads, patio and gravel drives. Only allow...
Instruction Manual
Page 3
... mower to turn mower off , wait for the cause immediately. Always stay alert, watch what you are doing, and use accessories approved by Black+Decker. 19.Never overreach while operating the mower. walk; Uneven terrain could lose your footing; Do not operate mower without the entire grass catcher, discharge guard, rear guard, or other objects that children will operate properly and perform their proper operation regularly. 4. Always be hazardous. Do not mow...
... mower to turn mower off , wait for the cause immediately. Always stay alert, watch what you are doing, and use accessories approved by Black+Decker. 19.Never overreach while operating the mower. walk; Uneven terrain could lose your footing; Do not operate mower without the entire grass catcher, discharge guard, rear guard, or other objects that children will operate properly and perform their proper operation regularly. 4. Always be hazardous. Do not mow...
Instruction Manual
Page 4
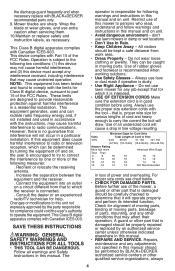
...; Dress Properly - If this manual should be performed by Black+Decker authorized service centers or other qualified service organizations, always 4 Always use face or dust mask if operation is responsible for alignment of moving parts, binding of moving parts. For proper size cords see chart below. • CHECK FOR DAMAGED PARTS. A guard or other part that may affect their operation. Repairs, maintenance and any interference received, including...
...; Dress Properly - If this manual should be performed by Black+Decker authorized service centers or other qualified service organizations, always 4 Always use face or dust mask if operation is responsible for alignment of moving parts, binding of moving parts. For proper size cords see chart below. • CHECK FOR DAMAGED PARTS. A guard or other part that may affect their operation. Repairs, maintenance and any interference received, including...
Instruction Manual
Page 5
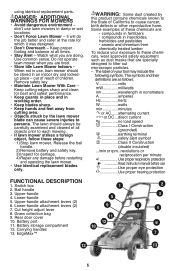
... reciprocation per minute Use proper respiratory protection Read instruction manual before restarting and operating the lawn mower. • Use identical replacement blades only. Release the bail handle. 2) Remove battery and safety key. 3) Inspect for which it was designed. • Don't Overreach - Switch box 2. Upper-handle attachment levers (2) 6. Rear door cover 10. EdgeMax™ WARNING: Some dust created by the lawn mower blade can cause severe injuries to these steps: 1) Stop lawn mower. Cut height adjust lever 8. Some examples of...
... reciprocation per minute Use proper respiratory protection Read instruction manual before restarting and operating the lawn mower. • Use identical replacement blades only. Release the bail handle. 2) Remove battery and safety key. 3) Inspect for which it was designed. • Don't Overreach - Switch box 2. Upper-handle attachment levers (2) 6. Rear door cover 10. EdgeMax™ WARNING: Some dust created by the lawn mower blade can cause severe injuries to these steps: 1) Stop lawn mower. Cut height adjust lever 8. Some examples of...
Instruction Manual
Page 6
... designed to use an extension cord unless it on a flat, stable surface (i.e., table top, bench top). • Do not operate charger with damaged cord or plug - Other types of opened battery cells may burst causing personal injury and damage. Do not attempt to operate on standard household electrical power (120 Volts). IIbmnaspttotrreutrcaytnpItoanscsakffseotry WARNING: For safe operation, read the safety instructions below...
... designed to use an extension cord unless it on a flat, stable surface (i.e., table top, bench top). • Do not operate charger with damaged cord or plug - Other types of opened battery cells may burst causing personal injury and damage. Do not attempt to operate on standard household electrical power (120 Volts). IIbmnaspttotrreutrcaytnpItoanscsakffseotry WARNING: For safe operation, read the safety instructions below...
Instruction Manual
Page 7
... sure that the battery terminals are designed to charge the battery. The green LED will prevent serious damage to detect certain problems that can detect a weak or damaged battery. If you see this happens, the charger automatically switches to service center for any way (i.e., pierced with a nail, hit with loose nails, screws, keys, etc. Charging Procedure Black+Decker chargers are protected and...
... sure that the battery terminals are designed to charge the battery. The green LED will prevent serious damage to detect certain problems that can detect a weak or damaged battery. If you see this happens, the charger automatically switches to service center for any way (i.e., pierced with a nail, hit with loose nails, screws, keys, etc. Charging Procedure Black+Decker chargers are protected and...
Instruction Manual
Page 8
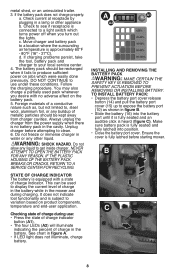
... before removing or installing battery. Unplug charger before starting mower. Never attempt to clean. 6. If the plastic housing of the battery pack breaks or cracks, return to display the current level of charge in the battery while in the cavity. This can be recharged when it is fully seated and an audible click is removed to produce sufficient power on the battery pack. 5. Check to...
... before removing or installing battery. Unplug charger before starting mower. Never attempt to clean. 6. If the plastic housing of the battery pack breaks or cracks, return to display the current level of charge in the battery while in the cavity. This can be recharged when it is fully seated and an audible click is removed to produce sufficient power on the battery pack. 5. Check to...
Instruction Manual
Page 9
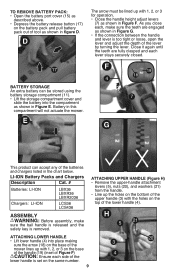
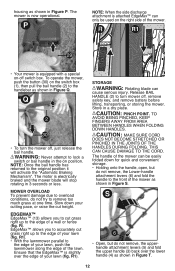
... of the upper handle (3) with 1, 2, or 3 for operation. • Close the handle height adjust levers (7) as shown in Figure E. H 5 21 ATTACHING LOWER HANDLE • Lift lower handle (4) into the compartment as shown in figure D. Close it again until the teeth are fully clasped and each , make sure the bail handle is released and the safety key is removed. LI-ION Battery Packs and Chargers...
... of the upper handle (3) with 1, 2, or 3 for operation. • Close the handle height adjust levers (7) as shown in Figure E. H 5 21 ATTACHING LOWER HANDLE • Lift lower handle (4) into the compartment as shown in figure D. Close it again until the teeth are fully clasped and each , make sure the bail handle is released and the safety key is removed. LI-ION Battery Packs and Chargers...
Instruction Manual
Page 10
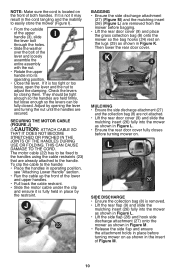
... M. 10 The motor cable (22) has to easily store the mower (Figure I). • From the outside of the upper handle (3), slide I the lever bolt through the holes. • Slide the washer over the bolt of both handles. K 8 24 25 9 Mulching • Ensure the side discharge attachment (27) and the collection bag (8) are secured. This can be fixed to the handles using the cable restraints (23) that...
... M. 10 The motor cable (22) has to easily store the mower (Figure I). • From the outside of the upper handle (3), slide I the lever bolt through the holes. • Slide the washer over the bolt of both handles. K 8 24 25 9 Mulching • Ensure the side discharge attachment (27) and the collection bag (8) are secured. This can be fixed to the handles using the cable restraints (23) that...
Instruction Manual
Page 11
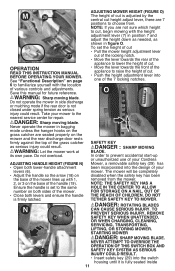
... you are not sure which height to the same number on both sides of the mower. • Close both lower-handle attachment levers (6). • Adjust the handle so the arrow (18) on the base of various controls and adjustments. Save this manual for repair. Never operate the mower in side discharge or mulching mode if the rear door is set the height of cut • Pull the mower height adjustment lever out of the locking...
... you are not sure which height to the same number on both sides of the mower. • Close both lower-handle attachment levers (6). • Adjust the handle so the arrow (18) on the base of various controls and adjustments. Save this manual for repair. Never operate the mower in side discharge or mulching mode if the rear door is set the height of cut • Pull the mower height adjustment lever out of the locking...
Instruction Manual
Page 12
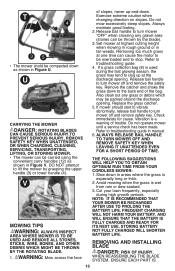
... not try to turn the mower off , remove safety key, and remove battery before lifting, transporting, or storing the mower. The motor is equipped with a special on the switch box (1), then pull the bail handle (2) to the handlebar as shown in Figure P. EdgeMax™ EdgeMax™ (13) allows you to accurately cut grass right up to overload conditions, do not remove, the upperhandle attachment levers (5) and fold...
... not try to turn the mower off , remove safety key, and remove battery before lifting, transporting, or storing the mower. The motor is equipped with a special on the switch box (1), then pull the bail handle (2) to the handlebar as shown in Figure P. EdgeMax™ EdgeMax™ (13) allows you to accurately cut grass right up to overload conditions, do not remove, the upperhandle attachment levers (5) and fold...
Instruction Manual
Page 13
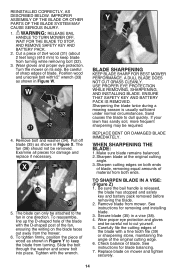
... packed around the discharge opening . Set mower at highest cutting height when mowing in rough ground or in Figure V. Removing too much grass at the discharge opening . Also clean out any gravel area (stones can cause the motor to be overloaded and to turn mower off and remove safety key. If mower should start to vibrate abnormally, release bail handle to stop. Do not operate mower until a service check has been made...
... packed around the discharge opening . Set mower at highest cutting height when mowing in rough ground or in Figure V. Removing too much grass at the discharge opening . Also clean out any gravel area (stones can cause the motor to be overloaded and to turn mower off and remove safety key. If mower should start to vibrate abnormally, release bail handle to stop. Do not operate mower until a service check has been made...
Instruction Manual
Page 14
... be removed. Remove bolt and washer (34). A DULL BLADE DOES NOT CUT GRASS CLEANLY. ENSURE THAT SAFETY KEY and battery pack IS REMOVED. Improper assembly of the blade or other parts of the original cutting edge. 6. Examine all pieces for damage and replace if necessary. Sand causes the blade to turn mower off blade (35) as shown in Figure Y to cut yourself. 5. Pull off , WAIT FOR THE BLADE TO STOP, AND REMOVE SAFETY KEY and battery...
... be removed. Remove bolt and washer (34). A DULL BLADE DOES NOT CUT GRASS CLEANLY. ENSURE THAT SAFETY KEY and battery pack IS REMOVED. Improper assembly of the blade or other parts of the original cutting edge. 6. Examine all pieces for damage and replace if necessary. Sand causes the blade to turn mower off blade (35) as shown in Figure Y to cut yourself. 5. Pull off , WAIT FOR THE BLADE TO STOP, AND REMOVE SAFETY KEY and battery...
Instruction Manual
Page 15
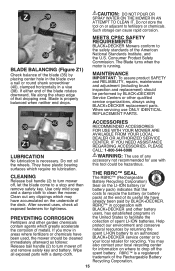
... blade come to drop off and remove safety key and battery. RBRC™ is necessary. Do not store the tool on where to a stop and then remove safety key. Use only mild soap and a damp cloth to the safety standards of the American National Standards Institute, and the U.S. MREEQETUSIRCEPMSECNTSSAFETY Black+Decker Mowers conform to clean the mower. MAINTENANCE Important: To assure product SAFETY and RELIABILITY, repairs, maintenance and adjustment...
... blade come to drop off and remove safety key and battery. RBRC™ is necessary. Do not store the tool on where to a stop and then remove safety key. Use only mild soap and a damp cloth to the safety standards of the American National Standards Institute, and the U.S. MREEQETUSIRCEPMSECNTSSAFETY Black+Decker Mowers conform to clean the mower. MAINTENANCE Important: To assure product SAFETY and RELIABILITY, repairs, maintenance and adjustment...
Instruction Manual
Page 16
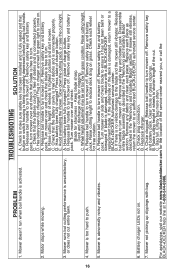
... of charge button. A. Release bail handle to turn mower off . B. Plug in charger and wait for free rotation. 5. Remove safety key and battery pack. Wheel height adjustment may be set too low for clogging. Check that blade is connected properly. B. Release bail handle to turn mower off . A. Empty bag more often. Battery charger LEDs not on . 2. PROBLEM TROUBLESHOOTING SOLUTION 1. C. A. Raise cutting height to reduce deck drag on side and check blade to an authorized Black+Decker authorized service center...
... of charge button. A. Release bail handle to turn mower off . B. Plug in charger and wait for free rotation. 5. Remove safety key and battery pack. Wheel height adjustment may be set too low for clogging. Check that blade is connected properly. B. Release bail handle to turn mower off . A. Empty bag more often. Battery charger LEDs not on . 2. PROBLEM TROUBLESHOOTING SOLUTION 1. C. A. Raise cutting height to reduce deck drag on side and check blade to an authorized Black+Decker authorized service center...

Instruction Manual
Page 17
... or see the website for repair or replacement at no charge in Latin America. Please check with efficient and reliable power tool service. Whether you need technical advice, repair, or genuine factory replacement parts, contact the Black+Decker location nearest you. The first, which vary from whom it was purchased (provided that are beyond the time set for their specific return policy regarding returns that...
... or see the website for repair or replacement at no charge in Latin America. Please check with efficient and reliable power tool service. Whether you need technical advice, repair, or genuine factory replacement parts, contact the Black+Decker location nearest you. The first, which vary from whom it was purchased (provided that are beyond the time set for their specific return policy regarding returns that...

Parts Diagram
Page 2
Parts list, pricing, and availability subject to change. Please visit www.dewaltservicenet.com for CM2040 Type 1 Description Qty Required COVER 1 GASKET 2 LOWER COVER 1 SELF TAPPING SCREW 1 HANDLE 4 SPRING PIN 4 PLATE 2 LOWER HANDLE 1 CLAMP LEVER 2 PAD 4 KNOB 2 HEX NUT 4 WIRE PIE 1 BAG 1 GRASS CATCHER 1 QUICK CLAMP 2 SHAFT 2 ADJUSTING GEAR 2 WHEEL COVER 2 RETAINING RING 4 COLLAR 8 REAR WHEEL 2 REAR AXLE 1 WHEEL PLATE 2 SELF TAPPING SCREW 28 WHEEL SHAFT ASSY. 6 SELF TAPPING SCREW 2 COPYRIGHT© 2005. All Rights Reserved. Page 1...
Parts list, pricing, and availability subject to change. Please visit www.dewaltservicenet.com for CM2040 Type 1 Description Qty Required COVER 1 GASKET 2 LOWER COVER 1 SELF TAPPING SCREW 1 HANDLE 4 SPRING PIN 4 PLATE 2 LOWER HANDLE 1 CLAMP LEVER 2 PAD 4 KNOB 2 HEX NUT 4 WIRE PIE 1 BAG 1 GRASS CATCHER 1 QUICK CLAMP 2 SHAFT 2 ADJUSTING GEAR 2 WHEEL COVER 2 RETAINING RING 4 COLLAR 8 REAR WHEEL 2 REAR AXLE 1 WHEEL PLATE 2 SELF TAPPING SCREW 28 WHEEL SHAFT ASSY. 6 SELF TAPPING SCREW 2 COPYRIGHT© 2005. All Rights Reserved. Page 1...

Parts Diagram
Page 4
Parts list, pricing, and availability subject to change. Please visit www.dewaltservicenet.com for CM2040 Type 1 Description Qty Required FRONT AXLE 1 PLATE 2 SCREW 3 MOTOR ASSEMBLY 1 CLAMP HANDLE 2 BATTERY CONTROLLER 1 BUTTON BLOCK 1 WEDGE PLATE 1 SWITCH BUTTON 1 BRACKET 1 PUSH-BUTTON SWITCH 1 BATTERY PACK 2 COVER 1 FLANGE HEAD SCREW 4 ANTI LOCK SPRING 2 CLAMP 1 TERMINAL 2 LEADWIRE 1 LEADWIRE 1 SOFT BOARD 1 PLATE 1 SELF TAPPING SCREW 2 FRONT CONNECTING ROD 1 SELF LOCK NUT 4 SUPPORT PLATE 1 ROD 1 TORSION SPRING 1 COPYRIGHT© 2005....
Parts list, pricing, and availability subject to change. Please visit www.dewaltservicenet.com for CM2040 Type 1 Description Qty Required FRONT AXLE 1 PLATE 2 SCREW 3 MOTOR ASSEMBLY 1 CLAMP HANDLE 2 BATTERY CONTROLLER 1 BUTTON BLOCK 1 WEDGE PLATE 1 SWITCH BUTTON 1 BRACKET 1 PUSH-BUTTON SWITCH 1 BATTERY PACK 2 COVER 1 FLANGE HEAD SCREW 4 ANTI LOCK SPRING 2 CLAMP 1 TERMINAL 2 LEADWIRE 1 LEADWIRE 1 SOFT BOARD 1 PLATE 1 SELF TAPPING SCREW 2 FRONT CONNECTING ROD 1 SELF LOCK NUT 4 SUPPORT PLATE 1 ROD 1 TORSION SPRING 1 COPYRIGHT© 2005....

Parts Diagram
Page 5
... Rights Reserved. Please visit www.dewaltservicenet.com for CM2040 Type 1 Description Qty Required COTTER PIN 1 CONNECTING ROD 1 TENSION SPRING 1 GASKET 1 SCREW 1 HANDLE 1 COVER 1 BATTERY COVER 1 SUPPORT ROD 1 HANDLE 1 COVER 1 BATTERY BOX 1 CHARGER 1 CIRCLIP 2 SHAFT 1 TORSION SPRING 1 COVER 1 PLATE 1 SCREW 4 SELF TAPPING SCREW 2 SWITCH BOX ASSY 1 HANDLE COVER 1 HANDLE 1 BUTTON 1 SPRING 1 COVER 1 SWITCH CABLE 1 COPYRIGHT© 2005. Page 4 Parts list, pricing, and availability subject to change. Item Number 83 84 85 86 87 88 89 90 91...
... Rights Reserved. Please visit www.dewaltservicenet.com for CM2040 Type 1 Description Qty Required COTTER PIN 1 CONNECTING ROD 1 TENSION SPRING 1 GASKET 1 SCREW 1 HANDLE 1 COVER 1 BATTERY COVER 1 SUPPORT ROD 1 HANDLE 1 COVER 1 BATTERY BOX 1 CHARGER 1 CIRCLIP 2 SHAFT 1 TORSION SPRING 1 COVER 1 PLATE 1 SCREW 4 SELF TAPPING SCREW 2 SWITCH BOX ASSY 1 HANDLE COVER 1 HANDLE 1 BUTTON 1 SPRING 1 COVER 1 SWITCH CABLE 1 COPYRIGHT© 2005. Page 4 Parts list, pricing, and availability subject to change. Item Number 83 84 85 86 87 88 89 90 91...


