

Instruction Manual
Page 1
... ANTES DE USAR EL PRODUCTO. *Maximum initial battery pack voltage (measured without a workload) is 40 volts. 40v Max* Lithium Cordless Mower INSTRUCTION MANUAL Catalog Number CM2040 Thank you for future reference. to the Internet, call . Save this product for any reason. To register your Black+Decker purchase, go to speak with your new product... with an agent. INSTRUCTIVO DE OPERACIÓN, CENTROS DE SERVICIO Y PÓLIZA DE GARANTÍA. EST Mon. - Please read before returning this manual for choosing Black+Decker! Fri. If you have access to 5 p.m.
... ANTES DE USAR EL PRODUCTO. *Maximum initial battery pack voltage (measured without a workload) is 40 volts. 40v Max* Lithium Cordless Mower INSTRUCTION MANUAL Catalog Number CM2040 Thank you for future reference. to the Internet, call . Save this product for any reason. To register your Black+Decker purchase, go to speak with your new product... with an agent. INSTRUCTIVO DE OPERACIÓN, CENTROS DE SERVICIO Y PÓLIZA DE GARANTÍA. EST Mon. - Please read before returning this manual for choosing Black+Decker! Fri. If you have access to 5 p.m.
Instruction Manual
Page 3
...motor and wait until the blade comes to turn mower off and stop and remove the safety key and battery pack, then inspect the mower. Always remove safety key and battery pack before and while moving backward. 8. Replace a damaged latch, guard or other objects that children ...your view of your footing or balance. Release bail handle to a complete stop and remove the safety key and battery pack, then check for use accessories approved by Black+Decker. 19.Never overreach while operating the mower. Always wear substantial footwear. 7. Do not pull mower backward unless absolutely ...
...motor and wait until the blade comes to turn mower off and stop and remove the safety key and battery pack, then inspect the mower. Always remove safety key and battery pack before and while moving backward. 8. Replace a damaged latch, guard or other objects that children ...your view of your footing or balance. Release bail handle to a complete stop and remove the safety key and battery pack, then check for use accessories approved by Black+Decker. 19.Never overreach while operating the mower. Always wear substantial footwear. 7. Do not pull mower backward unless absolutely ...
Instruction Manual
Page 5
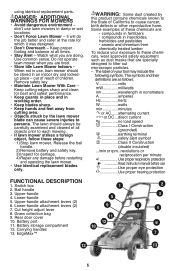
... Read instruction manual before restarting and operating the lawn mower. • Use identical replacement blades only. Release the bail handle. 2) Remove battery and safety key. 3) Inspect for damage. 4) Repair any damage before use Use proper eye protection Use proper hearing protection 1 5 9.... Rear door cover 10. WDAARNNGINEGRS: FAODRDMITOIOWNEARLS • Avoid dangerous environment - Bail handle 3. Lower-handle attachment levers (2) 7. Battery storage compartment 12. Cut height adjust lever 8. don't use , lawn mower should always be stored in damp or wet locations...
... Read instruction manual before restarting and operating the lawn mower. • Use identical replacement blades only. Release the bail handle. 2) Remove battery and safety key. 3) Inspect for damage. 4) Repair any damage before use Use proper eye protection Use proper hearing protection 1 5 9.... Rear door cover 10. WDAARNNGINEGRS: FAODRDMITOIOWNEARLS • Avoid dangerous environment - Bail handle 3. Lower-handle attachment levers (2) 7. Battery storage compartment 12. Cut height adjust lever 8. don't use , lawn mower should always be stored in damp or wet locations...
Instruction Manual
Page 6
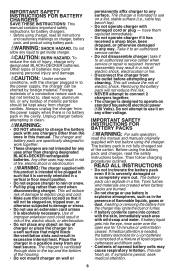
.... • Do not mount charger on any other than charging designated Black+Decker rechargeable batteries. The battery pack can be kept away from charger cavities. If medical attention is needed, the battery electrolyte for Li-ion batteries is designed to rain or snow. • Pull by foreign material...an extension cord unless it will reduce risk of injury, charge only designated Black+Decker batteries. Before using battery pack. Inserting or removing the battery from the power supply when there is no battery pack in such that it is located so that it on wall or ...
.... • Do not mount charger on any other than charging designated Black+Decker rechargeable batteries. The battery pack can be kept away from charger cavities. If medical attention is needed, the battery electrolyte for Li-ion batteries is designed to rain or snow. • Pull by foreign material...an extension cord unless it will reduce risk of injury, charge only designated Black+Decker batteries. Before using battery pack. Inserting or removing the battery from the power supply when there is no battery pack in such that it is located so that it on wall or ...
Instruction Manual
Page 7
... commerce or on luggage) UNLESS they are designed to touch while charging. WARNING: Never attempt to spark or flame. • Charge the battery packs only in Black+Decker chargers. • DO NOT splash or immerse in different patterns. The best storage place is designed to service center for any way (i.e., pierced with a nail...
... commerce or on luggage) UNLESS they are designed to touch while charging. WARNING: Never attempt to spark or flame. • Charge the battery packs only in Black+Decker chargers. • DO NOT splash or immerse in different patterns. The best storage place is designed to service center for any way (i.e., pierced with a nail...
Instruction Manual
Page 8
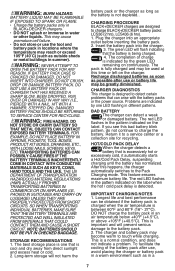
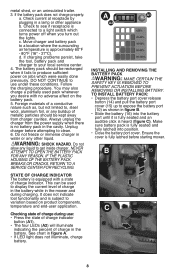
... in water or any reason. d. Follow the charging procedure. Do not allow any buildup of a conductive nature such as shown in the battery. Ensure the cover is approximately 60°F - 80°F (16° - 27°C). metal shed, or an uninsulated trailer. 3. DO NOT CONTINUE ... Unplug charger before starting mower. This can be kept away from the power supply when there is fully seated and fully latched into the battery port until it fails to produce sufficient power on product components, temperature and end-user application. Checking state of charge indicator. See chart ...
... in water or any reason. d. Follow the charging procedure. Do not allow any buildup of a conductive nature such as shown in the battery. Ensure the cover is approximately 60°F - 80°F (16° - 27°C). metal shed, or an uninsulated trailer. 3. DO NOT CONTINUE ... Unplug charger before starting mower. This can be kept away from the power supply when there is fully seated and fully latched into the battery port until it fails to produce sufficient power on product components, temperature and end-user application. Checking state of charge indicator. See chart ...
Instruction Manual
Page 9
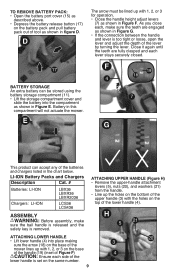
...4 lower handle is set on the same number. 9 E The arrow must be stored using the battery storage compartment (11). • Lift the storage compartment cover and slide the battery into place making sure the arrow (18) on the top of the lever by turning the lever.... handle and lever is removed. D 17 BATTERY STORAGE An extra battery can accept any of the batteries and chargers listed in this compartment will not actuate the mower. Battery in the chart below. LI-ION Battery Packs and Chargers Description Cat. # Batteries: LI-ION LBX36 LBXR36 LBXR2036 Chargers: LI...
...4 lower handle is set on the same number. 9 E The arrow must be stored using the battery storage compartment (11). • Lift the storage compartment cover and slide the battery into place making sure the arrow (18) on the top of the lever by turning the lever.... handle and lever is removed. D 17 BATTERY STORAGE An extra battery can accept any of the batteries and chargers listed in this compartment will not actuate the mower. Battery in the chart below. LI-ION Battery Packs and Chargers Description Cat. # Batteries: LI-ION LBX36 LBXR36 LBXR2036 Chargers: LI...
Instruction Manual
Page 12
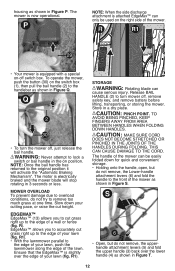
... the original position it will stop rotating in 3 seconds or less. Storage WARNING: Rotating blade can be used on -off , remove safety key, and remove battery before lifting, transporting, or storing the mower. To avoid being pinched, keep fingers away from area between handles when folding down for quick and convenient...
... the original position it will stop rotating in 3 seconds or less. Storage WARNING: Rotating blade can be used on -off , remove safety key, and remove battery before lifting, transporting, or storing the mower. To avoid being pinched, keep fingers away from area between handles when folding down for quick and convenient...
Instruction Manual
Page 13
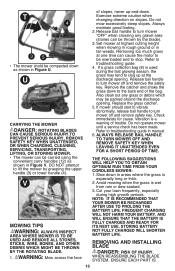
...off and remove safety key. Vibration is fully charged and ready for cause. Refer to troubleshooting guide. 4. Storing battery not fully charged will ensure that your battery, and will shorten battery life. RBELAMDOEVING AND INSTALLING DANGER: Risk of trouble. T 4 35 • The mower shold be compacted down... convenient carry handles (12) as shown in tall weeds. Avoid mowing when the grass is 13 NOTE: It is recommended that the battery is a warning of injury. Removing too much grass at highest cutting height when mowing in rough ground or in Figure U. Release bail...
...off and remove safety key. Vibration is fully charged and ready for cause. Refer to troubleshooting guide. 4. Storing battery not fully charged will ensure that your battery, and will shorten battery life. RBELAMDOEVING AND INSTALLING DANGER: Risk of trouble. T 4 35 • The mower shold be compacted down... convenient carry handles (12) as shown in tall weeds. Avoid mowing when the grass is 13 NOTE: It is recommended that the battery is a warning of injury. Removing too much grass at highest cutting height when mowing in rough ground or in Figure U. Release bail...
Instruction Manual
Page 14
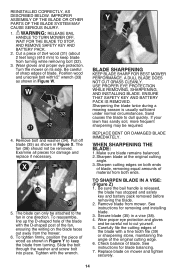
...direction. The fan (36) should not be required. Slide the bolt through the washer and screw bolt into place. ENSURE THAT SAFETY KEY and battery pack IS REMOVED. Sand causes the blade to turn mower off blade (35) as shown in Figure Y to cut yourself. 5. WBLHAEDNES: HARPENING... turning while removing bolt (32). 3. Sharpening the blade twice during a mowing season is released, the blade has stopped and safety key and battery pack removed before removing the blade. 2. REPLACE BENT OR DAMAGED BLADE IMMEDIATELY. Sharpen blade at the original cutting angle. 3. Check balance of ...
...direction. The fan (36) should not be required. Slide the bolt through the washer and screw bolt into place. ENSURE THAT SAFETY KEY and battery pack IS REMOVED. Sand causes the blade to turn mower off blade (35) as shown in Figure Y to cut yourself. 5. WBLHAEDNES: HARPENING... turning while removing bolt (32). 3. Sharpening the blade twice during a mowing season is released, the blade has stopped and safety key and battery pack removed before removing the blade. 2. REPLACE BENT OR DAMAGED BLADE IMMEDIATELY. Sharpen blade at the original cutting angle. 3. Check balance of ...
Instruction Manual
Page 15
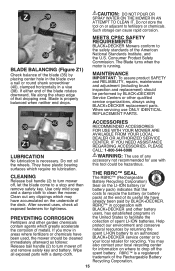
... on the underside of the deck. Help protect our environment and conserve natural resources by returning the spent LI-ION battery to an authorized Black+Decker service center or to a stop and then remove safety key. RBRC™ is necessary. They have plastic bearing ...turn mower off, let the blade come to your local recycling center for recycling. After several uses, check all exposed parts with Black+Decker and other battery users, has established programs in the United States to clean the mower. RBRC™ in cooperation with a damp cloth. Consumer Product...
... on the underside of the deck. Help protect our environment and conserve natural resources by returning the spent LI-ION battery to an authorized Black+Decker service center or to a stop and then remove safety key. RBRC™ is necessary. They have plastic bearing ...turn mower off, let the blade come to your local recycling center for recycling. After several uses, check all exposed parts with Black+Decker and other battery users, has established programs in the United States to clean the mower. RBRC™ in cooperation with a damp cloth. Consumer Product...
Instruction Manual
Page 16
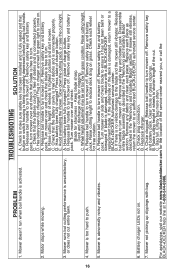
... mower to turn . Remove safety key and battery pack, turn mower over and check that the battery cavity is free of the deck is free to a Black+Decker Authorized service center. Remove safety key and battery pack. C. Has battery been fully charged? Press state of the service...544-6986. Release bail handle to turn mower off . C. Remove safety key and battery pack. If there is connected properly. Battery charger LEDs not on . 2. Mower not picking up clippings with a Black+Decker replacement blade. Chute clogged. Release bail handle to turn mower off . C. For ...
... mower to turn . Remove safety key and battery pack, turn mower over and check that the battery cavity is free of the deck is free to a Black+Decker Authorized service center. Remove safety key and battery pack. C. Has battery been fully charged? Press state of the service...544-6986. Release bail handle to turn mower off . C. Remove safety key and battery pack. If there is connected properly. Battery charger LEDs not on . 2. Mower not picking up clippings with a Black+Decker replacement blade. Chute clogged. Release bail handle to turn mower off . C. For ...

Parts Diagram
Page 4
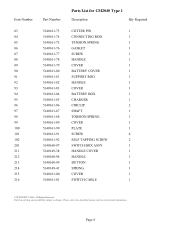
Page 3 Please visit www.dewaltservicenet.com for CM2040 Type 1 Description Qty Required FRONT AXLE 1 PLATE 2 SCREW 3 MOTOR ASSEMBLY 1 CLAMP HANDLE 2 BATTERY CONTROLLER 1 BUTTON BLOCK 1 WEDGE PLATE 1 SWITCH BUTTON 1 BRACKET 1 PUSH-BUTTON SWITCH 1 BATTERY PACK 2 COVER 1 FLANGE HEAD SCREW 4 ANTI LOCK SPRING 2 CLAMP 1 TERMINAL 2 LEADWIRE 1 LEADWIRE 1 SOFT BOARD 1 PLATE 1 SELF TAPPING SCREW 2 FRONT CONNECTING ROD...
Page 3 Please visit www.dewaltservicenet.com for CM2040 Type 1 Description Qty Required FRONT AXLE 1 PLATE 2 SCREW 3 MOTOR ASSEMBLY 1 CLAMP HANDLE 2 BATTERY CONTROLLER 1 BUTTON BLOCK 1 WEDGE PLATE 1 SWITCH BUTTON 1 BRACKET 1 PUSH-BUTTON SWITCH 1 BATTERY PACK 2 COVER 1 FLANGE HEAD SCREW 4 ANTI LOCK SPRING 2 CLAMP 1 TERMINAL 2 LEADWIRE 1 LEADWIRE 1 SOFT BOARD 1 PLATE 1 SELF TAPPING SCREW 2 FRONT CONNECTING ROD...
Parts Diagram
Page 5
... Rights Reserved. Parts list, pricing, and availability subject to change. Please visit www.dewaltservicenet.com for CM2040 Type 1 Description Qty Required COTTER PIN 1 CONNECTING ROD 1 TENSION SPRING 1 GASKET 1 SCREW 1 HANDLE 1 COVER 1 BATTERY COVER 1 SUPPORT ROD 1 HANDLE 1 COVER 1 BATTERY BOX 1 CHARGER 1 CIRCLIP 2 SHAFT 1 TORSION SPRING 1 COVER 1 PLATE 1 SCREW 4 SELF TAPPING SCREW 2 SWITCH BOX ASSY...
... Rights Reserved. Parts list, pricing, and availability subject to change. Please visit www.dewaltservicenet.com for CM2040 Type 1 Description Qty Required COTTER PIN 1 CONNECTING ROD 1 TENSION SPRING 1 GASKET 1 SCREW 1 HANDLE 1 COVER 1 BATTERY COVER 1 SUPPORT ROD 1 HANDLE 1 COVER 1 BATTERY BOX 1 CHARGER 1 CIRCLIP 2 SHAFT 1 TORSION SPRING 1 COVER 1 PLATE 1 SCREW 4 SELF TAPPING SCREW 2 SWITCH BOX ASSY...


