
Instruction Manual
Page 9
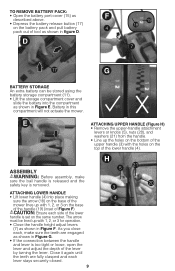
... up with 1, 2, or 3 on the base of the handle (19) (inset of Figure F) CAUTION: Ensure each lever stays securely closed. 9 H 5 21 20 3 4 Close it again until the teeth are engaged as shown in this compartment will not actuate the mower. TO REMOVE BATTERY PACK: • Open the...lower handle (4) into the compartment as shown in Figure E. E ATTACHING UPPER HANDLE (Figure H) • Remove the upper-handle attachment levers or knobs (5), nuts (20), and washers (21) from the handle. • Line up the holes on the bottom of the upper handle (3) with the holes on the same number...
... up with 1, 2, or 3 on the base of the handle (19) (inset of Figure F) CAUTION: Ensure each lever stays securely closed. 9 H 5 21 20 3 4 Close it again until the teeth are engaged as shown in this compartment will not actuate the mower. TO REMOVE BATTERY PACK: • Open the...lower handle (4) into the compartment as shown in Figure E. E ATTACHING UPPER HANDLE (Figure H) • Remove the upper-handle attachment levers or knobs (5), nuts (20), and washers (21) from the handle. • Line up the holes on the bottom of the upper handle (3) with the holes on the same number...