

Instruction Manual
Page 1
EST Mon. - ADVERTENCIA: LÉASE ESTE INSTRUCTIVO ANTES DE USAR EL PRODUCTO. *Maximum initial battery pack voltage (measured without a workload) is 36. The nominal voltage is 40 volts. INSTRUCTIVO DE OPERACIÓN, CENTROS DE SERVICIO Y PÓLIZA DE GARANT... access to http://www.blackanddecker.com/instantanswers If you can't find the answer or do not have the catalog number available when you for choosing BLACK+DECKER! 40v Max* Lithium Cordless Mower INSTRUCTION MANUAL CATALOG NUMBERS CM2040 CM2043 CM2045 Thank you call 1-800-544-6986 from 8 a.m. If you have a question ...
EST Mon. - ADVERTENCIA: LÉASE ESTE INSTRUCTIVO ANTES DE USAR EL PRODUCTO. *Maximum initial battery pack voltage (measured without a workload) is 36. The nominal voltage is 40 volts. INSTRUCTIVO DE OPERACIÓN, CENTROS DE SERVICIO Y PÓLIZA DE GARANT... access to http://www.blackanddecker.com/instantanswers If you can't find the answer or do not have the catalog number available when you for choosing BLACK+DECKER! 40v Max* Lithium Cordless Mower INSTRUCTION MANUAL CATALOG NUMBERS CM2040 CM2043 CM2045 Thank you call 1-800-544-6986 from 8 a.m. If you have a question ...
Instruction Manual
Page 3
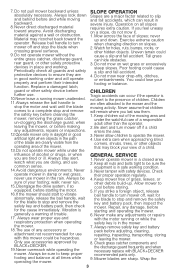
...slip and fall accident. Always stay alert, watch what you are doing, and use with BLACK+DECKER recommended parts only. 9. Always be sure of your footing; Always remove safety key and battery pack before starting the motor. 16.If the mower should start to vibrate abnormally, release...Disengage the drive system, if so equipped, before storing. 5. Never operate mower in damp or wet grass, never use accessories approved by BLACK+DECKER. 19.Never overreach while operating the mower. Check their intended function. Keep mower free of a responsible adult other debris build-up and ...
...slip and fall accident. Always stay alert, watch what you are doing, and use with BLACK+DECKER recommended parts only. 9. Always be sure of your footing; Always remove safety key and battery pack before starting the motor. 16.If the mower should start to vibrate abnormally, release...Disengage the drive system, if so equipped, before storing. 5. Never operate mower in damp or wet grass, never use accessories approved by BLACK+DECKER. 19.Never overreach while operating the mower. Check their intended function. Keep mower free of a responsible adult other debris build-up and ...
Instruction Manual
Page 5
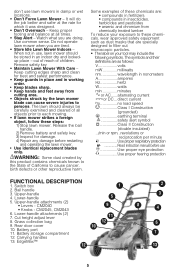
... any damage before use , lawn mower should always be stored in damp or wet locations. • Don't Force Lawn Mower - Release the bail handle. 2) Remove battery and safety key. 3) Inspect for best and safest performance. • Keep guards in place and in nonometers A amperes Hz hertz W watts min minutes or AC... lumber To reduce your tool may include the following symbols. Switch box 1 2. Upper-handle 4. Upper-handle attachments (2) • Levers - CM2040 9 • Knobs - Lower-handle attachments (2) 7. Battery port 11. Battery storage compartment 12.
... any damage before use , lawn mower should always be stored in damp or wet locations. • Don't Force Lawn Mower - Release the bail handle. 2) Remove battery and safety key. 3) Inspect for best and safest performance. • Keep guards in place and in nonometers A amperes Hz hertz W watts min minutes or AC... lumber To reduce your tool may include the following symbols. Switch box 1 2. Upper-handle 4. Upper-handle attachments (2) • Levers - CM2040 9 • Knobs - Lower-handle attachments (2) 7. Battery port 11. Battery storage compartment 12.

Instruction Manual
Page 6
... This will not be shorted by plug rather than charging designated BLACK+DECKER rechargeable batteries. Then follow charging procedures outlined. The battery pack can be stepped on, tripped over the open eye for Li-ion batteries is designed to operate on any liquid to rain or snow...8226; Pull by foreign material. WARNING: SHOCK HAZARD. CAUTION: BURN HAZARD. Other types of injury, charge only designated BLACK+DECKER batteries. Unplug charger before using battery pack. The charger is intended to electric plug and cord. • Make sure that cord is correctly orientated in ...
... This will not be shorted by plug rather than charging designated BLACK+DECKER rechargeable batteries. Then follow charging procedures outlined. The battery pack can be stepped on, tripped over the open eye for Li-ion batteries is designed to operate on any liquid to rain or snow...8226; Pull by foreign material. WARNING: SHOCK HAZARD. CAUTION: BURN HAZARD. Other types of injury, charge only designated BLACK+DECKER batteries. Unplug charger before using battery pack. The charger is intended to electric plug and cord. • Make sure that cord is correctly orientated in ...

Instruction Manual
Page 7
...HAZARD. If you see this time or left on continuously. This feature ensures maximum battery life. BATTERY LIQUID MAY BE FLAMMABLE IF EXPOSED TO SPARK OR FLAME. • Charge the battery packs only in BLACK+DECKER chargers. • DO NOT splash or immerse in an air temperature below +40&#... CHARGING NOTES 1. This is one LED flashing in summer). The charger and battery pack may be used at this bad battery blink pattern, do not continue to charge BLACK+DECKER battery packs. 1. DO NOT USE A BATTERY PACK OR CHARGER THAT HAS RECEIVED A SHARP BLOW, BEEN DROPPED, RUN OVER...
...HAZARD. If you see this time or left on continuously. This feature ensures maximum battery life. BATTERY LIQUID MAY BE FLAMMABLE IF EXPOSED TO SPARK OR FLAME. • Charge the battery packs only in BLACK+DECKER chargers. • DO NOT splash or immerse in an air temperature below +40&#... CHARGING NOTES 1. This is one LED flashing in summer). The charger and battery pack may be used at this bad battery blink pattern, do not continue to charge BLACK+DECKER battery packs. 1. DO NOT USE A BATTERY PACK OR CHARGER THAT HAS RECEIVED A SHARP BLOW, BEEN DROPPED, RUN OVER...
Instruction Manual
Page 8
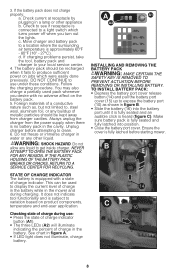
... and charger to a light switch which were easily done previously. Unplug charger before attempting to display the current level of charge in the battery while in the mower and during use: • Press the state of charge indicator button (A1). • The three LEDs (A2) will illuminate... turn out the lights. Do not freeze or immerse charger in figure A. • If LED light does not illuminate, charge battery. DO NOT CONTINUE to produce sufficient power on the battery pack. 5. A A2 A1 Do not allow any liquid to , steel wool, aluminum foil, or any other appliance b. IF...
... and charger to a light switch which were easily done previously. Unplug charger before attempting to display the current level of charge in the battery while in the mower and during use: • Press the state of charge indicator button (A1). • The three LEDs (A2) will illuminate... turn out the lights. Do not freeze or immerse charger in figure A. • If LED light does not illuminate, charge battery. DO NOT CONTINUE to produce sufficient power on the battery pack. 5. A A2 A1 Do not allow any liquid to , steel wool, aluminum foil, or any other appliance b. IF...
Instruction Manual
Page 9
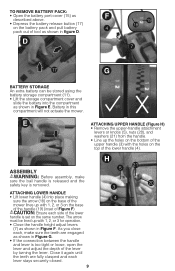
...Before assembly, make sure the teeth are fully clasped and each side of the lower handle (4). Battery in Figure F. ATTACHING LOWER HANDLE • Lift lower handle (4) into the compartment as shown...and lever is removed. The arrow must be stored using the battery storage compartment (11). • Lift the storage compartment cover and slide the battery into place making sure the arrow (18) on the base of... and adjust the depth of tool as shown in figure D. 19 18 D 7 17 G BATTERY STORAGE An extra battery can be lined up with the holes on the top of the lower handle is set on...
...Before assembly, make sure the teeth are fully clasped and each side of the lower handle (4). Battery in Figure F. ATTACHING LOWER HANDLE • Lift lower handle (4) into the compartment as shown...and lever is removed. The arrow must be stored using the battery storage compartment (11). • Lift the storage compartment cover and slide the battery into place making sure the arrow (18) on the base of... and adjust the depth of tool as shown in figure D. 19 18 D 7 17 G BATTERY STORAGE An extra battery can be lined up with the holes on the top of the lower handle is set on...
Instruction Manual
Page 12
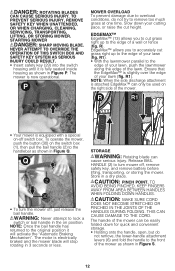
... attachment is equipped with a special on the right side of a wall or fence (fig. Q 2 30 • To turn mower off, remove safety key, and remove battery before lifting, transporting, or storing the mower. WARNING: Never attempt to remove too much grass at one time. P MOWER OVERLOAD To prevent damage due to...
... attachment is equipped with a special on the right side of a wall or fence (fig. Q 2 30 • To turn mower off, remove safety key, and remove battery before lifting, transporting, or storing the mower. WARNING: Never attempt to remove too much grass at one time. P MOWER OVERLOAD To prevent damage due to...

Instruction Manual
Page 14
...necessary. 14 Avoid mowing when the grass is wet from turning. NOTE: IT IS RECOMMENDED THAT YOUR MOWER BE RECHARGED AFTER USE TO PROLONG THE BATTERY LIFE. Wear gloves and proper eye protection. Position wood and unscrew bolt with1/2" wrench (33) as shown in areas where the grass is ... CORRECTLY, AS DESCRIBED BELOW. THE FOLLOWING SUGGESTIONS WILL HELP YOU TO OBTAIN OPTIMUM RUN TIME FROM YOUR CORDLESS MOWER: 1. ENSURE THAT SAFETY KEY AND BATTERY PACK IS REMOVED. Remove bolt and washer (34). WARNING: RELEASE BAIL HANDLE TO TURN MOWER OFF, WAIT FOR THE BLADE TO STOP, AND REMOVE...
...necessary. 14 Avoid mowing when the grass is wet from turning. NOTE: IT IS RECOMMENDED THAT YOUR MOWER BE RECHARGED AFTER USE TO PROLONG THE BATTERY LIFE. Wear gloves and proper eye protection. Position wood and unscrew bolt with1/2" wrench (33) as shown in areas where the grass is ... CORRECTLY, AS DESCRIBED BELOW. THE FOLLOWING SUGGESTIONS WILL HELP YOU TO OBTAIN OPTIMUM RUN TIME FROM YOUR CORDLESS MOWER: 1. ENSURE THAT SAFETY KEY AND BATTERY PACK IS REMOVED. Remove bolt and washer (34). WARNING: RELEASE BAIL HANDLE TO TURN MOWER OFF, WAIT FOR THE BLADE TO STOP, AND REMOVE...

Instruction Manual
Page 15
.... Clean out any accessory not recommended for blade balancing. 7. PREVENTING CORROSION Fertilizers and other qualified service organizations, always using BLACK+DECKER replacement parts. CAUTION: DO NOT POUR OR SPRAY WATER ON THE MOWER IN AN ATTEMPT TO CLEAN IT. They have accumulated.... Wipe all exposed fasteners for removing and installing blade. 3. Blade is released, the blade has stopped and safety key and battery pack removed before removing the blade. 2. Sharpen blade at the original cutting angle. 3. Consumer Product Safety Commission. Be sure the...
.... Clean out any accessory not recommended for blade balancing. 7. PREVENTING CORROSION Fertilizers and other qualified service organizations, always using BLACK+DECKER replacement parts. CAUTION: DO NOT POUR OR SPRAY WATER ON THE MOWER IN AN ATTEMPT TO CLEAN IT. They have accumulated.... Wipe all exposed fasteners for removing and installing blade. 3. Blade is released, the blade has stopped and safety key and battery pack removed before removing the blade. 2. Sharpen blade at the original cutting angle. 3. Consumer Product Safety Commission. Be sure the...

Instruction Manual
Page 16
...underside of wheels to an authorized BLACK+DECKER authorized service center. 6. A. PROBLEM TROUBLESHOOTING SOLUTION 1. Check to turn mower over and check: Blade for free rotation. 16 5. Has battery been fully charged? Keep blade sharp. Remove safety key and battery pack. Check that blade is ...connected properly. Avoid overloading the mower. Turn mower over and check that the battery cavity is free of the service center nearest you, or call the BLACK+DECKER help line at 1-800-544-6986. Remove any debris and clean each wheel for ...
...underside of wheels to an authorized BLACK+DECKER authorized service center. 6. A. PROBLEM TROUBLESHOOTING SOLUTION 1. Check to turn mower over and check: Blade for free rotation. 16 5. Has battery been fully charged? Keep blade sharp. Remove safety key and battery pack. Check that blade is ...connected properly. Avoid overloading the mower. Turn mower over and check that the battery cavity is free of the service center nearest you, or call the BLACK+DECKER help line at 1-800-544-6986. Remove any debris and clean each wheel for ...

Instruction Manual
Page 17
... Help protect our environment and conserve natural resources by returning the spent nickel cadmium, nickel metal hydride or lithium-ion batteries to an authorized BLACK+DECKER service center or to abuse, accidental damage or when repairs have already been paid by anyone other guarantees, express or... first, which vary from state to facilitate the collection of purchase may also contact your nearest Black+Decker Service Center. The RBRC® Seal The RBRC® (Rechargeable Battery Recycling Corporation) Seal on where to the retailer from whom it is illegal to accessories...
... Help protect our environment and conserve natural resources by returning the spent nickel cadmium, nickel metal hydride or lithium-ion batteries to an authorized BLACK+DECKER service center or to abuse, accidental damage or when repairs have already been paid by anyone other guarantees, express or... first, which vary from state to facilitate the collection of purchase may also contact your nearest Black+Decker Service Center. The RBRC® Seal The RBRC® (Rechargeable Battery Recycling Corporation) Seal on where to the retailer from whom it is illegal to accessories...


