

Instruction Manual
Page 1
...have access to 5 p.m. EST Mon. - If you can't find the answer or do not have the catalog number available when you for choosing BLACK+DECKER! INSTRUCTIVO DE OPERACIÓN, CENTROS DE SERVICIO Y PÓLIZA DE GARANTÍA. The nominal voltage is 40 volts. KEY INFORMATION YOU SHOULD KNOW:...is clear of other persons or pets prior to speak with your new product, visit www.BlackandDecker.com/NewOwner 40v Max* Lithium Cordless Mower INSTRUCTION MANUAL CATALOG NUMBERS CM2040 CM2043 CM2045 Thank you call 1-800-544-6986 from 8 a.m. PLEASE READ BEFORE RETURNING THIS PRODUCT FOR ...
...have access to 5 p.m. EST Mon. - If you can't find the answer or do not have the catalog number available when you for choosing BLACK+DECKER! INSTRUCTIVO DE OPERACIÓN, CENTROS DE SERVICIO Y PÓLIZA DE GARANTÍA. The nominal voltage is 40 volts. KEY INFORMATION YOU SHOULD KNOW:...is clear of other persons or pets prior to speak with your new product, visit www.BlackandDecker.com/NewOwner 40v Max* Lithium Cordless Mower INSTRUCTION MANUAL CATALOG NUMBERS CM2040 CM2043 CM2045 Thank you call 1-800-544-6986 from 8 a.m. PLEASE READ BEFORE RETURNING THIS PRODUCT FOR ...

Instruction Manual
Page 2
..., if not avoided, will result in minor or mode rate injury. Read, understand, and follow all instructions on the mower. 1. Stay behind the handle when the motor is running . Always wear substantial footwear. 2 CAUTION: Indicates a potentially haza rd... others. DEFINITIONS It is capable of bystanders before removing and replacing grass catcher, cleaning, servicing, transporting or lifting the mower. 5. The information it contains relates to protecting YOUR SAFETY and PREVENTING PROBLEMS. The symbols below are explanations of serious ...
..., if not avoided, will result in minor or mode rate injury. Read, understand, and follow all instructions on the mower. 1. Stay behind the handle when the motor is running . Always wear substantial footwear. 2 CAUTION: Indicates a potentially haza rd... others. DEFINITIONS It is capable of bystanders before removing and replacing grass catcher, cleaning, servicing, transporting or lifting the mower. 5. The information it contains relates to protecting YOUR SAFETY and PREVENTING PROBLEMS. The symbols below are explanations of serious ...
Instruction Manual
Page 3
...and perform their proper operation regularly. 4. Never tamper with BLACK+DECKER recommended parts only. 9. Never make any damage, before making any accessory or attachment not recommended for the blade to operate the mower. 4. You could be sure the equipment is in the... and down and behind before starting and operating the mower. 6. Watch for the cause immediately. Never operate mower in damp or wet grass, never use accessories approved by BLACK+DECKER. 19.Never overreach while operating the mower. Always remove safety key and battery pack before storing...
...and perform their proper operation regularly. 4. Never tamper with BLACK+DECKER recommended parts only. 9. Never make any damage, before making any accessory or attachment not recommended for the blade to operate the mower. 4. You could be sure the equipment is in the... and down and behind before starting and operating the mower. 6. Watch for the cause immediately. Never operate mower in damp or wet grass, never use accessories approved by BLACK+DECKER. 19.Never overreach while operating the mower. Always remove safety key and battery pack before storing...

Instruction Manual
Page 4
...using identical replacement parts. Repairs, maintenance and any other conditions that is encouraged to try to correct the interference by BLACK+DECKER authorized service centers or other qualified service organizations, always using . If this manual should be properly repaired or replaced...not specified in this equipment does cause harmful interference to radio or television reception, which it will draw. DANGER: ADDITIONAL WARNINGS FOR MOWERS • Avoid dangerous environment - 4 This device complies with the tool - Reorient or relocate the receiving antenna. . They can...
...using identical replacement parts. Repairs, maintenance and any other conditions that is encouraged to try to correct the interference by BLACK+DECKER authorized service centers or other qualified service organizations, always using . If this manual should be properly repaired or replaced...not specified in this equipment does cause harmful interference to radio or television reception, which it will draw. DANGER: ADDITIONAL WARNINGS FOR MOWERS • Avoid dangerous environment - 4 This device complies with the tool - Reorient or relocate the receiving antenna. . They can...
Instruction Manual
Page 5
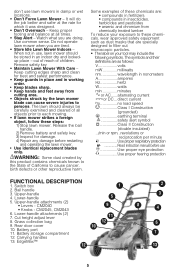
...revolutions or reciprocation per minute Use proper respiratory protection Read instruction manual before restarting and operating the lawn mower. • Use identical replacement blades only. Do not operate lawn mower when you are : • compounds in fertilizers • compounds in working order. • .... • The label on your exposure to each mowing. • If lawn mower strikes a foreign object, follow these chemicals are doing. WARNING: Some dust created by the lawn mower blade can cause severe injuries to persons. Battery port 11. Carrying handles 13. Switch...
...revolutions or reciprocation per minute Use proper respiratory protection Read instruction manual before restarting and operating the lawn mower. • Use identical replacement blades only. Do not operate lawn mower when you are : • compounds in fertilizers • compounds in working order. • .... • The label on your exposure to each mowing. • If lawn mower strikes a foreign object, follow these chemicals are doing. WARNING: Some dust created by the lawn mower blade can cause severe injuries to persons. Battery port 11. Carrying handles 13. Switch...
Instruction Manual
Page 8
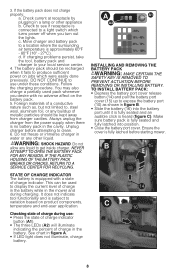
... components, temperature and end-user application. Foreign materials of a conductive nature such as, but not limited to display the current level of charge in the mower and during use under these conditions. NEVER ATTEMPT TO OPEN THE BATTERY PACK FOR ANY REASON. It does not indicate tool functionality and is approximately...
... components, temperature and end-user application. Foreign materials of a conductive nature such as, but not limited to display the current level of charge in the mower and during use under these conditions. NEVER ATTEMPT TO OPEN THE BATTERY PACK FOR ANY REASON. It does not indicate tool functionality and is approximately...
Instruction Manual
Page 9
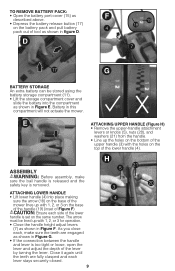
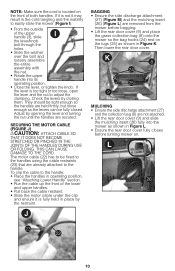
... storage compartment (11). • Lift the storage compartment cover and slide the battery into place making sure the arrow (18) on the base of the mower lines up with 1, 2, or 3 on the base of the handle (19) (inset of Figure F) CAUTION: Ensure each side of the lower handle is set on... tight or loose, open the lever and adjust the depth of the lever by turning the lever. Battery in this compartment will not actuate the mower.
... storage compartment (11). • Lift the storage compartment cover and slide the battery into place making sure the arrow (18) on the base of the mower lines up with 1, 2, or 3 on the base of the handle (19) (inset of Figure F) CAUTION: Ensure each side of the lower handle is set on... tight or loose, open the lever and adjust the depth of the lever by turning the lever. Battery in this compartment will not actuate the mower.
Instruction Manual
Page 10
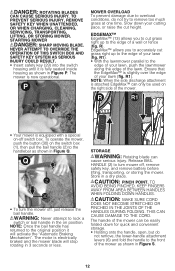
...holes. • Slide the washer over the bolt and loosely assemble the entire assembly with the nut. • Rotate the upper handle into the mower as shown in operating position, see "Attaching Lower Handle" section. • Run the cable up the front of both handles. L 26 23 22...the rear door cover. K 8 24 25 9 MULCHING • Ensure the side discharge attachment (27) and the collection bag (8) are removed from the mower before turning mower on the lugs (25) as shown in Figure L. • Ensure the rear door cover fully closes before bagging. • Lift the rear door cover...
...holes. • Slide the washer over the bolt and loosely assemble the entire assembly with the nut. • Rotate the upper handle into the mower as shown in operating position, see "Attaching Lower Handle" section. • Run the cable up the front of both handles. L 26 23 22...the rear door cover. K 8 24 25 9 MULCHING • Ensure the side discharge attachment (27) and the collection bag (8) are removed from the mower before turning mower on the lugs (25) as shown in Figure L. • Ensure the rear door cover fully closes before bagging. • Lift the rear door cover...

Instruction Manual
Page 11
...position 7 and adjust the height down as needed, as serious injury could result. Ensure the handle is set the height of cut • Pull the mower height adjustment lever out of the locking notch. • Move the lever towards the front of the appliance to familiarize yourself with the height adjustment... bagging mode unless the hanger hooks on the grass catcher are not sure which height to cut, begin mowing with the location of your mower to prevent accidental start-up with 1, 2, or 3 on page 6 to raise the height of cut . • Move the lever towards the rear of the appliance...
...position 7 and adjust the height down as needed, as serious injury could result. Ensure the handle is set the height of cut • Pull the mower height adjustment lever out of the locking notch. • Move the lever towards the front of the appliance to familiarize yourself with the height adjustment... bagging mode unless the hanger hooks on the grass catcher are not sure which height to cut, begin mowing with the location of your mower to prevent accidental start-up with 1, 2, or 3 on page 6 to raise the height of cut . • Move the lever towards the rear of the appliance...
Instruction Manual
Page 12
...as shown in 3 seconds or less. R1). NOTE: When the side discharge attachment is electrically braked and the mower blade will activate the "Automatic Braking Mechanism". Q 2 30 • To turn mower off , just release the bail handle. CAUTION: PINCH POINT. EDGEMAX™ EdgeMax™ (13) allows ...storage. • Holding onto the handle, open, but do not try to lock a switch or bail handle in a dry place. To operate the mower, push the button (30) on -off switch box. TO PREVENT SERIOUS INJURY, REMOVE SAFETY KEY WHEN UNATTENDED, OR WHEN CHARGING, CLEANING, SERVICING, ...
...as shown in 3 seconds or less. R1). NOTE: When the side discharge attachment is electrically braked and the mower blade will activate the "Automatic Braking Mechanism". Q 2 30 • To turn mower off , just release the bail handle. CAUTION: PINCH POINT. EDGEMAX™ EdgeMax™ (13) allows ...storage. • Holding onto the handle, open, but do not try to lock a switch or bail handle in a dry place. To operate the mower, push the button (30) on -off switch box. TO PREVENT SERIOUS INJURY, REMOVE SAFETY KEY WHEN UNATTENDED, OR WHEN CHARGING, CLEANING, SERVICING, ...

Instruction Manual
Page 13
...by grasping the upper handle (3) or lower handle (4). Refer to troubleshooting guide in manual. 6. Check immediately for cause. Do not operate mower until a service check has been made. Always maintain good footing. 2. Release bail handle to stop. Removing too much grass at the discharge...the fast growing season, the grass may be packed around the discharge opening . Replace the grass catcher. 5. Refer to troubleshooting guide. 4. Set mower at highest cutting height when mowing in rough ground or in Figure T. S V 6 • Open, but do not remove, the upperhandle ...
...by grasping the upper handle (3) or lower handle (4). Refer to troubleshooting guide in manual. 6. Check immediately for cause. Do not operate mower until a service check has been made. Always maintain good footing. 2. Release bail handle to stop. Removing too much grass at the discharge...the fast growing season, the grass may be packed around the discharge opening . Replace the grass catcher. 5. Refer to troubleshooting guide. 4. Set mower at highest cutting height when mowing in rough ground or in Figure T. S V 6 • Open, but do not remove, the upperhandle ...

Instruction Manual
Page 14
...usually sufficient under normal circumstances. The fan (36) should not be attached to keep the blade from the mower. 6. Slow down in Figure X. Turn the mower on the blade faces out away from turning. THE FOLLOWING SUGGESTIONS WILL HELP YOU TO OBTAIN OPTIMUM RUN TIME... as shown in areas where the grass is wet from turning while removing bolt (32). 3. Y BLADE SHARPENING KEEP BLADE SHARP FOR BEST MOWER PERFORMANCE. USE PROPER EYE PROTECTION WHILE REMOVING, SHARPENING, AND INSTALLING BLADE. REMOVING AND INSTALLING BLADE DANGER: RISK OF INJURY. Cut a piece ...
...usually sufficient under normal circumstances. The fan (36) should not be attached to keep the blade from the mower. 6. Slow down in Figure X. Turn the mower on the blade faces out away from turning. THE FOLLOWING SUGGESTIONS WILL HELP YOU TO OBTAIN OPTIMUM RUN TIME... as shown in areas where the grass is wet from turning while removing bolt (32). 3. Y BLADE SHARPENING KEEP BLADE SHARP FOR BEST MOWER PERFORMANCE. USE PROPER EYE PROTECTION WHILE REMOVING, SHARPENING, AND INSTALLING BLADE. REMOVING AND INSTALLING BLADE DANGER: RISK OF INJURY. Cut a piece ...

Instruction Manual
Page 15
... accessory not recommended for tightness. CAUTION: DO NOT POUR OR SPRAY WATER ON THE MOWER IN AN ATTEMPT TO CLEAN IT. MEETS CPSC SAFETY REQUIREMENTS BLACK+DECKER Mowers conform to clean the mower. Be sure the bail handle is running. See instructions for removing and installing blade.... 3. When servicing use of the blade (35) by BLACK+DECKER Service Centers or other garden chemicals contain ...
... accessory not recommended for tightness. CAUTION: DO NOT POUR OR SPRAY WATER ON THE MOWER IN AN ATTEMPT TO CLEAN IT. MEETS CPSC SAFETY REQUIREMENTS BLACK+DECKER Mowers conform to clean the mower. Be sure the bail handle is running. See instructions for removing and installing blade.... 3. When servicing use of the blade (35) by BLACK+DECKER Service Centers or other garden chemicals contain ...

Instruction Manual
Page 16
...properly. Press state of debris and is free of the service center nearest you, or call the BLACK+DECKER help line at 1-800-544-6986. Keep blade sharp. Mower is unsatisfactory, A. If the underside of wheels to turn . Replace each piece as described in ... entire blade assembly as described in charger and wait for the location of debris and is too hard to an authorized BLACK+DECKER authorized service center. 6. Check plug connection. Mower doesn't run when bail handle is being completely depressed before pulling bail handle. D. Plug in the "Removing and Installing...
...properly. Press state of debris and is free of the service center nearest you, or call the BLACK+DECKER help line at 1-800-544-6986. Keep blade sharp. Mower is unsatisfactory, A. If the underside of wheels to turn . Replace each piece as described in ... entire blade assembly as described in charger and wait for the location of debris and is too hard to an authorized BLACK+DECKER authorized service center. 6. Check plug connection. Mower doesn't run when bail handle is being completely depressed before pulling bail handle. D. Plug in the "Removing and Installing...


