Instruction Manual
Page 2
...electrical appliances, basic precautions should , has been dropped, damaged, left outdoors, or dropped into an electrical outlet. • Use the charger only in property damage. If appliance is a 20-35% solution of California to read and understand this information. The batteries can ...the State of potassium hydroxide, gets on cord. To unplug, grasp the plug, not the cord. • Do not handle charger, including charger plug, and charger terminals with damaged cord or plug. Use only manufacturer's recommended attachments. • Do not use . • Shock Hazard. keep...
...electrical appliances, basic precautions should , has been dropped, damaged, left outdoors, or dropped into an electrical outlet. • Use the charger only in property damage. If appliance is a 20-35% solution of California to read and understand this information. The batteries can ...the State of potassium hydroxide, gets on cord. To unplug, grasp the plug, not the cord. • Do not handle charger, including charger plug, and charger terminals with damaged cord or plug. Use only manufacturer's recommended attachments. • Do not use . • Shock Hazard. keep...
Instruction Manual
Page 3
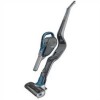
... not look into the air vents when the unit is switched on /off power button 2. Carrying the appliance with the charger specified by a qualified repair person using only identical replacement parts. A charger that have the switch on /off -position before connecting to battery pack, picking up or carrying the appliance. d)Do not...
... not look into the air vents when the unit is switched on /off power button 2. Carrying the appliance with the charger specified by a qualified repair person using only identical replacement parts. A charger that have the switch on /off -position before connecting to battery pack, picking up or carrying the appliance. d)Do not...
Instruction Manual
Page 4
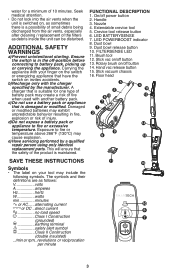
...above 104 °F. The green LED will begin in the low-speed mode. • Depress the button a second time to your appliance. Plug the charger into the chassis until you hear a snap as shown in Figure C. • To remove, depress the hand vac release button (14) and pull the... and does not indicate a problem. D • Fasten the two parts together with the supplied screw as shown in Figure B. NOTE: While charging, the charger may 4 Assembly • Slide the handle into the charging socket of the tool as shown in Figure D. This is assembled securely. E Charging the battery ...
...above 104 °F. The green LED will begin in the low-speed mode. • Depress the button a second time to your appliance. Plug the charger into the chassis until you hear a snap as shown in Figure C. • To remove, depress the hand vac release button (14) and pull the... and does not indicate a problem. D • Fasten the two parts together with the supplied screw as shown in Figure B. NOTE: While charging, the charger may 4 Assembly • Slide the handle into the charging socket of the tool as shown in Figure D. This is assembled securely. E Charging the battery ...


