
Instruction Manual
Page 1
SAVE THIS MANUAL FOR FUTURE REFERENCE. PLEASE READ BEFORE RETURNING THIS PRODUCT FOR ANY REASON. CORDLESS 2-IN-1 STICK VAC INSTRUCTION MANUAL CATALOG NUMBERS HSVJ415JMBF HSVJ520JMBF Thank you for choosing BLACK+DECKER!
SAVE THIS MANUAL FOR FUTURE REFERENCE. PLEASE READ BEFORE RETURNING THIS PRODUCT FOR ANY REASON. CORDLESS 2-IN-1 STICK VAC INSTRUCTION MANUAL CATALOG NUMBERS HSVJ415JMBF HSVJ520JMBF Thank you for choosing BLACK+DECKER!
Instruction Manual
Page 2
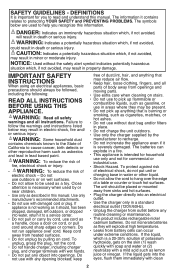
... injury. Use only manufacturer's recommended attachments. • Do not use in death or serious injury. To unplug, grasp the plug, not the cord. • Do not handle charger, including charger plug, and charger terminals with any routine cleaning or maintenance. • This product includes rechargeable nickel cadmium batteries. WARNING: Indicates a potentially hazardous situation which is important for commercial or industrial use with wet hands. •...
... injury. Use only manufacturer's recommended attachments. • Do not use in death or serious injury. To unplug, grasp the plug, not the cord. • Do not handle charger, including charger plug, and charger terminals with any routine cleaning or maintenance. • This product includes rechargeable nickel cadmium batteries. WARNING: Indicates a potentially hazardous situation which is important for commercial or industrial use with wet hands. •...
Instruction Manual
Page 3
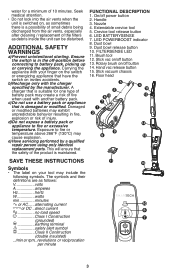
... injury. Extendable crevice tool 5. Hand vac release button 15. Floor head 5 3 6 10 7 4 12 13 1 2 14 9 8 15 SAVE THESE INSTRUCTIONS 11 16 Symbols • The label on your finger on invites accidents. Carrying the appliance with your tool may cause explosion. Brush tool 12. Ensure the switch is maintained. e) Have servicing performed by the manufacturer. Handle 3. Rotary brush on /off power button 2. d)Do not expose a battery pack or appliance...
... injury. Extendable crevice tool 5. Hand vac release button 15. Floor head 5 3 6 10 7 4 12 13 1 2 14 9 8 15 SAVE THESE INSTRUCTIONS 11 16 Symbols • The label on your finger on invites accidents. Carrying the appliance with your tool may cause explosion. Brush tool 12. Ensure the switch is maintained. e) Have servicing performed by the manufacturer. Handle 3. Rotary brush on /off power button 2. d)Do not expose a battery pack or appliance...
Instruction Manual
Page 4
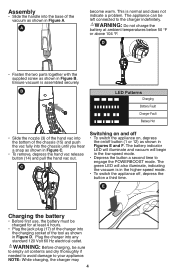
... remove, depress the hand vac release button (14) and pull the hand vac out. Assembly • Slide the handle into the charging socket of the tool as shown in Figure D. Ensure vacuum is normal and does not indicate a problem. NOTE: While charging, the charger may 4 A become warm. The appliance can be left connected to your appliance. E Charging the battery • Before first use, the battery...
... remove, depress the hand vac release button (14) and pull the hand vac out. Assembly • Slide the handle into the charging socket of the tool as shown in Figure D. Ensure vacuum is normal and does not indicate a problem. NOTE: While charging, the charger may 4 A become warm. The appliance can be left connected to your appliance. E Charging the battery • Before first use, the battery...
Instruction Manual
Page 5
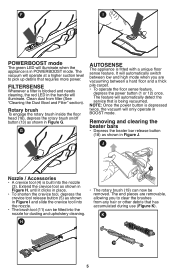
... be removed. The vacuum will automatically switch between a hard floor and a thick pile carpet. • To operate the floor sense feature, depress the power button (1 or 12) once. FILTERSENSE Whenever a filter is in Figure J. F I and slide the crevice tool into the nozzle. • The brush tool (11) can now be fitted into the nozzle for dusting and upholstery cleaning. Removing and clearing the beater bars • Depress the beater bar release button...
... be removed. The vacuum will automatically switch between a hard floor and a thick pile carpet. • To operate the floor sense feature, depress the power button (1 or 12) once. FILTERSENSE Whenever a filter is in Figure J. F I and slide the crevice tool into the nozzle. • The brush tool (11) can now be fitted into the nozzle for dusting and upholstery cleaning. Removing and clearing the beater bars • Depress the beater bar release button...

Instruction Manual
Page 6
... warm soapy water. Allow to keep the suction force optimised, the filters must be washed in Figure M. remove bag from the cloth filter (22), twist the plastic filter in Figure N. • Shake or lightly brush any loose dust off of the product after it "clicks" firmly into the bowl pressing firmly to freshen the air. Optimizing the suction force In order to dry before use the appliance...
... warm soapy water. Allow to keep the suction force optimised, the filters must be washed in Figure M. remove bag from the cloth filter (22), twist the plastic filter in Figure N. • Shake or lightly brush any loose dust off of the product after it "clicks" firmly into the bowl pressing firmly to freshen the air. Optimizing the suction force In order to dry before use the appliance...
Instruction Manual
Page 7
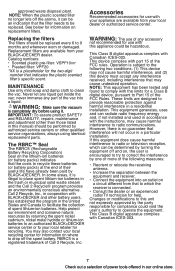
... could be replaced every 6 to clean the vac. never immerse any liquid get inside the vac; You may cause harmful interference to recycle these batteries (or battery packs) at the end of the vac into an outlet on where to operate the equipment. If this manual) should be hazardous. IMPORTANT: To assure product SAFETY and RELIABILITY, repairs, maintenance and adjustment (other battery users, has...
... could be replaced every 6 to clean the vac. never immerse any liquid get inside the vac; You may cause harmful interference to recycle these batteries (or battery packs) at the end of the vac into an outlet on where to operate the equipment. If this manual) should be hazardous. IMPORTANT: To assure product SAFETY and RELIABILITY, repairs, maintenance and adjustment (other battery users, has...


