
Instruction Manual
Page 1
to speak with your new product, call 1-800-544-6986 or visit www.BlackandDecker.com/NewOwner Please have the catalog number available when you can't find the answer or do not have a question or experience a problem with an agent. If you have access to ... RETURNING THIS PRODUCT FOR ANY REASON. Fri. ADVERTENCIA: LÉASE ESTE INSTRUCTIVO ANTES DE USAR EL PRODUCTO. To register your BLACK+DECKER purchase, go to the Internet, call . VEA EL ESPANOL EN LA CONTRAPORTADA. EST Mon. - CORDLESS 2-IN-1 STICK VAC INSTRUCTION MANUAL CATALOG NUMBERS HSVJ415JMBF HSVJ520JMBF ...
to speak with your new product, call 1-800-544-6986 or visit www.BlackandDecker.com/NewOwner Please have the catalog number available when you can't find the answer or do not have a question or experience a problem with an agent. If you have access to ... RETURNING THIS PRODUCT FOR ANY REASON. Fri. ADVERTENCIA: LÉASE ESTE INSTRUCTIVO ANTES DE USAR EL PRODUCTO. To register your BLACK+DECKER purchase, go to the Internet, call . VEA EL ESPANOL EN LA CONTRAPORTADA. EST Mon. - CORDLESS 2-IN-1 STICK VAC INSTRUCTION MANUAL CATALOG NUMBERS HSVJ415JMBF HSVJ520JMBF ...

Instruction Manual
Page 2
... recognize this manual. IMPORTANT SAFETY INSTRUCTIONS When using an electrical appliances, basic precautions should , has been dropped, damaged, left outdoors, or dropped into openings. If appliance is important for commercial or industrial use with a mild acid such as a handle, close a door on the skin (1) wash quickly with soap and water or (2) neutralize with any object into water, return it to a service center. •...
... recognize this manual. IMPORTANT SAFETY INSTRUCTIONS When using an electrical appliances, basic precautions should , has been dropped, damaged, left outdoors, or dropped into openings. If appliance is important for commercial or industrial use with a mild acid such as a handle, close a door on the skin (1) wash quickly with soap and water or (2) neutralize with any object into water, return it to a service center. •...

Instruction Manual
Page 3
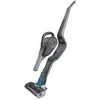
... tool 5. Floor head 5 3 6 10 7 4 12 13 1 2 14 9 8 15 SAVE THESE INSTRUCTIONS 11 16 Symbols • The label on your finger on /off power button 2. Seek medical attention. • Do not look into the air vents when the unit is switched on /off -position before connecting to fire or excessive temperature. e) Have servicing performed by the manufacturer. FUNCTIONAL DESCRIPTION 1. Nozzle 4. Dust bowl 9. water...
... tool 5. Floor head 5 3 6 10 7 4 12 13 1 2 14 9 8 15 SAVE THESE INSTRUCTIONS 11 16 Symbols • The label on your finger on /off power button 2. Seek medical attention. • Do not look into the air vents when the unit is switched on /off -position before connecting to fire or excessive temperature. e) Have servicing performed by the manufacturer. FUNCTIONAL DESCRIPTION 1. Nozzle 4. Dust bowl 9. water...

Instruction Manual
Page 4
... vacuum is in the higher-speed mode. • To switch the appliance off button (1 or 12) as shown in Figures E and F. E Charging the battery • Before first use, the battery must be sure to empty all contents and dry thoroughly if needed to avoid damage to your appliance. WARNING: Do not charge the battery at least 4 hours. • Plug the jack plug...
... vacuum is in the higher-speed mode. • To switch the appliance off button (1 or 12) as shown in Figures E and F. E Charging the battery • Before first use, the battery must be sure to empty all contents and dry thoroughly if needed to avoid damage to your appliance. WARNING: Do not charge the battery at least 4 hours. • Plug the jack plug...

Instruction Manual
Page 5
... the rotary brush inside the floor head (16), depress the rotary brush on/off button (13) as shown in Figure G. K 19 5 Clean dust from any hair or other debris that has accumulated during use (Figure K). The feature will automatically detect the service that requires more power. NOTE: Once the power button is being vacuumed. Removing and clearing the beater bars • Depress the beater bar release button (18...
... the rotary brush inside the floor head (16), depress the rotary brush on/off button (13) as shown in Figure G. K 19 5 Clean dust from any hair or other debris that has accumulated during use (Figure K). The feature will automatically detect the service that requires more power. NOTE: Once the power button is being vacuumed. Removing and clearing the beater bars • Depress the beater bar release button (18...

Instruction Manual
Page 6
... washed in warm soapy water. Scented filter BEFORE FIRST USE - Reassemble per instructions above . • To separate the plastic filter (21) from the scented pre-filter. For a more thorough cleaning • Remove the dust bowl and filter assembly as described above . IMPORTANT: Maximum dust collection will only be obtained with clean filters. remove bag from the cloth filter (22), twist the plastic filter in a counterclockwise direction and lift it is switched...
... washed in warm soapy water. Scented filter BEFORE FIRST USE - Reassemble per instructions above . • To separate the plastic filter (21) from the scented pre-filter. For a more thorough cleaning • Remove the dust bowl and filter assembly as described above . IMPORTANT: Maximum dust collection will only be obtained with clean filters. remove bag from the cloth filter (22), twist the plastic filter in a counterclockwise direction and lift it is switched...

Instruction Manual
Page 7
... than those listed in a particular installation. This Class B digital apparatus complies with this appliance could void the user's authority to this manual) should be performed by the party responsible for help. In some areas, it can be replaced. RBRC® is completely dry before using identical replacement parts. Changes or modifications to operate the equipment. IMPORTANT: To assure product SAFETY and RELIABILITY, repairs, maintenance and...
... than those listed in a particular installation. This Class B digital apparatus complies with this appliance could void the user's authority to this manual) should be performed by the party responsible for help. In some areas, it can be replaced. RBRC® is completely dry before using identical replacement parts. Changes or modifications to operate the equipment. IMPORTANT: To assure product SAFETY and RELIABILITY, repairs, maintenance and...

Instruction Manual
Page 8
... when repairs have been made within the time period of the retailer's policy for commercial use, and accordingly, such commercial use of your warning labels become illegible or are listed online at BLACK+DECKER's option. This warranty does not apply to a BLACK+DECKER owned or authorized Service Center for such information. LATIN AMERICA:This warranty does not apply to products sold in Latin America, check country specific warranty...
... when repairs have been made within the time period of the retailer's policy for commercial use, and accordingly, such commercial use of your warning labels become illegible or are listed online at BLACK+DECKER's option. This warranty does not apply to a BLACK+DECKER owned or authorized Service Center for such information. LATIN AMERICA:This warranty does not apply to products sold in Latin America, check country specific warranty...

Instruction Manual
Page 28
HSVJ415JMBF, HSVJ520JMBF Copyright© 2016 BLACK+DECKER Printed in China 28 Form No. 90632059 January 2016 No. Cat.
HSVJ415JMBF, HSVJ520JMBF Copyright© 2016 BLACK+DECKER Printed in China 28 Form No. 90632059 January 2016 No. Cat.


