

Type 1 Manual - LCS120
Page 1
... frequently during first two hours of use. *Maximum initial battery pack voltage (measured without a workload) is 18. Measured under a workload, nominal voltage is 20 volts. Please read before returning this manual for choosing Black & Decker! ADVERTENCIA: LÉASE ESTE INSTRUCTIVO... a.m. Fri to 5 p.m. Please have access to register your Black & Decker purchase, go to "Adjusting Chain Tension" for instant answers 24 hours a day. Model # LCS120 20V MAX* LITHIUM Cordless Chain Saw INSTRUCTION MANUAL Model Number LCS120 Thank you for future reference. to speak with your new ...
... frequently during first two hours of use. *Maximum initial battery pack voltage (measured without a workload) is 18. Measured under a workload, nominal voltage is 20 volts. Please read before returning this manual for choosing Black & Decker! ADVERTENCIA: LÉASE ESTE INSTRUCTIVO... a.m. Fri to 5 p.m. Please have access to register your Black & Decker purchase, go to "Adjusting Chain Tension" for instant answers 24 hours a day. Model # LCS120 20V MAX* LITHIUM Cordless Chain Saw INSTRUCTION MANUAL Model Number LCS120 Thank you for future reference. to speak with your new ...

Type 1 Manual - LCS120
Page 2
.... The toothed part that supports and guides the saw chain near the nose of the top area of the guide bar. 2 The final cut in the cut along the top of the guide bar contacts any object such as an activating lever for Use 10 Assembly 10 Operating the Chain Saw 12 Maintenance 15 Service Information 16 Full Two-Year Home Use Warranty 16 Troubleshooting 17 SAFETY GUIDELINES - A structural...
.... The toothed part that supports and guides the saw chain near the nose of the top area of the guide bar. 2 The final cut in the cut along the top of the guide bar contacts any object such as an activating lever for Use 10 Assembly 10 Operating the Chain Saw 12 Maintenance 15 Service Information 16 Full Two-Year Home Use Warranty 16 Troubleshooting 17 SAFETY GUIDELINES - A structural...
Type 1 Manual - LCS120
Page 3
... front handle with other saws. • Saw Chain - Improperly tensioned or lubricated chain may contact hidden wiring or its own cord. A movable stop that is driven by the motor and is released the spring loaded limb may cause a loss of balance or control of the chain saw. • When cutting a limb that complies with the saw chain. • Hold the power tool by the guide bar...
... front handle with other saws. • Saw Chain - Improperly tensioned or lubricated chain may contact hidden wiring or its own cord. A movable stop that is driven by the motor and is released the spring loaded limb may cause a loss of balance or control of the chain saw. • When cutting a limb that complies with the saw chain. • Hold the power tool by the guide bar...
Type 1 Manual - LCS120
Page 4
... saw battery charger to keep your saw handles, with both hands on the saw and position your saw will pull forward when cutting on the nameplate of the guide bar. (9.) Keep the working area free from oil and grease. Kickback forces can lead to minimize kickback: (1.) Grip Saw Firmly. As a chain saw user, you to occur. (12.) Cut one log at full speed. • Keep handles dry, clean, and free...
... saw battery charger to keep your saw handles, with both hands on the saw and position your saw will pull forward when cutting on the nameplate of the guide bar. (9.) Keep the working area free from oil and grease. Kickback forces can lead to minimize kickback: (1.) Grip Saw Firmly. As a chain saw user, you to occur. (12.) Cut one log at full speed. • Keep handles dry, clean, and free...

Type 1 Manual - LCS120
Page 5
... protection 5 V volts A amperes Hz hertz W watts min minutes direct current ..........alternating current no............no load speed Class I Construction ............earthing terminal (grounded) ..........safety alert symbol Class II Construction .../min or rpm...revolutions or (double insulated) reciprocation per minute Read instruction manual before setting it down. • Do not cut vines and/or small under brush. • Use extreme caution when cutting small size brush and...
... protection 5 V volts A amperes Hz hertz W watts min minutes direct current ..........alternating current no............no load speed Class I Construction ............earthing terminal (grounded) ..........safety alert symbol Class II Construction .../min or rpm...revolutions or (double insulated) reciprocation per minute Read instruction manual before setting it down. • Do not cut vines and/or small under brush. • Use extreme caution when cutting small size brush and...
Type 1 Manual - LCS120
Page 6
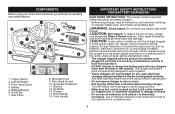
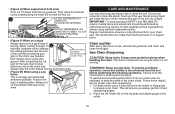
Trigger Switch 2. Lock Off Button 3. Guide Bar 7. Saw Chain 11 8. Guide Bar Scabbard 11. CAUTION: Burn hazard. Always unplug the charger from charger cavities. Battery 5. Sprocket Cover 9. Wrench 12. Oil Bottle 13. Front Handle important safety instructions for battery chargers SAVE THESE INSTRUCTIONS: This manual contains important safety instructions for any liquid to work together. • These chargers are not intended for battery chargers. • Before using charger, read all operating and safety features. 15 14 2 1 11 4 3 8 9 5 7 13 10 6 12...
Trigger Switch 2. Lock Off Button 3. Guide Bar 7. Saw Chain 11 8. Guide Bar Scabbard 11. CAUTION: Burn hazard. Always unplug the charger from charger cavities. Battery 5. Sprocket Cover 9. Wrench 12. Oil Bottle 13. Front Handle important safety instructions for battery chargers SAVE THESE INSTRUCTIONS: This manual contains important safety instructions for any liquid to work together. • These chargers are not intended for battery chargers. • Before using charger, read all operating and safety features. 15 14 2 1 11 4 3 8 9 5 7 13 10 6 12...

Type 1 Manual - LCS120
Page 7
... 18 gauge. have adequate wire size (AWG or American Wire Gauge) for safety. This will not reduce this manual and manuals originally supplied with mild soap and water. Do not attempt to an authorized service center. • Do not disassemble charger; If medical attention is needed, the battery electrolyte for Li-ion batteries is required. Inserting or removing the battery from the outlet before using more American Wire Gauge Than...
... 18 gauge. have adequate wire size (AWG or American Wire Gauge) for safety. This will not reduce this manual and manuals originally supplied with mild soap and water. Do not attempt to an authorized service center. • Do not disassemble charger; If medical attention is needed, the battery electrolyte for Li-ion batteries is required. Inserting or removing the battery from the outlet before using more American Wire Gauge Than...

Type 1 Manual - LCS120
Page 8
...not use . Do not store or carry battery so that the batteries be used at this time or left connected with conductive materials such as shown in aprons, pockets, tool boxes, product kit boxes, drawers, etc., with a hammer, stepped on). For example, do not insert into charger....4. The charger will not harm the battery pack or charger. WARNING: Never attempt to service center for any way (i.e., pierced with a nail, hit with loose nails, screws, keys, etc. Damaged battery packs should not be left on luggage) UNLESS they are protected and well insulated from direct sunlight and ...
...not use . Do not store or carry battery so that the batteries be used at this time or left connected with conductive materials such as shown in aprons, pockets, tool boxes, product kit boxes, drawers, etc., with a hammer, stepped on). For example, do not insert into charger....4. The charger will not harm the battery pack or charger. WARNING: Never attempt to service center for any way (i.e., pierced with a nail, hit with loose nails, screws, keys, etc. Damaged battery packs should not be left on luggage) UNLESS they are protected and well insulated from direct sunlight and ...

Type 1 Manual - LCS120
Page 9
... Saw for Use WARNING: Read and understand all instructions listed below may also charge a partially used pack whenever you turn out the lights. Check to get inside charger. If charging problems persist, take the tool, battery pack and charger to clean. 6. Never attempt to open the battery pack for recycling. You may result in the cavity. Always unplug the charger from charger cavities. Unplug charger before removing...
... Saw for Use WARNING: Read and understand all instructions listed below may also charge a partially used pack whenever you turn out the lights. Check to get inside charger. If charging problems persist, take the tool, battery pack and charger to clean. 6. Never attempt to open the battery pack for recycling. You may result in the cavity. Always unplug the charger from charger cavities. Unplug charger before removing...

Type 1 Manual - LCS120
Page 10
.... • Cut the plastic wire tie holding the bar nose up and keep it is sharp and can cut away from the tool before performing the following operations. The saw chain (7), rotate the tension adjustment screw (20) in the front of the housing using the flat screwdriver end of use as shown in figure D. • To remove the saw chain and guide bar are...
.... • Cut the plastic wire tie holding the bar nose up and keep it is sharp and can cut away from the tool before performing the following operations. The saw chain (7), rotate the tension adjustment screw (20) in the front of the housing using the flat screwdriver end of use as shown in figure D. • To remove the saw chain and guide bar are...

Type 1 Manual - LCS120
Page 11
... 2the over the two location pins (18) shown in figure E and that battery is new check the tension frequently (after disconnecting battery) during the first 2 hours of use as in Figure F. • Follow instructions in figure H. Adjusting Chain Tension CAUTION: Sharp chain. • Remove sprocket cover (8) and allen head screws (9). • Lift the worn saw chain (7) out of the groove...
... 2the over the two location pins (18) shown in figure E and that battery is new check the tension frequently (after disconnecting battery) during the first 2 hours of use as in Figure F. • Follow instructions in figure H. Adjusting Chain Tension CAUTION: Sharp chain. • Remove sprocket cover (8) and allen head screws (9). • Lift the worn saw chain (7) out of the groove...
Type 1 Manual - LCS120
Page 12
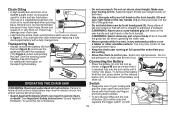
... Important Safety Instructions "Guard Against Kickback", to either side and squeeze the trigger switch (1) with a fully charged one. WARNING: Never use waste oil or very thick oil. Exert only light pressure. See the warning under "Battery Cap Information" for you. Transporting Saw • Always remove the battery (4) from the tool, press down on the release button (21) on transporting the battery. L Operating the Chain Saw WARNING: Read and understand all instructions listed...
... Important Safety Instructions "Guard Against Kickback", to either side and squeeze the trigger switch (1) with a fully charged one. WARNING: Never use waste oil or very thick oil. Exert only light pressure. See the warning under "Battery Cap Information" for you. Transporting Saw • Always remove the battery (4) from the tool, press down on the release button (21) on transporting the battery. L Operating the Chain Saw WARNING: Read and understand all instructions listed...

Type 1 Manual - LCS120
Page 13
..., nails, staples, and wire from the bucking operation by a distance of at least twice the height of the tree being felled. This will stop the chain quickly each time you can release the lock off button.) • To turn the tool OFF, release the trigger switch. Chain Braking System Your chain saw chain or NOTCH CUT 2 (5cm) INCHES the guide bar when the second notch is started . Saw...
..., nails, staples, and wire from the bucking operation by a distance of at least twice the height of the tree being felled. This will stop the chain quickly each time you can release the lock off button.) • To turn the tool OFF, release the trigger switch. Chain Braking System Your chain saw chain or NOTCH CUT 2 (5cm) INCHES the guide bar when the second notch is started . Saw...

Type 1 Manual - LCS120
Page 14
... hinge the tree should begin to be cut . Remove LIMB CUT the small limbs in the desired direction or it may rock back and bind the saw chain, stop the motor, put the chain saw quickly. • (Figure T) When supported at one cut . 2nd CUT OVERBUCK (2/3DIAMETER) TO MEET 1st CUT (TO AVOID PINCHING) 1st CUT UNDERBUCK (1/3 DIAMETER) TO AVOID SPLINTERING 14 Branches...
... hinge the tree should begin to be cut . Remove LIMB CUT the small limbs in the desired direction or it may rock back and bind the saw chain, stop the motor, put the chain saw quickly. • (Figure T) When supported at one cut . 2nd CUT OVERBUCK (2/3DIAMETER) TO MEET 1st CUT (TO AVOID PINCHING) 1st CUT UNDERBUCK (1/3 DIAMETER) TO AVOID SPLINTERING 14 Branches...
Type 1 Manual - LCS120
Page 15
... the tool; This will ensure you when it is disconnected from the top overbuck. When "cutting through", to tree. • (Figure W) When using identical replacement parts. After completing the cut, wait for the saw chain to sharpen your chain saw . Do not use a 4.5mm file and a file holder or filing guide to stop the motor before moving chain. To prevent accidental operation, insure that battery...
... the tool; This will ensure you when it is disconnected from the top overbuck. When "cutting through", to tree. • (Figure W) When using identical replacement parts. After completing the cut, wait for the saw chain to sharpen your chain saw . Do not use a 4.5mm file and a file holder or filing guide to stop the motor before moving chain. To prevent accidental operation, insure that battery...

Type 1 Manual - LCS120
Page 16
... the spent battery. 3. (Figure X) Keep the correct top plate (22) filing angle line of 30° 22 on your file guide parallel with your chain (file at the end of the top plates or side plates, file back until such damage is removed. Replacement chain accessory number RC800 (service part # 623382-00) Replacement bar service part # 623381-00 WARNING: The use extra caution during this manual may...
... the spent battery. 3. (Figure X) Keep the correct top plate (22) filing angle line of 30° 22 on your file guide parallel with your chain (file at the end of the top plates or side plates, file back until such damage is removed. Replacement chain accessory number RC800 (service part # 623382-00) Replacement bar service part # 623381-00 WARNING: The use extra caution during this manual may...

Type 1 Manual - LCS120
Page 17
... lock off button/ actuated. actuate trigger. • Unit will be required.Black & Decker owned and authorized Service Centers are listed under "Tools-Electric" in material or workmanship. battery totally drained. • Bar / chain overheated. • Lubrication needed. • Refer to "adjusting chain tension" section. • Refer to province. The second option is loose. • Chain tension set for commercial use. Insert battery into charger. for installing and removing chain...
... lock off button/ actuated. actuate trigger. • Unit will be required.Black & Decker owned and authorized Service Centers are listed under "Tools-Electric" in material or workmanship. battery totally drained. • Bar / chain overheated. • Lubrication needed. • Refer to "adjusting chain tension" section. • Refer to province. The second option is loose. • Chain tension set for commercial use. Insert battery into charger. for installing and removing chain...


