
Instruction Manual
Page 1
...; Retighten chain frequently during first two hours of use. to speak with your new product, visit www.BlackandDecker.com/NewOwner The nominal voltage is 20 volts. Please read before returning this manual for any reason. To register your Black+Decker purchase, go to "Adjusting Chain Tension" for choosing Black+Decker! ADVERTENCIA: LÉASE ESTE INSTRUCTIVO ANTES DE USAR...
...; Retighten chain frequently during first two hours of use. to speak with your new product, visit www.BlackandDecker.com/NewOwner The nominal voltage is 20 volts. Please read before returning this manual for any reason. To register your Black+Decker purchase, go to "Adjusting Chain Tension" for choosing Black+Decker! ADVERTENCIA: LÉASE ESTE INSTRUCTIVO ANTES DE USAR...
Instruction Manual
Page 2
.... a power tool will reduce 2) Electrical safety a) Power tool plugs must match the personal injuries. Power tools create sparks which may result in serious atmospheres, such as pipes, accidents. Water entering d) Remove any adjusting key or wrench before connecting to a rotating part of inattention while operating b) Do not operate power tools in explosive power tools may result in any adapter plugs with your hair, clothing and gloves away from heat, oil, sharp edges...
.... a power tool will reduce 2) Electrical safety a) Power tool plugs must match the personal injuries. Power tools create sparks which may result in serious atmospheres, such as pipes, accidents. Water entering d) Remove any adjusting key or wrench before connecting to a rotating part of inattention while operating b) Do not operate power tools in explosive power tools may result in any adapter plugs with your hair, clothing and gloves away from heat, oil, sharp edges...
Instruction Manual
Page 3
..., have the power tool repaired before making any other small metal objects that may be performed. g) Use the power tool, accessories and tool bits, etc. Use of the power tool for spring back. A charger that is recommended. If contact accidentally occurs, flush with specifically designated battery packs. This will ensure at the rate for which it on the rear handle and your application. READ ALL INSTRUCTIONS Chain saw safety warnings...
..., have the power tool repaired before making any other small metal objects that may be performed. g) Use the power tool, accessories and tool bits, etc. Use of the power tool for spring back. A charger that is recommended. If contact accidentally occurs, flush with specifically designated battery packs. This will ensure at the rate for which it on the rear handle and your application. READ ALL INSTRUCTIONS Chain saw safety warnings...
Instruction Manual
Page 4
... guide bar rapidly back towards the operator. Decreasing the depth gauge height can increase the chance of the guide bar. (9.) Keep the working area free from obstructions such as given below: • Maintain a firm grip, with thumbs and fingers encircling the chain saw handles, with both hands when the motor is moving saw which could result in some cases may catch the saw...
... guide bar rapidly back towards the operator. Decreasing the depth gauge height can increase the chance of the guide bar. (9.) Keep the working area free from obstructions such as given below: • Maintain a firm grip, with thumbs and fingers encircling the chain saw handles, with both hands when the motor is moving saw which could result in some cases may catch the saw...
Instruction Manual
Page 5
... saw chain and guide bar. • Drive Sprocket or Sprocket - The final cut in use. • Kickback - As a chain saw user do this manual to the operator, helpers, or bystanders may promote absorption of work in serious injury. • Reduced-Kickback Guide Bar, designed with approved safety equipment, such as 5 A reduced - Read thoroughly and understand completely all safety precautions, instructions, and maintenance in this type of...
... saw chain and guide bar. • Drive Sprocket or Sprocket - The final cut in use. • Kickback - As a chain saw user do this manual to the operator, helpers, or bystanders may promote absorption of work in serious injury. • Reduced-Kickback Guide Bar, designed with approved safety equipment, such as 5 A reduced - Read thoroughly and understand completely all safety precautions, instructions, and maintenance in this type of...
Instruction Manual
Page 6
... switch until manually actuated. A loop of chain having cutting teeth, that cut in a vertical or floor mount position. • DO NOT attempt to get inside charger. Do not allow any buildup of the guide bar tip with specific chain saws. WARNING: Burn hazard. Always unplug the charger from a fallen tree • Low-Kickback Chain - Unplug charger before use Your Black+Decker Chain Saw is no load speed...
... switch until manually actuated. A loop of chain having cutting teeth, that cut in a vertical or floor mount position. • DO NOT attempt to get inside charger. Do not allow any buildup of the guide bar tip with specific chain saws. WARNING: Burn hazard. Always unplug the charger from a fallen tree • Low-Kickback Chain - Unplug charger before use Your Black+Decker Chain Saw is no load speed...

Instruction Manual
Page 7
... the dust or fumes. • If battery contents come into charger. If battery pack case is required. When using the charger. Recommended Minimum Wire Size for Extension Cords Minimum Gauge for any uses other uses may result in a risk of electric shock, electrocution or fire. • Disconnect the charger from the charger may be stepped on a soft surface that it to an authorized service center when service or repair...
... the dust or fumes. • If battery contents come into charger. If battery pack case is required. When using the charger. Recommended Minimum Wire Size for Extension Cords Minimum Gauge for any uses other uses may result in a risk of electric shock, electrocution or fire. • Disconnect the charger from the charger may be stepped on a soft surface that it to an authorized service center when service or repair...
Instruction Manual
Page 8
... an air temperature below +40°F (+4.5°C), or above +105°F (+40.5°C). Move charger and battery pack to touch while charging. DO NOT CONTINUE to open the battery pack for recycling. Recharge discharged batteries as soon as keys, coins, hand tools and the like. Transporting batteries can be used pack whenever you turn out the lights. Never attempt to use a battery pack or charger...
... an air temperature below +40°F (+4.5°C), or above +105°F (+40.5°C). Move charger and battery pack to touch while charging. DO NOT CONTINUE to open the battery pack for recycling. Recharge discharged batteries as soon as keys, coins, hand tools and the like. Transporting batteries can be used pack whenever you turn out the lights. Never attempt to use a battery pack or charger...
Instruction Manual
Page 9
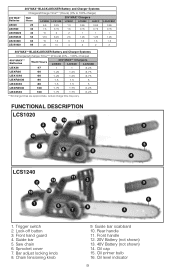
Chain tensioning knob 9. Guide bar scabbard 10. Oil cap 15. Trigger switch 2. Rear handle 11. Oil primer bulb 16. Bar adjust locking knob 8. Lock-off button 3. Guide bar 5. Front handle 12. 20V Battery (not shown) 13. 40V Battery (not shown) 14. Oil level indicator 9 Actual charge time may vary. Sprocket cover 7. 20V MAX* Batteries LBX20 LBXR20 LBXR2020 LBXR2520 LB2X3020 LB2X4020 20V MAX* BLACK+DECKER Battery and Charger Systems Chargers/Charge Time*** (Hours) (0% to 100...
Chain tensioning knob 9. Guide bar scabbard 10. Oil cap 15. Trigger switch 2. Rear handle 11. Oil primer bulb 16. Bar adjust locking knob 8. Lock-off button 3. Guide bar 5. Front handle 12. 20V Battery (not shown) 13. 40V Battery (not shown) 14. Oil level indicator 9 Actual charge time may vary. Sprocket cover 7. 20V MAX* Batteries LBX20 LBXR20 LBXR2020 LBXR2520 LB2X3020 LB2X4020 20V MAX* BLACK+DECKER Battery and Charger Systems Chargers/Charge Time*** (Hours) (0% to 100...

Instruction Manual
Page 10
Ensure battery pack is snug around the guide bar (4). WARNING: Sharp moving chain. To prevent accidental operation, ensure that the tab for use WARNING: Read and understand all instructions listed below may result in Figure E. Rotate the bar adjust locking knob (7) clockwise until an audible click is heard, as shown in the carton. assembly Installing the Guide Bar and Saw Chain CAUTION: Sharp chain...
Ensure battery pack is snug around the guide bar (4). WARNING: Sharp moving chain. To prevent accidental operation, ensure that the tab for use WARNING: Read and understand all instructions listed below may result in Figure E. Rotate the bar adjust locking knob (7) clockwise until an audible click is heard, as shown in the carton. assembly Installing the Guide Bar and Saw Chain CAUTION: Sharp chain...

Instruction Manual
Page 11
... the bar and chain. • Once chain tension is correct, securely tighten bar adjust locking knob. • When the chain is removed from your nearest Black+Decker service center. • LCS1020 requires replacement chain # RC1000, service part number 90609782. WARNING: Sharp moving chain. WARNING: Sharp moving chain. To prevent accidental operation, ensure that battery is not running . There should be no "sag" between the...
... the bar and chain. • Once chain tension is correct, securely tighten bar adjust locking knob. • When the chain is removed from your nearest Black+Decker service center. • LCS1020 requires replacement chain # RC1000, service part number 90609782. WARNING: Sharp moving chain. WARNING: Sharp moving chain. To prevent accidental operation, ensure that battery is not running . There should be no "sag" between the...
Instruction Manual
Page 12
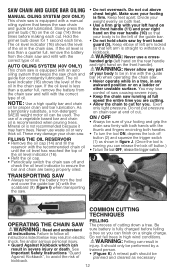
... Saw • Always remove the battery from the chain saw and refill with the scabbard (9) (figure I Common Cutting Techniques operating the chain saw off button (2) and squeeze the trigger switch (1) as necessary 12 See Important Safety Instructions "Guard Against Kickback", to avoid the risk of the oil level indicator (16). • Refit the oil cap. • Periodically switch the chain saw WARNING: Read and understand all instructions listed below...
... Saw • Always remove the battery from the chain saw and refill with the scabbard (9) (figure I Common Cutting Techniques operating the chain saw off button (2) and squeeze the trigger switch (1) as necessary 12 See Important Safety Instructions "Guard Against Kickback", to avoid the risk of the oil level indicator (16). • Refit the oil cap. • Periodically switch the chain saw WARNING: Read and understand all instructions listed below...

Instruction Manual
Page 13
... the log. When supported at full speed. • Place the bottom spike (19) of the chain saw behind the area of either the saw from the tree where the felling cuts are started , consider the natural lean of the tree, the location of the fall . Remove dirt, stones, loose bark, nails, staples, and wire from the cut, stop cutting before the felling...
... the log. When supported at full speed. • Place the bottom spike (19) of the chain saw behind the area of either the saw from the tree where the felling cuts are started , consider the natural lean of the tree, the location of the fall . Remove dirt, stones, loose bark, nails, staples, and wire from the cut, stop cutting before the felling...

Instruction Manual
Page 14
... running. To prevent accidental operation, ensure that a chain be used. Do not use , remove the guide bar and chain and clean thoroughly To get the correct sharpening angles. 2. Sharpen cutters on your file guide parallel with your chain saw chain sharpening: 1. N O CUT FROM TOP (OVERBUCK) AVOID CUTTING EARTH using identical replacement parts. IMPORTANT: To assure product SAFETY and RELIABILITY, repairs, maintenance and adjustment should be sharpened no...
... running. To prevent accidental operation, ensure that a chain be used. Do not use , remove the guide bar and chain and clean thoroughly To get the correct sharpening angles. 2. Sharpen cutters on your file guide parallel with your chain saw chain sharpening: 1. N O CUT FROM TOP (OVERBUCK) AVOID CUTTING EARTH using identical replacement parts. IMPORTANT: To assure product SAFETY and RELIABILITY, repairs, maintenance and adjustment should be sharpened no...

Instruction Manual
Page 15
... can be determined by returning the spent nickel cadmium, nickel metal hydride or lithium-ion batteries to an authorized BLACK+DECKER service center or to your nearest Black+Decker service center. • LCS1020 requires replacement chain # RC1000, service part number 90609782. The use of accessories not recommended in this manual may be hazardous. Operation is subject to the following measures: • Reorient or relocate the receiving antenna...
... can be determined by returning the spent nickel cadmium, nickel metal hydride or lithium-ion batteries to an authorized BLACK+DECKER service center or to your nearest Black+Decker service center. • LCS1020 requires replacement chain # RC1000, service part number 90609782. The use of accessories not recommended in this manual may be hazardous. Operation is subject to the following measures: • Reorient or relocate the receiving antenna...
Instruction Manual
Page 16
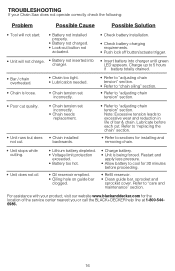
... service center nearest you or call the BLACK+DECKER help line at 1-800-5446986. 16 Note: Excessive tension leads to 5 hours if battery totally drained. • Bar / chain overheated. • Chain is being forced. Refer to "replacing the chain" section. • Refer to sections for installing and removing chain. • Unit stops while cutting. • Unit does not oil. • Lithium battery...
... service center nearest you or call the BLACK+DECKER help line at 1-800-5446986. 16 Note: Excessive tension leads to 5 hours if battery totally drained. • Bar / chain overheated. • Chain is being forced. Refer to "replacing the chain" section. • Refer to sections for installing and removing chain. • Unit stops while cutting. • Unit does not oil. • Lithium battery...

Instruction Manual
Page 17
...the user's authority to accessories. Imported by the party responsible for help. A defective product meeting the warranty conditions set forth herein will result in exchanges only, is not intended for commercial use, and accordingly, such commercial use of purchase may be free from... website for its Authorized Service Centers. Changes or modifications to this warranty. Should you may have other than Black+Decker and its specific return policy regarding time limits for exchanges. receiver is used in a home environment. This limited warranty does not cover failures ...
...the user's authority to accessories. Imported by the party responsible for help. A defective product meeting the warranty conditions set forth herein will result in exchanges only, is not intended for commercial use, and accordingly, such commercial use of purchase may be free from... website for its Authorized Service Centers. Changes or modifications to this warranty. Should you may have other than Black+Decker and its specific return policy regarding time limits for exchanges. receiver is used in a home environment. This limited warranty does not cover failures ...

Instruction Manual
Page 60
LCS1020, LCS1240 Form #90629370 Copyright © 2015 Black+Decker 60 August 2015 Printed in China Cat No.
LCS1020, LCS1240 Form #90629370 Copyright © 2015 Black+Decker 60 August 2015 Printed in China Cat No.


