

Instruction Manual
Page 1
20V MAX* STRING TRIMMER INSTRUCTION MANUAL CATALOG NUMBER LST522 Thank you call. Please have access to http://www.blackanddecker.com/instantanswers If you can't find the answer or do not have the catalog number available when you for choosing BLACK+DECKER! INSTRUCTIVO DE OPERACIÓN, CENTROS DE SERVICIO ...LIZA DE GARANTÍA. KEY INFORMATION YOU SHOULD KNOW: • The guard must be installed before trimming or edging - To register your BLACK+DECKER purchase, go to the Internet, call 1-800-544-6986 or visit www.BlackandDecker.com/NewOwner EST Mon. - SAVE THIS MANUAL FOR ...
20V MAX* STRING TRIMMER INSTRUCTION MANUAL CATALOG NUMBER LST522 Thank you call. Please have access to http://www.blackanddecker.com/instantanswers If you can't find the answer or do not have the catalog number available when you for choosing BLACK+DECKER! INSTRUCTIVO DE OPERACIÓN, CENTROS DE SERVICIO ...LIZA DE GARANTÍA. KEY INFORMATION YOU SHOULD KNOW: • The guard must be installed before trimming or edging - To register your BLACK+DECKER purchase, go to the Internet, call 1-800-544-6986 or visit www.BlackandDecker.com/NewOwner EST Mon. - SAVE THIS MANUAL FOR ...

Instruction Manual
Page 3
... State of California to get wet, allow any liquid to cause cancer, birth defects or other reproductive harm. Lock-off . Speed-control switch 5. Trimmer head 9. Battery 3 5 12 SYMBOLS The label on or off button 3. Actual charge time may include the following symbols. no no load speed Class... such as follows: V volts A amperes Hz hertz W watts min minutes or AC......alternating current or DC....direct current 7 8 9 6 10 11 4 2 1 BLACK+DECKER Battery and Charger Systems Chargers/Charge Time** (Hours) (0% to -edge collar 8. Trigger 2. Spool housing 12.
... State of California to get wet, allow any liquid to cause cancer, birth defects or other reproductive harm. Lock-off . Speed-control switch 5. Trimmer head 9. Battery 3 5 12 SYMBOLS The label on or off button 3. Actual charge time may include the following symbols. no no load speed Class... such as follows: V volts A amperes Hz hertz W watts min minutes or AC......alternating current or DC....direct current 7 8 9 6 10 11 4 2 1 BLACK+DECKER Battery and Charger Systems Chargers/Charge Time** (Hours) (0% to -edge collar 8. Trigger 2. Spool housing 12.

Instruction Manual
Page 6
... pack. 5. To facilitate the cooling of metallic particles should be kept away from charger cavities. Always unplug the charger from the guard. • Turn the trimmer upside down so that you turn out the lights. ASSEMBLY TOOLS REQUIRED (NOT SUPPLIED): - This is fully seated and fully latched into position. If the...
... pack. 5. To facilitate the cooling of metallic particles should be kept away from charger cavities. Always unplug the charger from the guard. • Turn the trimmer upside down so that you turn out the lights. ASSEMBLY TOOLS REQUIRED (NOT SUPPLIED): - This is fully seated and fully latched into position. If the...
Instruction Manual
Page 7
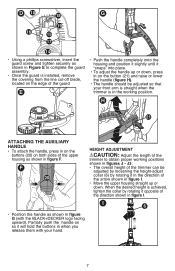
... • Position the handle as shown in when you release them with the BLACK+DECKER logo facing upward). I . Partially push the handle on so it will hold the buttons in figure G (with your front arm is straight when the trimmer is in figures J - H 21 ATTACHING THE AUXILIARY HANDLE • To ...tighten securely as shown in Figure E to obtain proper working positions shown in the working position. J3. • The overall height of the trimmer to complete the guard assembly. • Once the guard is installed, remove the covering from the line cut-off blade, located on the...
... • Position the handle as shown in when you release them with the BLACK+DECKER logo facing upward). I . Partially push the handle on so it will hold the buttons in figure G (with your front arm is straight when the trimmer is in figures J - H 21 ATTACHING THE AUXILIARY HANDLE • To ...tighten securely as shown in Figure E to obtain proper working positions shown in the working position. J3. • The overall height of the trimmer to complete the guard assembly. • Once the guard is installed, remove the covering from the line cut-off blade, located on the...

Instruction Manual
Page 8
...area to trim overhanging grass along lawn edges and flower beds. Be particularly careful to create trenches. • Using the edging wheel (9), guide the trimmer as shown in figure I. If it is not: • Remove the battery from hard surfaces use edge wheel (9). • Maintain a minimum ...handle snaps back into the path of cutting line. CAUTION: Before you begin trimming, only use this distance adjust the overall height of the trimmer as shown in figure J. • Maintain a cutting angle of a chain link fence. J2 J3 CONVERT TO EDGING MODE CAUTION: The wheeled...
...area to trim overhanging grass along lawn edges and flower beds. Be particularly careful to create trenches. • Using the edging wheel (9), guide the trimmer as shown in figure I. If it is not: • Remove the battery from hard surfaces use edge wheel (9). • Maintain a minimum ...handle snaps back into the path of cutting line. CAUTION: Before you begin trimming, only use this distance adjust the overall height of the trimmer as shown in figure J. • Maintain a cutting angle of a chain link fence. J2 J3 CONVERT TO EDGING MODE CAUTION: The wheeled...

Instruction Manual
Page 9
... Remove the battery from the right to operate at the operator. • Avoid trees and shrubs. SPEED CONTROL & RUNTIME EXTENSION MODE This string trimmer gives you the choice to left. do not force string head into position #2. This mode is best to be edged. • To make ...a closer cut, slightly tilt the trimmer. The advanced automatic line feeding mechanism senses when more efficient speed to feed line or for any assembly, adjustments or changing accessories. This...
... Remove the battery from the right to operate at the operator. • Avoid trees and shrubs. SPEED CONTROL & RUNTIME EXTENSION MODE This string trimmer gives you the choice to left. do not force string head into position #2. This mode is best to be edged. • To make ...a closer cut, slightly tilt the trimmer. The advanced automatic line feeding mechanism senses when more efficient speed to feed line or for any assembly, adjustments or changing accessories. This...

Instruction Manual
Page 11
... any interference received, including interference that interference will not occur in a particular installation. Feed the cutting line into one or more frequently than BLACK+DECKER factory wound spools. Your trimmer line can radiate radio frequency energy and, if not installed and used in accordance with the limits for purchase from bulk line are...
... any interference received, including interference that interference will not occur in a particular installation. Feed the cutting line into one or more frequently than BLACK+DECKER factory wound spools. Your trimmer line can radiate radio frequency energy and, if not installed and used in accordance with the limits for purchase from bulk line are...

Instruction Manual
Page 13
... cross. • Inspect tracks at the bottom of the auto feed system. • Remove the spool and check if the lever in Figure T. Imported by Black & Decker (U.S.) Inc., 701 E. If it is maintained. • Ensure you are using correct line size and diameter (0.065 inch (1.65 mm)) - Towson, MD ... Joppa Rd. If insufficient cutting line is removed. • Make sure to approximately 3 inches (76.2mm). If it does, cut outs in the trimmer head. • Ensure that the spool housing can move freely. • Remove the spool and unwind the cutting line, then wind it if necessary....
... cross. • Inspect tracks at the bottom of the auto feed system. • Remove the spool and check if the lever in Figure T. Imported by Black & Decker (U.S.) Inc., 701 E. If it is maintained. • Ensure you are using correct line size and diameter (0.065 inch (1.65 mm)) - Towson, MD ... Joppa Rd. If insufficient cutting line is removed. • Make sure to approximately 3 inches (76.2mm). If it does, cut outs in the trimmer head. • Ensure that the spool housing can move freely. • Remove the spool and unwind the cutting line, then wind it if necessary....


