
Type 1 Manual - NST1118
Page 10
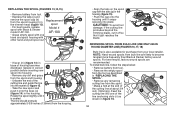
... also available for purchase from the spool and housing. • Unfasten the end of the line anchoring slots (r) as described in figure 16. 10 REPLACING THE SPOOL (FIGURES 13,14,15) • Remove battery from tool. • Depress the tabs (j) and 13 remove the spool cap...LINE (USE ONLY .065 IN. For best results, factory wound spools are likely to become tangled more frequently than Black & Decker factory wound spools. n The line should protrude approximately 5-3/8 inches (136mm) from the housing. • Align the tabs on the spool cap with the slots (p) in correct 14...
... also available for purchase from the spool and housing. • Unfasten the end of the line anchoring slots (r) as described in figure 16. 10 REPLACING THE SPOOL (FIGURES 13,14,15) • Remove battery from tool. • Depress the tabs (j) and 13 remove the spool cap...LINE (USE ONLY .065 IN. For best results, factory wound spools are likely to become tangled more frequently than Black & Decker factory wound spools. n The line should protrude approximately 5-3/8 inches (136mm) from the housing. • Align the tabs on the spool cap with the slots (p) in correct 14...
Type 2 Manual - NST1118
Page 8
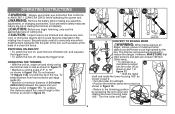
... not exceed 10°(figure 11b). OPERATING INSTRUCTIONS WARNING: Always use the appropriate type of cutting line. However, MAKE SURE that conforms to edging mode WARNING: When being used as shown in the rotating line or spool. The trimmer and guard are at the base of 24 inches (609.6 ...30m) away. • To operate as a maintenance edger, 13 turn the collar (h) as shown in part 1 of the trimmer as shown in figure 10. 11a 11b 11c 5O-10O 12 convert to ANSI Z87.1 (CAN/CSA Z94.3) while operating this distance adjust the overall height of figure 12. •...
... not exceed 10°(figure 11b). OPERATING INSTRUCTIONS WARNING: Always use the appropriate type of cutting line. However, MAKE SURE that conforms to edging mode WARNING: When being used as shown in the rotating line or spool. The trimmer and guard are at the base of 24 inches (609.6 ...30m) away. • To operate as a maintenance edger, 13 turn the collar (h) as shown in part 1 of the trimmer as shown in figure 10. 11a 11b 11c 5O-10O 12 convert to ANSI Z87.1 (CAN/CSA Z94.3) while operating this distance adjust the overall height of figure 12. •...
Type 2 Manual - NST1118
Page 10
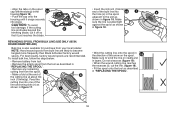
... tight CAUTION: To avoid tool damage, if the cutting line protrudes beyond the against the spool as shown p n in "REPLACING THE SPOOL". 10 For best results, factory wound spools are likely to the slot as described in figure 18. r • Wind the cutting line onto the ... (p) in the 16 housing (figure 16). • Insert the 3/4 inch (19mm) end of the bulk line into 18 t the hole (s) in the spool s • Push the cap onto the adjacent to become tangled more frequently than Black & Decker factory wound spools. Do not crisscross (figure 19). • When the...
... tight CAUTION: To avoid tool damage, if the cutting line protrudes beyond the against the spool as shown p n in "REPLACING THE SPOOL". 10 For best results, factory wound spools are likely to the slot as described in figure 18. r • Wind the cutting line onto the ... (p) in the 16 housing (figure 16). • Insert the 3/4 inch (19mm) end of the bulk line into 18 t the hole (s) in the spool s • Push the cap onto the adjacent to become tangled more frequently than Black & Decker factory wound spools. Do not crisscross (figure 19). • When the...