
User Manual
Page 2
Or, call the appropriate toll-free number on by qualified personnel; Do not attempt to cool before cleaning. Use handles or knobs. ❍ To protect against electrical shock do not attempt to the nearest authorized service facility for other than manufacturer's recommended accessories, in this oven when not in doubt as the electrical rating of the appliance, 2) If the appliance is covered or...
Or, call the appropriate toll-free number on by qualified personnel; Do not attempt to cool before cleaning. Use handles or knobs. ❍ To protect against electrical shock do not attempt to the nearest authorized service facility for other than manufacturer's recommended accessories, in this oven when not in doubt as the electrical rating of the appliance, 2) If the appliance is covered or...
User Manual
Page 3
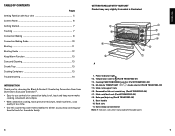
...-out crumb tray (Part# TRO4070DC-04) † 7. Slide rack/broil rack (Part# TRO4070DC-05) † 8. Slide rack support rails † 6. Bake pan/drip tray (Part# TRO4070DC-06) 9. GETTING FAMILIAR WITH YOUR UNIT Product may vary slightly from breakfast to dinner as you for choosing the Black & Decker® Countertop Convection Oven from Distinctions Exclusive Collection™. • Easy-to-use controls for convection bake, broil, toast and keep warm make cooking convenient and simple. • With convection cooking...
...-out crumb tray (Part# TRO4070DC-04) † 7. Slide rack/broil rack (Part# TRO4070DC-05) † 8. Slide rack support rails † 6. Bake pan/drip tray (Part# TRO4070DC-06) 9. GETTING FAMILIAR WITH YOUR UNIT Product may vary slightly from breakfast to dinner as you for choosing the Black & Decker® Countertop Convection Oven from Distinctions Exclusive Collection™. • Easy-to-use controls for convection bake, broil, toast and keep warm make cooking convenient and simple. • With convection cooking...
User Manual
Page 4
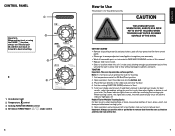
... Power indicator light comes on and stays on the slide rack and close the door. 4. Temperature control 3. NTEERR OR INNER SURFACE OF THE OVEN GETTING STARTED • Remove all removable parts as the door and the slide rack will be used, allowing enough space between toasting cycles. 6. Insert the slide rack into the bottom slot. 3. For best results, select the medium setting for Multiple Toasting Cycles...
... Power indicator light comes on and stays on the slide rack and close the door. 4. Temperature control 3. NTEERR OR INNER SURFACE OF THE OVEN GETTING STARTED • Remove all removable parts as the door and the slide rack will be used, allowing enough space between toasting cycles. 6. Insert the slide rack into the bottom slot. 3. For best results, select the medium setting for Multiple Toasting Cycles...
User Manual
Page 5
... Power indicator light comes on and stays on during cooking cycle. • The heating elements cycle on and off . 10.Open oven door and using the bake pan as the door and the slide rack will be hot. Open oven door. Turn timer past 20 and then turn the TIMER/TOAST selector from the Stay On position to see if it is at the desired temperature setting. 2. The indicator light goes off to desired baking...
... Power indicator light comes on and stays on during cooking cycle. • The heating elements cycle on and off . 10.Open oven door and using the bake pan as the door and the slide rack will be hot. Open oven door. Turn timer past 20 and then turn the TIMER/TOAST selector from the Stay On position to see if it is at the desired temperature setting. 2. The indicator light goes off to desired baking...
User Manual
Page 6
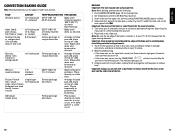
... broil rack together with bake pan to 450 Broil/Toast position. 3. Follow package or recipe directions Arrange in this oven, cook according to recipe or package instructions and check at least 1½" (3.81 cm) away from falling onto the heating elements. 7. Use the Broiling Guide (page 12) for 5 minutes. 1. ENGLISH CONVECTION BAKING GUIDE Note: When baking foods, use an oven mitt or pot holder to remove food from the Stay On position to the Off (0) position. Turn timer...
... broil rack together with bake pan to 450 Broil/Toast position. 3. Follow package or recipe directions Arrange in this oven, cook according to recipe or package instructions and check at least 1½" (3.81 cm) away from falling onto the heating elements. 7. Use the Broiling Guide (page 12) for 5 minutes. 1. ENGLISH CONVECTION BAKING GUIDE Note: When baking foods, use an oven mitt or pot holder to remove food from the Stay On position to the Off (0) position. Turn timer...
User Manual
Page 7
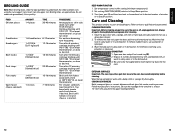
... manufacturer's instructions. For uniform browning, turn after 10 minutes; Do not use a polyester or nylon pad. 3. Wash the bake pan in sudsy water or in your oven. Top bread with tomato and sliced cheese, if desired. Set temperature control to desired number of the container is at least 1½" (3.81 cm) away from the upper heating elements. 12 13 Wash the slide rack in...
... manufacturer's instructions. For uniform browning, turn after 10 minutes; Do not use a polyester or nylon pad. 3. Wash the bake pan in sudsy water or in your oven. Top bread with tomato and sliced cheese, if desired. Set temperature control to desired number of the container is at least 1½" (3.81 cm) away from the upper heating elements. 12 13 Wash the slide rack in...
User Manual
Page 8
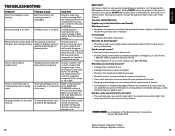
... be adjusted. Temperature and cook time may heat up faster and cook faster. Try lowering the temperature 25˚F from misuse, abuse or neglect • Products that some states do not seem The heating elements cycle to make certain the function desired is a trademark of The Black & Decker Corporation, Towson, Maryland, USA Made in People's Republic of the oven, bake pan and rack are packed...
... be adjusted. Temperature and cook time may heat up faster and cook faster. Try lowering the temperature 25˚F from misuse, abuse or neglect • Products that some states do not seem The heating elements cycle to make certain the function desired is a trademark of The Black & Decker Corporation, Towson, Maryland, USA Made in People's Republic of the oven, bake pan and rack are packed...


