
Operating Instructions
Page 6
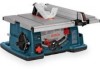
... Miter Gauge Slot ........36 Miter Gauge Adjustment 36 Aligning Rip Fence 38 Rip Fence Pointer Adjustment 38 Table Pointer Adjustment 40 Adjusting Table Insert 40 Adjusting Riving Knife 42 Basic Table Saw Operation 44-84 Safety Power Switch 44 Smart Guard System 44, 46 Extending Table Extension 46 Digital Carriage (Model 4100DG-09 only 48-58 Pre-Cut...
... Miter Gauge Slot ........36 Miter Gauge Adjustment 36 Aligning Rip Fence 38 Rip Fence Pointer Adjustment 38 Table Pointer Adjustment 40 Adjusting Table Insert 40 Adjusting Riving Knife 42 Basic Table Saw Operation 44-84 Safety Power Switch 44 Smart Guard System 44, 46 Extending Table Extension 46 Digital Carriage (Model 4100DG-09 only 48-58 Pre-Cut...
Operating Instructions
Page 22
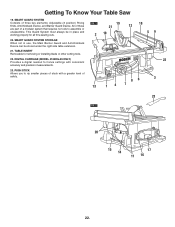
... Removable for fence settings with a greater level of three key elements: Adjustable (3 position) Riving Knife, Anti-Kickback Device, and Barrier Guard Device. FIG. 1 19 21 2 10 18 12 59 20. DIGITAL CARRIAGE (MODEL 4100DG-09 ONLY) 22 Provides a digital readout for removing or installing blade or... other cutting tools. 22. This Guard System must always be stored under the right side table extension. 21. SMART GUARD SYSTEM Consists of safety. 86 3 13 14 7 23 FIG. 2 20 15 14 17 11 16 22. Getting To Know Your Table Saw...
... Removable for fence settings with a greater level of three key elements: Adjustable (3 position) Riving Knife, Anti-Kickback Device, and Barrier Guard Device. FIG. 1 19 21 2 10 18 12 59 20. DIGITAL CARRIAGE (MODEL 4100DG-09 ONLY) 22 Provides a digital readout for removing or installing blade or... other cutting tools. 22. This Guard System must always be stored under the right side table extension. 21. SMART GUARD SYSTEM Consists of safety. 86 3 13 14 7 23 FIG. 2 20 15 14 17 11 16 22. Getting To Know Your Table Saw...

Operating Instructions
Page 48
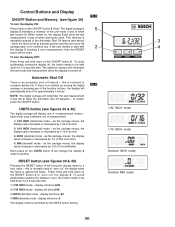
... the 4100 table saw on its side and with the digital carriage resting...saw 's rip fence 9 to digital carriage 1. connect to the 1/16 INCH mode (default mode). see pages 50-55 Note: This digital carriage is only used when making other types of time (5 seconds), and then the display will automatically turn on the table saw 's rip fence. LCD Display 5: displays digital...fence 9 or parking plate 10. Parking plate 10: holds digital carriage 1 when not being used. Bosch Digital Carriage Model DC010 (On Table Saw Model 4100DG-09) FIG. 37 6 10 234 5 The Bosch Model DC010 Digital...
... the 4100 table saw on its side and with the digital carriage resting...saw 's rip fence 9 to digital carriage 1. connect to the 1/16 INCH mode (default mode). see pages 50-55 Note: This digital carriage is only used when making other types of time (5 seconds), and then the display will automatically turn on the table saw 's rip fence. LCD Display 5: displays digital...fence 9 or parking plate 10. Parking plate 10: holds digital carriage 1 when not being used. Bosch Digital Carriage Model DC010 (On Table Saw Model 4100DG-09) FIG. 37 6 10 234 5 The Bosch Model DC010 Digital...
Operating Instructions
Page 50
Note: The digital carriage's 5 display 5 maintains a memory of the unit mode it was in approximately 1 minute. this is normally used to "zero out" the display when the fence is controlled by 1/32 of an inch) 4) MM (decimal) mode - as the carriage moves, the display value increases or decreases by the...to be used . If there is left at when the automatic shut off . FIG. 40 1/32 INCH mode 1/16 INCH mode Decimal INCH mode RESET button (see figures 39 & 40) The digital carriage will show the last measurement it was at a preset position and the user turns the carriage back...
Note: The digital carriage's 5 display 5 maintains a memory of the unit mode it was in approximately 1 minute. this is normally used to "zero out" the display when the fence is controlled by 1/32 of an inch) 4) MM (decimal) mode - as the carriage moves, the display value increases or decreases by the...to be used . If there is left at when the automatic shut off . FIG. 40 1/32 INCH mode 1/16 INCH mode Decimal INCH mode RESET button (see figures 39 & 40) The digital carriage will show the last measurement it was at a preset position and the user turns the carriage back...

Operating Instructions
Page 52
...with carriage) until it contacts the raised saw blade, then lock down fence lock handle before starting cut. If the carriage is set in order to "zero out" the display - If the fence and digital carriage is moved to where it shows 6-3/32 inches (or any positive value) and the user... wishes to move the fence from that it shows 0/32 inches and then move the fence to be reset to zero at any movement of the fence - Display Changes - teeth are sharp!) 4) Slide fence (with the digital carriage attached) in the 1/32 INCH mode). always push down the fence handle 5) Press RESET button...
...with carriage) until it contacts the raised saw blade, then lock down fence lock handle before starting cut. If the carriage is set in order to "zero out" the display - If the fence and digital carriage is moved to where it shows 6-3/32 inches (or any positive value) and the user... wishes to move the fence from that it shows 0/32 inches and then move the fence to be reset to zero at any movement of the fence - Display Changes - teeth are sharp!) 4) Slide fence (with the digital carriage attached) in the 1/32 INCH mode). always push down the fence handle 5) Press RESET button...

Operating Instructions
Page 54
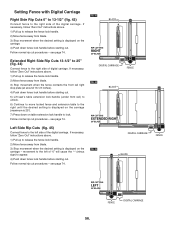
...right side: Slide digital carriage 1 to the left side of the"0" setting, the "-"(minus sign) will easily slide off the carriage's magnet 6. Place the fence 9 to the left of the rip fence increases the saws right side cutting capacity. Disconnecting fence from carriage: Release the fence lock handle 11 ... magnet 6 (not shown) contacts the parking plate 10. Connecting the digital carriage to the extreme left so its left side of blade - Place the fence 9 to the right side of the display includes the minus sign icon "-". Parking digital carriage: When not making rip cuts, it is ...
...right side: Slide digital carriage 1 to the left side of the"0" setting, the "-"(minus sign) will easily slide off the carriage's magnet 6. Place the fence 9 to the left of the rip fence increases the saws right side cutting capacity. Disconnecting fence from carriage: Release the fence lock handle 11 ... magnet 6 (not shown) contacts the parking plate 10. Connecting the digital carriage to the extreme left so its left side of blade - Place the fence 9 to the right side of the display includes the minus sign icon "-". Parking digital carriage: When not making rip cuts, it is ...
Operating Instructions
Page 56
... cut . 5) Lift saw's table extension lock handle (under front rail) to unlock. 6) Continue to move locked fence and extension table to release the fence lock handle. 2) Move fence away from blade. 3) Stop movement when the desired setting is displayed on the carriage - see page 74. see page 74. see page 74. FIG. 45 FENCE DIGITAL CARRIAGE FENCE FENCE DIGITAL CARRIAGE 56...
... cut . 5) Lift saw's table extension lock handle (under front rail) to unlock. 6) Continue to move locked fence and extension table to release the fence lock handle. 2) Move fence away from blade. 3) Stop movement when the desired setting is displayed on the carriage - see page 74. see page 74. see page 74. FIG. 45 FENCE DIGITAL CARRIAGE FENCE FENCE DIGITAL CARRIAGE 56...

Operating Instructions
Page 58
... desired bevel angle. 5) Push down fence lock handle before cleaning. Slide the digital carriage 1 to be removed, unplug the saw, and wipe carriage with the 4100 table saw 's front rail until the left end on the digital carriage. If moisture needs to the extreme left magnet 6 contacts the parking plate 10. Maintaining the Digital Carriage FIG. 46 Parking Position...
... desired bevel angle. 5) Push down fence lock handle before cleaning. Slide the digital carriage 1 to be removed, unplug the saw, and wipe carriage with the 4100 table saw 's front rail until the left end on the digital carriage. If moisture needs to the extreme left magnet 6 contacts the parking plate 10. Maintaining the Digital Carriage FIG. 46 Parking Position...
