
Operating Instructions
Page 3
.... Motors in these tools normally spark, and may result in a dangerous condition. Inspect extension cords periodically and replace if damaged. If in a well lit area and on the ...ripping widths of trips and falls. WARNING Before connecting the tool to the instructions ... Basic Table Saw Operation 44-84 7. KICKBACKS AND POSSIBLE INJURY CAN USUALLY BE AVOIDED BY: a. Maintaining the ... ripping, apply the feed force to misalignment, can result in gaseous or explosive atmospheres. above). 10. Additional Safety Rules Tool Care DO NOT ALTER OR MISUSE TOOL These tools are cut -off ...
.... Motors in these tools normally spark, and may result in a dangerous condition. Inspect extension cords periodically and replace if damaged. If in a well lit area and on the ...ripping widths of trips and falls. WARNING Before connecting the tool to the instructions ... Basic Table Saw Operation 44-84 7. KICKBACKS AND POSSIBLE INJURY CAN USUALLY BE AVOIDED BY: a. Maintaining the ... ripping, apply the feed force to misalignment, can result in gaseous or explosive atmospheres. above). 10. Additional Safety Rules Tool Care DO NOT ALTER OR MISUSE TOOL These tools are cut -off ...
Operating Instructions
Page 5
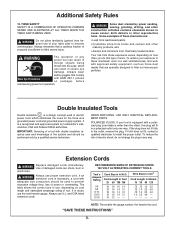
... or overheating. WHEN SERVICING, USE ONLY IDENTICAL REPLACEMENT PARTS. If the plug does not fit fully in Feet 25 50 100 150 3-6 6-8 8-10 10-12 12-16 18 16 16 14 18 16 14 12 18 16 14 12 16 16 14 12 14 12 - - WARNING Replace damaged cords... and should be performed only by Underwriter's Laboratories, CSA and Federal OSHA authorities. Extension Cords ! Additional Safety Rules 12. THINK SAFETY SAFETY IS A COMBINATION OF OPERATOR COMMON SENSE AND ALERTNESS AT ALL TIMES WHEN THE TABLE SAW IS BEING USED. ! Always remember that comply Wear Eye Protection with double insulation...
... or overheating. WHEN SERVICING, USE ONLY IDENTICAL REPLACEMENT PARTS. If the plug does not fit fully in Feet 25 50 100 150 3-6 6-8 8-10 10-12 12-16 18 16 16 14 18 16 14 12 18 16 14 12 16 16 14 12 14 12 - - WARNING Replace damaged cords... and should be performed only by Underwriter's Laboratories, CSA and Federal OSHA authorities. Extension Cords ! Additional Safety Rules 12. THINK SAFETY SAFETY IS A COMBINATION OF OPERATOR COMMON SENSE AND ALERTNESS AT ALL TIMES WHEN THE TABLE SAW IS BEING USED. ! Always remember that comply Wear Eye Protection with double insulation...

Operating Instructions
Page 6
... Rules 3-5 Double Insulated Tools & Extension Cords 5 Table of Contents 6 Glossary of Terms 7 Tools Needed For Assembly 7 Getting To Know Your Table Saw 20, 22 Power Switch 20 Table 20 Base/Sub-Base 20 Blade Bevel Lock Handle 20 Table Extension 20 Table Extension Lock Handle 20 Elevation Wheel 20 ...Rip Fence 38 Rip Fence Pointer Adjustment 38 Table Pointer Adjustment 40 Adjusting Table Insert 40 Adjusting Riving Knife 42 Basic Table Saw Operation 44-84 Safety Power Switch 44 Smart Guard System 44, 46 Extending Table Extension 46 Digital Carriage (Model 4100DG-09 only 48...
... Rules 3-5 Double Insulated Tools & Extension Cords 5 Table of Contents 6 Glossary of Terms 7 Tools Needed For Assembly 7 Getting To Know Your Table Saw 20, 22 Power Switch 20 Table 20 Base/Sub-Base 20 Blade Bevel Lock Handle 20 Table Extension 20 Table Extension Lock Handle 20 Elevation Wheel 20 ...Rip Fence 38 Rip Fence Pointer Adjustment 38 Table Pointer Adjustment 40 Adjusting Table Insert 40 Adjusting Riving Knife 42 Basic Table Saw Operation 44-84 Safety Power Switch 44 Smart Guard System 44, 46 Extending Table Extension 46 Digital Carriage (Model 4100DG-09 only 48...

Operating Instructions
Page 20
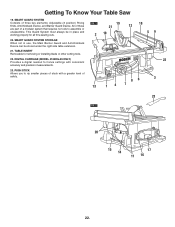
... 10" blades and arbor wrench. 15. ELEVATION WHEEL Elevates or lowers the blade. Lower portion of the way when transporting or storing. 17. Upper portion of table saw . 15 14 17 11 16 16. CORD WRAP Allows you to 13.5 inches. BLADE BEVEL LOCK HANDLE Locks the blade to lock the table extension at desired distances. TABLE EXTENSION...
... 10" blades and arbor wrench. 15. ELEVATION WHEEL Elevates or lowers the blade. Lower portion of the way when transporting or storing. 17. Upper portion of table saw . 15 14 17 11 16 16. CORD WRAP Allows you to 13.5 inches. BLADE BEVEL LOCK HANDLE Locks the blade to lock the table extension at desired distances. TABLE EXTENSION...
Operating Instructions
Page 22
...the Main Barrier Guard and Anti-Kickback Device can be stored under the right side table extension. 21. SMART GUARD SYSTEM STORAGE When not in place and working properly for all thru-sawing cuts. FIG. 1 19 21 2 10 18 12 59 20. PUSH STICK Allows you to assemble or unassemble. DIGITAL CARRIAGE...system that requires no tools to rip smaller pieces of safety. 86 3 13 14 7 23 FIG. 2 20 15 14 17 11 16 22. TABLE INSERT Removable for fence settings with a greater level of stock with consistent accuracy and precision measurements. 23. All of these are part of three key...
...the Main Barrier Guard and Anti-Kickback Device can be stored under the right side table extension. 21. SMART GUARD SYSTEM STORAGE When not in place and working properly for all thru-sawing cuts. FIG. 1 19 21 2 10 18 12 59 20. PUSH STICK Allows you to assemble or unassemble. DIGITAL CARRIAGE...system that requires no tools to rip smaller pieces of safety. 86 3 13 14 7 23 FIG. 2 20 15 14 17 11 16 22. TABLE INSERT Removable for fence settings with a greater level of stock with consistent accuracy and precision measurements. 23. All of these are part of three key...
Operating Instructions
Page 30
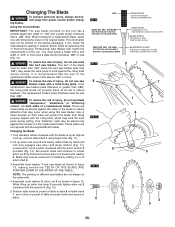
...when using finger hole (Fig. 11). 2. Loosen arbor nut 3 counter clockwise with the supplied Bosch blade. Set wrench aside and continue to the original blade. FIG. 10 .090" MUST BE .092" OR MORE DOIT ÊTRE DE 0,092 PO OU PLUS... certain the TEETH OF THE BLADE ARE POINTING DOWN AT THE FRONT OF THE TABLE. Turn elevation wheel clockwise until lock fully engages saw blade's plate thickness is .086" thick. WARNING To prevent personal injury, always...which may cause the work piece during cutting. Changing The Blade ! Bosch offers an extensive line of .092" or more . !
...when using finger hole (Fig. 11). 2. Loosen arbor nut 3 counter clockwise with the supplied Bosch blade. Set wrench aside and continue to the original blade. FIG. 10 .090" MUST BE .092" OR MORE DOIT ÊTRE DE 0,092 PO OU PLUS... certain the TEETH OF THE BLADE ARE POINTING DOWN AT THE FRONT OF THE TABLE. Turn elevation wheel clockwise until lock fully engages saw blade's plate thickness is .086" thick. WARNING To prevent personal injury, always...which may cause the work piece during cutting. Changing The Blade ! Bosch offers an extensive line of .092" or more . !
Operating Instructions
Page 46
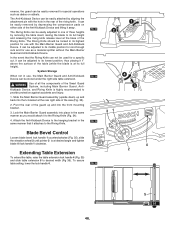
...saw (Fig. 33). 2. Lock the Main Barrier Guard assembly into place in use, the Main Barrier Guard and Anti-Kickback Device can be easily removed for a specific cut, it can be adjusted to its lowest position, thus placing it away. reverse, the guard can be stored under the right side table extension...into the U-bracket at the base of the table (while the blade is highly recommended to desired width (Fig 36). Extending Table Extension To extend the table, raise the table extension lock handle 4 (Fig. 35) and slide table extension 5 to provide protection against accidents and injury...
...saw (Fig. 33). 2. Lock the Main Barrier Guard assembly into place in use, the Main Barrier Guard and Anti-Kickback Device can be easily removed for a specific cut, it can be adjusted to its lowest position, thus placing it away. reverse, the guard can be stored under the right side table extension...into the U-bracket at the base of the table (while the blade is highly recommended to desired width (Fig 36). Extending Table Extension To extend the table, raise the table extension lock handle 4 (Fig. 35) and slide table extension 5 to provide protection against accidents and injury...
Operating Instructions
Page 56
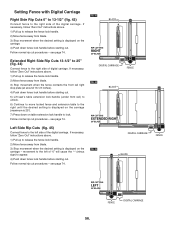
... the front rail right stop plate (at around 13-1/2 inches). 4) Push down fence lock handle before starting cut. 5) Lift saw's table extension lock handle (under front rail) to unlock. 6) Continue to move locked fence and extension table to the right until the desired setting is displayed on ...the carriage (maximum is displayed on table extension lock handle to lock. see page 74...
... the front rail right stop plate (at around 13-1/2 inches). 4) Push down fence lock handle before starting cut. 5) Lift saw's table extension lock handle (under front rail) to unlock. 6) Continue to move locked fence and extension table to the right until the desired setting is displayed on ...the carriage (maximum is displayed on table extension lock handle to lock. see page 74...

Operating Instructions
Page 80
...211;N DE LA MESA DE MORTAJAR 80. Lower the blades below the table top and insert the Bosch Dado Table Insert (TS1007) (Fig. 70). See page 76 for details). Whenever possible, use the table saws' inner washer. WARNING To reduce the risk of injury, never make practice... dado cuts and adjust height accordingly. ! Never use the accessory dado washer. Instead, use chippers without both outside cutters. Depending on this saw thru- When performing extensive repetitive dado cutting...
...211;N DE LA MESA DE MORTAJAR 80. Lower the blades below the table top and insert the Bosch Dado Table Insert (TS1007) (Fig. 70). See page 76 for details). Whenever possible, use the table saws' inner washer. WARNING To reduce the risk of injury, never make practice... dado cuts and adjust height accordingly. ! Never use the accessory dado washer. Instead, use chippers without both outside cutters. Depending on this saw thru- When performing extensive repetitive dado cutting...


