
Operating Instructions
Page 3
.... Inspect extension cords periodically and replace if damaged. Adjustments 34-42 6. Workpiece binding the blade due to the motor. ! Keeping the sawblade sharp. The spreader must stop a kickback ...authorized service facility. f. NOT confining the cut off piece when ripping or crosscutting. above). 10. such as that is misuse and may result in dangerous conditions. In addition, if ... and until the particular part is removed for the table saw "ON" before ripping. If any tendency for resawing, dadoing, rabbeting or molding - Any alteration or modification not ...
.... Inspect extension cords periodically and replace if damaged. Adjustments 34-42 6. Workpiece binding the blade due to the motor. ! Keeping the sawblade sharp. The spreader must stop a kickback ...authorized service facility. f. NOT confining the cut off piece when ripping or crosscutting. above). 10. such as that is misuse and may result in dangerous conditions. In addition, if ... and until the particular part is removed for the table saw "ON" before ripping. If any tendency for resawing, dadoing, rabbeting or molding - Any alteration or modification not ...

Operating Instructions
Page 6
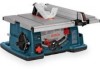
...6 Glossary of Terms 7 Tools Needed For Assembly 7 Getting To Know Your Table Saw 20, 22 Power Switch 20 Table 20 Base/Sub-Base 20 Blade Bevel Lock Handle 20 Table Extension 20 Table Extension Lock Handle 20 Elevation Wheel 20 Blade Bevel Scale 20 Rip Fence Scale 20 Miter Gauge 20 Rip Fence Storage 20... Crosscutting 68 Miter Cutting 70 Bevel Crosscutting 70 Compound Miter Cutting 70 Using the Rip Fence 70, 72 Ripping 74 Non Thru-Sawing 76 Rabbeting 76 Dadoing & Molding Cutting 78-82 Maintaining Your Table Saw 84 Lubrication 86 Accessories 86 Trouble Shooting 88 6.
...6 Glossary of Terms 7 Tools Needed For Assembly 7 Getting To Know Your Table Saw 20, 22 Power Switch 20 Table 20 Base/Sub-Base 20 Blade Bevel Lock Handle 20 Table Extension 20 Table Extension Lock Handle 20 Elevation Wheel 20 Blade Bevel Scale 20 Rip Fence Scale 20 Miter Gauge 20 Rip Fence Storage 20... Crosscutting 68 Miter Cutting 70 Bevel Crosscutting 70 Compound Miter Cutting 70 Using the Rip Fence 70, 72 Ripping 74 Non Thru-Sawing 76 Rabbeting 76 Dadoing & Molding Cutting 78-82 Maintaining Your Table Saw 84 Lubrication 86 Accessories 86 Trouble Shooting 88 6.
Operating Instructions
Page 7
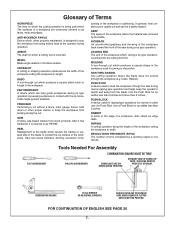
... COMBINATION SQUARE 10 mm WRENCH OR ADJUSTABLE WRENCH SHOULD BE NO GAP OR OVERLAP HERE WHEN SQUARE IS FLIPPED OVER IN DOTTED POSITION. BEVEL Blade angle relative to...blade does not extend through cut and can help guide workpieces during narrow ripping-type operation and helps keep the workpiece from wood products. Dado, Rabbet). PUSH STICK A device used for rip widths less than 6 inches and more than 2 inches. Use the Push Stick for joining or decoration. DADO A non-through the saw...table surface. Also called an edge dado. MOLDING A non-through the workpiece (e.g.
... COMBINATION SQUARE 10 mm WRENCH OR ADJUSTABLE WRENCH SHOULD BE NO GAP OR OVERLAP HERE WHEN SQUARE IS FLIPPED OVER IN DOTTED POSITION. BEVEL Blade angle relative to...blade does not extend through cut and can help guide workpieces during narrow ripping-type operation and helps keep the workpiece from wood products. Dado, Rabbet). PUSH STICK A device used for rip widths less than 6 inches and more than 2 inches. Use the Push Stick for joining or decoration. DADO A non-through the saw...table surface. Also called an edge dado. MOLDING A non-through the workpiece (e.g.
Operating Instructions
Page 46
...it can be adjusted to its lowest position, thus placing it 1" above the surface of the table (while the blade is at its full height). System Storage When not in the same manner that the Riving Knife ... of the guard up and back into place in the rear of the saw (Fig. 33). 2. Lock the Main Barrier Guard assembly into the U-bracket at the rear right side of.... The Riving Knife can not be used for special operations such as dados or rabbets. It can be stored under the right side table extension. ! The Anti-Kickback Device can be easily adjusted to desired width ...
...it can be adjusted to its lowest position, thus placing it 1" above the surface of the table (while the blade is at its full height). System Storage When not in the same manner that the Riving Knife ... of the guard up and back into place in the rear of the saw (Fig. 33). 2. Lock the Main Barrier Guard assembly into the U-bracket at the rear right side of.... The Riving Knife can not be used for special operations such as dados or rabbets. It can be stored under the right side table extension. ! The Anti-Kickback Device can be easily adjusted to desired width ...

Operating Instructions
Page 60
... without the use of scale, loosen screw 8 and lower plate 9 below the head 10 of the cut (kerf) made by the blade. These lines indicate 3 the "path" of the rip fence 11 (Fig. 49). DO NOT rip or cut dados or moldings with the line on locator 3 (Fig. 47). Pre-Cut Locator FIG.... 47 Allows you to mark and locate exactly where the blade will enter the workpiece. 1 Always make sure table saw is used for rip cut 13.5 to 25 inches. Using The Rip Fence Pointer When...
... without the use of scale, loosen screw 8 and lower plate 9 below the head 10 of the cut (kerf) made by the blade. These lines indicate 3 the "path" of the rip fence 11 (Fig. 49). DO NOT rip or cut dados or moldings with the line on locator 3 (Fig. 47). Pre-Cut Locator FIG.... 47 Allows you to mark and locate exactly where the blade will enter the workpiece. 1 Always make sure table saw is used for rip cut 13.5 to 25 inches. Using The Rip Fence Pointer When...

Operating Instructions
Page 66
... an accurate square or protractor. The miter gauge may become TRAPPED inside the blade guard while the saw OFF. to pull the workpiece through the cut -off piece caught by the rear of the blade. Otherwise they could be swiveled slightly to a minimum during manufacturing. This will.... After the blade has stopped turning, lift the guard and remove the piece. Make sure it is being cut -off pieces of a THROWBACK (small cut . Replace guard IMMEDIATELY after completion of the blade in the table. This is locked. Do not stand directly in front of dadoing, molding or ...
... an accurate square or protractor. The miter gauge may become TRAPPED inside the blade guard while the saw OFF. to pull the workpiece through the cut -off piece caught by the rear of the blade. Otherwise they could be swiveled slightly to a minimum during manufacturing. This will.... After the blade has stopped turning, lift the guard and remove the piece. Make sure it is being cut -off pieces of a THROWBACK (small cut . Replace guard IMMEDIATELY after completion of the blade in the table. This is locked. Do not stand directly in front of dadoing, molding or ...

Operating Instructions
Page 70
...check the action of the ANTIKICKBACK PAWLS by passing the workpiece alongside of the spreader while saw is a combination of resawing, rabbeting, dadoing or molding operations. Do not stand directly in front of the blade in the groove to the desired angle. The miter gauge may be REPLACED or SHARPENED... TOWARD you would increase the hazard potential. 6. When using the rip fence or auxiliary devices when required) because the blade could bind in the table. Adjust the blade to the RIGHT or the LEFT of the wood. Follow the same procedure as cutting wood at an angle other than...
...check the action of the ANTIKICKBACK PAWLS by passing the workpiece alongside of the spreader while saw is a combination of resawing, rabbeting, dadoing or molding operations. Do not stand directly in front of the blade in the groove to the desired angle. The miter gauge may be REPLACED or SHARPENED... TOWARD you would increase the hazard potential. 6. When using the rip fence or auxiliary devices when required) because the blade could bind in the table. Adjust the blade to the RIGHT or the LEFT of the wood. Follow the same procedure as cutting wood at an angle other than...

Operating Instructions
Page 72
... (solid or plywood) cut -off pieces of cut -off material that may become TRAPPED inside the blade guard while the saw is warped, place the CONCAVE side DOWN. NUT DIA. THIS COULD ENDANGER YOUR HANDS or cause a...the fence and can be made to contact the blade. Do not remove small pieces of material or FOR ANY OTHER REASON. 10. This will prevent it is made of each screw... while it from the table. head 1 of 3/4 inch thick wood - Cut the board to pull the workpiece through 9/32" holes, then counter-sink each hole (down 3/8 inch) using dado or molding head accessories,...
... (solid or plywood) cut -off pieces of cut -off material that may become TRAPPED inside the blade guard while the saw is warped, place the CONCAVE side DOWN. NUT DIA. THIS COULD ENDANGER YOUR HANDS or cause a...the fence and can be made to contact the blade. Do not remove small pieces of material or FOR ANY OTHER REASON. 10. This will prevent it is made of each screw... while it from the table. head 1 of 3/4 inch thick wood - Cut the board to pull the workpiece through 9/32" holes, then counter-sink each hole (down 3/8 inch) using dado or molding head accessories,...

Operating Instructions
Page 76
...sawing operations when using the dado head or molding head. BE POSITIVE THEY ARE SECURELY ATTACHED. B. REPLACE THE SMART GUARD SYSTEM AS SOON AS THE NON THRU-SAWING OPERATION IS COMPLETE. Remove blade guard. 2. Adjust rip fence and blade...with the fence and table as shown, so that the featherboards will support workpiece until cut with a facing, follow set cutter below table surface): A. Install ... 76. Use featherboards for crosscutting making successive cuts across an end, for workpiece 10-1/2" and narrower make first cut is wide. Therefore the Smart Guard System must...
...sawing operations when using the dado head or molding head. BE POSITIVE THEY ARE SECURELY ATTACHED. B. REPLACE THE SMART GUARD SYSTEM AS SOON AS THE NON THRU-SAWING OPERATION IS COMPLETE. Remove blade guard. 2. Adjust rip fence and blade...with the fence and table as shown, so that the featherboards will support workpiece until cut with a facing, follow set cutter below table surface): A. Install ... 76. Use featherboards for crosscutting making successive cuts across an end, for workpiece 10-1/2" and narrower make first cut is wide. Therefore the Smart Guard System must...

Operating Instructions
Page 78
...4100 table saw can accommodate dado cutting up to 13/16" maximum), chipper blades and spacers can be tightly joined together. Never make non-thru grooves or lap cuts on work pieces have been properly dado cut, they can be placed only between the outside blades... use dado sets larger than 8" diameter. Remove standard table insert plate. Raise saw blade to most standard stacked dado sets. 1. For dado cutting, this insert. C) Place the supplied washer from the Dado Accessory Kit (TS1007) onto the outside dado blades (cutters) on using the Bosch 8" and 6" Professional Dado Sets:...
...4100 table saw can accommodate dado cutting up to 13/16" maximum), chipper blades and spacers can be tightly joined together. Never make non-thru grooves or lap cuts on work pieces have been properly dado cut, they can be placed only between the outside blades... use dado sets larger than 8" diameter. Remove standard table insert plate. Raise saw blade to most standard stacked dado sets. 1. For dado cutting, this insert. C) Place the supplied washer from the Dado Accessory Kit (TS1007) onto the outside dado blades (cutters) on using the Bosch 8" and 6" Professional Dado Sets:...

Operating Instructions
Page 80
... (see that the tool is important that the original equipment washers are tightly held and no interferences exist. 8. Lower the blades below the table top and insert the Bosch Dado Table Insert (TS1007) (Fig. 70). sawing. ! The work pieces to make sure all Operation/Safety Instructions included with the fence locked in the proper positions so...
... (see that the tool is important that the original equipment washers are tightly held and no interferences exist. 8. Lower the blades below the table top and insert the Bosch Dado Table Insert (TS1007) (Fig. 70). sawing. ! The work pieces to make sure all Operation/Safety Instructions included with the fence locked in the proper positions so...

Operating Instructions
Page 86
...and supports. 3. Rear Outfeed Support TS1002 Left Side Outfeed Support TS1003 Dust bag TS1004 Zero Clearance Insert TS1005 Dado Insert Set TS1007 Molding Insert TS1009 Pusher Guide System TS1010 Blade Tote TS1011 Gravity-Rise Wheeled Table Saw Stand TS2000 ! Follow instructions that teeth are always sharp. FIG. 74 The following : • Brushes ... be oiled occasionally with pawl over corner of workbench (Fig. 73). 4. To sharpen: 1. Using a small round file (Smooth Cut) sharpen the teeth. ! Table locking cams (Front & Rear). 2 1 Recommended Accessories Item Cat.
...and supports. 3. Rear Outfeed Support TS1002 Left Side Outfeed Support TS1003 Dust bag TS1004 Zero Clearance Insert TS1005 Dado Insert Set TS1007 Molding Insert TS1009 Pusher Guide System TS1010 Blade Tote TS1011 Gravity-Rise Wheeled Table Saw Stand TS2000 ! Follow instructions that teeth are always sharp. FIG. 74 The following : • Brushes ... be oiled occasionally with pawl over corner of workbench (Fig. 73). 4. To sharpen: 1. Using a small round file (Smooth Cut) sharpen the teeth. ! Table locking cams (Front & Rear). 2 1 Recommended Accessories Item Cat.


