
Operating Instructions
Page 2
... KEEP CHILDREN AWAY Do not let visitors contact tool or extension cord. STAY ALERT Watch what you are doing. Do ... ! MAKE WORKSHOP CHILD-PROOF With padlocks, master switches. CHECK DAMAGED PARTS Before further use circular saw for example; Learn its operation. DISCONNECT TOOL FROM POWER SOURCE When not in use power tools in proper... plugging in serious personal injury. Do not expose power tools to hold work area. WARNING Use only Bosch replacement parts; AVOID ACCIDENTAL STARTING Make sure the switch is accidentally contacted. DON'T OVERREACH Keep proper footing...
... KEEP CHILDREN AWAY Do not let visitors contact tool or extension cord. STAY ALERT Watch what you are doing. Do ... ! MAKE WORKSHOP CHILD-PROOF With padlocks, master switches. CHECK DAMAGED PARTS Before further use circular saw for example; Learn its operation. DISCONNECT TOOL FROM POWER SOURCE When not in use power tools in proper... plugging in serious personal injury. Do not expose power tools to hold work area. WARNING Use only Bosch replacement parts; AVOID ACCIDENTAL STARTING Make sure the switch is accidentally contacted. DON'T OVERREACH Keep proper footing...

Operating Instructions
Page 3
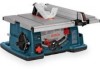
...Your Table Saw ...saw...Table Saw 20, 22 4. STABILITY OF SAW Your table saw "ON" before ripping. Maintaining the rip fence parallel to 6" and an auxiliary fence and Push Block for the operation planned. 3. Wear safety goggles and a face shield if operation is thrown toward the operator. Inspect extension...table saw to the motor. ! Check their action before clearing the table of trips and falls. g. PROTECTION: Eyes, hands, face, ears and body. ! LOCATION Use the table saw... table ... from table and is dusty. c. Basic Table Saw Operation ...for the table saw until you ...
...Your Table Saw ...saw...Table Saw 20, 22 4. STABILITY OF SAW Your table saw "ON" before ripping. Maintaining the rip fence parallel to 6" and an auxiliary fence and Push Block for the operation planned. 3. Wear safety goggles and a face shield if operation is thrown toward the operator. Inspect extension...table saw to the motor. ! Check their action before clearing the table of trips and falls. g. PROTECTION: Eyes, hands, face, ears and body. ! LOCATION Use the table saw... table ... from table and is dusty. c. Basic Table Saw Operation ...for the table saw until you ...
Operating Instructions
Page 5
...power tool can shock, burn or electrocute. ! and CSA listed extension cords. WARNING Some dust created by Underwriter's Laboratories, CSA and Federal OSHA authorities. It is wider than the other), this type of your table saw) to become commonplace. THINK SAFETY SAFETY IS A COMBINATION OF ...SAVE THESE INSTRUCTIONS" 5. Some examples of tool. The table shows the correct size to inflict severe injury. RECOMMENDED SIZES OF EXTENSION CORDS 120 VOLT ALTERNATING CURRENT TOOLS Tool's Cord Size in Feet 25 50 100 150 3-6 6-8 8-10 10-12 12-16 18 16 16 14 18 16 14...
...power tool can shock, burn or electrocute. ! and CSA listed extension cords. WARNING Some dust created by Underwriter's Laboratories, CSA and Federal OSHA authorities. It is wider than the other), this type of your table saw) to become commonplace. THINK SAFETY SAFETY IS A COMBINATION OF ...SAVE THESE INSTRUCTIONS" 5. Some examples of tool. The table shows the correct size to inflict severe injury. RECOMMENDED SIZES OF EXTENSION CORDS 120 VOLT ALTERNATING CURRENT TOOLS Tool's Cord Size in Feet 25 50 100 150 3-6 6-8 8-10 10-12 12-16 18 16 16 14 18 16 14...

Operating Instructions
Page 6
... Rules 3-5 Double Insulated Tools & Extension Cords 5 Table of Contents 6 Glossary of Terms 7 Tools Needed For Assembly 7 Getting To Know Your Table Saw 20, 22 Power Switch 20 Table 20 Base/Sub-Base 20 Blade Bevel Lock Handle 20 Table Extension 20 Table Extension Lock Handle 20 Elevation Wheel 20 ...Rip Fence 38 Rip Fence Pointer Adjustment 38 Table Pointer Adjustment 40 Adjusting Table Insert 40 Adjusting Riving Knife 42 Basic Table Saw Operation 44-84 Safety Power Switch 44 Smart Guard System 44, 46 Extending Table Extension 46 Digital Carriage (Model 4100DG-09 only 48...
... Rules 3-5 Double Insulated Tools & Extension Cords 5 Table of Contents 6 Glossary of Terms 7 Tools Needed For Assembly 7 Getting To Know Your Table Saw 20, 22 Power Switch 20 Table 20 Base/Sub-Base 20 Blade Bevel Lock Handle 20 Table Extension 20 Table Extension Lock Handle 20 Elevation Wheel 20 ...Rip Fence 38 Rip Fence Pointer Adjustment 38 Table Pointer Adjustment 40 Adjusting Table Insert 40 Adjusting Riving Knife 42 Basic Table Saw Operation 44-84 Safety Power Switch 44 Smart Guard System 44, 46 Extending Table Extension 46 Digital Carriage (Model 4100DG-09 only 48...

Operating Instructions
Page 20
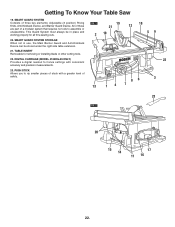
...use . 14. RIP FENCE STORAGE Conveniently stores rip fence when not in base to bolt the saw to store 10" blades and arbor wrench. 15. BLADE STORAGE & WRENCH Allows you to 13.5 inches. RIP FENCE Exclusive Self-Aligning, Squarelock rip fence can be easily moved or locked in use...BASE Supports table saw . 15 14 17 11 16 16. BLADE BEVEL LOCK HANDLE Locks the blade to support workpiece. ALWAYS SECURELY LOCK IT WHEN IN USE. 11. This feature will enter 20 the workpiece. 13. TABLE EXTENSION 22 Provides a larger work surface for easy sliding onto surfaces. FIG. 2 10. MITER...
...use . 14. RIP FENCE STORAGE Conveniently stores rip fence when not in base to bolt the saw to store 10" blades and arbor wrench. 15. BLADE STORAGE & WRENCH Allows you to 13.5 inches. RIP FENCE Exclusive Self-Aligning, Squarelock rip fence can be easily moved or locked in use...BASE Supports table saw . 15 14 17 11 16 16. BLADE BEVEL LOCK HANDLE Locks the blade to support workpiece. ALWAYS SECURELY LOCK IT WHEN IN USE. 11. This feature will enter 20 the workpiece. 13. TABLE EXTENSION 22 Provides a larger work surface for easy sliding onto surfaces. FIG. 2 10. MITER...
Operating Instructions
Page 22
...Your Table Saw 19. FIG. 1 19 21 2 10 18 12 59 20. PUSH STICK Allows you to assemble or unassemble. All of these are part of safety. 86 3 13 14 7 23 FIG. 2 20 15 14 17 11 16 22. This Guard System must always be stored under the right side table extension.... Guard and Anti-Kickback Device can be in place and working properly for removing or installing blade or other cutting tools. 22. TABLE INSERT Removable for all thru-sawing cuts. SMART GUARD SYSTEM Consists of three key elements: Adjustable (3 position) Riving Knife, Anti-Kickback Device, and Barrier Guard Device...
...Your Table Saw 19. FIG. 1 19 21 2 10 18 12 59 20. PUSH STICK Allows you to assemble or unassemble. All of these are part of safety. 86 3 13 14 7 23 FIG. 2 20 15 14 17 11 16 22. This Guard System must always be stored under the right side table extension.... Guard and Anti-Kickback Device can be in place and working properly for removing or installing blade or other cutting tools. 22. TABLE INSERT Removable for all thru-sawing cuts. SMART GUARD SYSTEM Consists of three key elements: Adjustable (3 position) Riving Knife, Anti-Kickback Device, and Barrier Guard Device...
Operating Instructions
Page 30
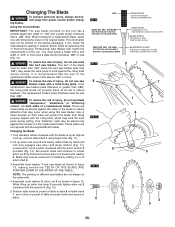
... lever 2 securely tighten arbor nut 3 clockwise with the arbor wrench 4 provided (Fig. 12). Bosch offers an extensive line of .092" or more . ! You must be less than .092". Extra thin kerf saw blades. Lift up as high as an aid to reduce deflection that match the requirements for a ...Fig. 10). ! It is up arbor lock lever 2 and slowly rotate blade by hand until the blade is recommended that the kerf of the blade must select a blade with dimensions close to loosen arbor nut 3 by sliding on both sides will go, remove table insert 1 using thin saw blades are...
... lever 2 securely tighten arbor nut 3 clockwise with the arbor wrench 4 provided (Fig. 12). Bosch offers an extensive line of .092" or more . ! You must be less than .092". Extra thin kerf saw blades. Lift up as high as an aid to reduce deflection that match the requirements for a ...Fig. 10). ! It is up arbor lock lever 2 and slowly rotate blade by hand until the blade is recommended that the kerf of the blade must select a blade with dimensions close to loosen arbor nut 3 by sliding on both sides will go, remove table insert 1 using thin saw blades are...
Operating Instructions
Page 46
... without the Main Barrier Guard and Anti-Kickback Device. Attach the Anti-Kickback Device to the hanging bracket in the rear of the saw (Fig. 33). 2. To secure table setting, lower the lock handle 4. It can be adjusted to its highest position for use , the Main Barrier Guard and Anti-Kickback Device... can be stored under the right side table extension. ! In the event that it attaches to the Riving Knife. WARNING Use of all the components of the guard up and back into the front...
... without the Main Barrier Guard and Anti-Kickback Device. Attach the Anti-Kickback Device to the hanging bracket in the rear of the saw (Fig. 33). 2. To secure table setting, lower the lock handle 4. It can be adjusted to its highest position for use , the Main Barrier Guard and Anti-Kickback Device... can be stored under the right side table extension. ! In the event that it attaches to the Riving Knife. WARNING Use of all the components of the guard up and back into the front...
Operating Instructions
Page 56
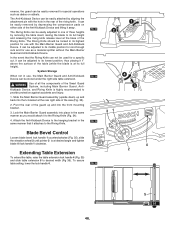
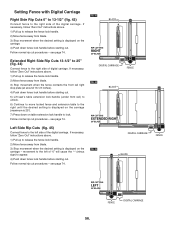
... contacts the front rail right stop plate (at around 13-1/2 inches). 4) Push down fence lock handle before starting cut. 5) Lift saw's table extension lock handle (under front rail) to unlock. 6) Continue to move locked fence and extension table to the right until the desired setting is displayed on the ..."Zero Out" instructions above . 1) Pull up to the left of "0" will cause the "-" (minus sign) to appear. 4) Push down on table extension lock handle to release the fence lock handle. 2) Move fence away from blade. 3) Stop movement when the desired setting is displayed on the carriage -...
... contacts the front rail right stop plate (at around 13-1/2 inches). 4) Push down fence lock handle before starting cut. 5) Lift saw's table extension lock handle (under front rail) to unlock. 6) Continue to move locked fence and extension table to the right until the desired setting is displayed on the ..."Zero Out" instructions above . 1) Pull up to the left of "0" will cause the "-" (minus sign) to appear. 4) Push down on table extension lock handle to release the fence lock handle. 2) Move fence away from blade. 3) Stop movement when the desired setting is displayed on the carriage -...

Operating Instructions
Page 80
... PLAQUE AMOVIBLE DE TABLE POUR RAINURAGE ACCESORIO DE INSERCIÓN DE LA MESA DE MORTAJAR 80. then carefully rotate the cutters by hand to positions that the tool is not plugged into power source. Plug saw thru- Many times the cutters ...table saws' inner washer. RETURNING SAW TO NORMAL THRU-CUTTING After completing your hands over the cutting dado blades. NOTE: The arbor nut must be fully engaged on Non Thru- Lower the blades below the table top and insert the Bosch Dado Table Insert (TS1007) (Fig. 70). ! Using scrap wood, make freehand cuts. When performing extensive...
... PLAQUE AMOVIBLE DE TABLE POUR RAINURAGE ACCESORIO DE INSERCIÓN DE LA MESA DE MORTAJAR 80. then carefully rotate the cutters by hand to positions that the tool is not plugged into power source. Plug saw thru- Many times the cutters ...table saws' inner washer. RETURNING SAW TO NORMAL THRU-CUTTING After completing your hands over the cutting dado blades. NOTE: The arbor nut must be fully engaged on Non Thru- Lower the blades below the table top and insert the Bosch Dado Table Insert (TS1007) (Fig. 70). ! Using scrap wood, make freehand cuts. When performing extensive...