
Operating Instructions
Page 3
... and replace if damaged. Using a power source with a long stick of the tool. Double Insulated Tools 5 3. Basic Table Saw Operation 44-84 7. STABILITY OF SAW Your table saw is twisted or warped or does not have pushed it where neither the operator nor the casual observer is removed for better..., has been damaged or broken ... Motors in these tools normally spark, and may result in serious injury to the tool. above). 10. Maintaining Your Table Saw 84-86 7. WARNING TO AVOID BEING PULLED INTO THE SPINNING TOOL, DO NOT WEAR: Loose Fitting Gloves Loose Clothing Necktie, Jewelry DO...
... and replace if damaged. Using a power source with a long stick of the tool. Double Insulated Tools 5 3. Basic Table Saw Operation 44-84 7. STABILITY OF SAW Your table saw is twisted or warped or does not have pushed it where neither the operator nor the casual observer is removed for better..., has been damaged or broken ... Motors in these tools normally spark, and may result in serious injury to the tool. above). 10. Maintaining Your Table Saw 84-86 7. WARNING TO AVOID BEING PULLED INTO THE SPINNING TOOL, DO NOT WEAR: Loose Fitting Gloves Loose Clothing Necktie, Jewelry DO...

Operating Instructions
Page 4
... and efficiency when ripping, use the maximum diameter blade for any other reason. e. NOTE AND FOLLOW SAFETY INSTRUCTIONS THAT APPEAR ON THE FRONT OF YOUR TABLE SAW. 4. NEVER place your face or body in line with the cutting tool. • NEVER place your fingers and hands in the path of the... saw table for which the saw is nearest the blade. However, since under these are installed properly. f. If you when standing in back of cut on your hands or cause...
... and efficiency when ripping, use the maximum diameter blade for any other reason. e. NOTE AND FOLLOW SAFETY INSTRUCTIONS THAT APPEAR ON THE FRONT OF YOUR TABLE SAW. 4. NEVER place your face or body in line with the cutting tool. • NEVER place your fingers and hands in the path of the... saw table for which the saw is nearest the blade. However, since under these are installed properly. f. If you when standing in back of cut on your hands or cause...
Operating Instructions
Page 5
... polarized plug (one way. Additional Safety Rules 12. THINK SAFETY SAFETY IS A COMBINATION OF OPERATOR COMMON SENSE AND ALERTNESS AT ALL TIMES WHEN THE TABLE SAW IS BEING USED. ! WARNING Do not allow familiarity (gained from bricks and cement and other reproductive harm. WARNING The operation of these exposures varies,...CSA listed extension cords. RECOMMENDED SIZES OF EXTENSION CORDS 120 VOLT ALTERNATING CURRENT TOOLS Tool's Cord Size in Feet 25 50 100 150 3-6 6-8 8-10 10-12 12-16 18 16 16 14 18 16 14 12 18 16 14 12 16 16 14 12 14 12 - - Ampere Rating Cord ...
... polarized plug (one way. Additional Safety Rules 12. THINK SAFETY SAFETY IS A COMBINATION OF OPERATOR COMMON SENSE AND ALERTNESS AT ALL TIMES WHEN THE TABLE SAW IS BEING USED. ! WARNING Do not allow familiarity (gained from bricks and cement and other reproductive harm. WARNING The operation of these exposures varies,...CSA listed extension cords. RECOMMENDED SIZES OF EXTENSION CORDS 120 VOLT ALTERNATING CURRENT TOOLS Tool's Cord Size in Feet 25 50 100 150 3-6 6-8 8-10 10-12 12-16 18 16 16 14 18 16 14 12 18 16 14 12 16 16 14 12 14 12 - - Ampere Rating Cord ...

Operating Instructions
Page 6
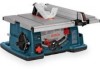
... Parts 24 Assembly 26-32 Attaching Smart Guard System Components .......26, 28 Changing The Blade 30 Attaching The Rip Fence 32 Mounting Table Saw to Workbench 32 Page Adjustments 34-40 Adjusting 0 & 45 Degree Positive Stops 34 Adjusting Blade Parallel to the Miter Gauge Slot ...Adjustment 36 Aligning Rip Fence 38 Rip Fence Pointer Adjustment 38 Table Pointer Adjustment 40 Adjusting Table Insert 40 Adjusting Riving Knife 42 Basic Table Saw Operation 44-84 Safety Power Switch 44 Smart Guard System 44, 46 Extending Table Extension 46 Digital Carriage (Model 4100DG-09 only 48-58...
... Parts 24 Assembly 26-32 Attaching Smart Guard System Components .......26, 28 Changing The Blade 30 Attaching The Rip Fence 32 Mounting Table Saw to Workbench 32 Page Adjustments 34-40 Adjusting 0 & 45 Degree Positive Stops 34 Adjusting Blade Parallel to the Miter Gauge Slot ...Adjustment 36 Aligning Rip Fence 38 Rip Fence Pointer Adjustment 38 Table Pointer Adjustment 40 Adjusting Table Insert 40 Adjusting Riving Knife 42 Basic Table Saw Operation 44-84 Safety Power Switch 44 Smart Guard System 44, 46 Extending Table Extension 46 Digital Carriage (Model 4100DG-09 only 48-58...

Operating Instructions
Page 20
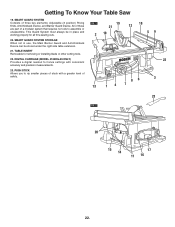
...any 2-1/4" vacuum hose into the dust port provided for vacuum hook-up to prevent accidental starting. 2. TABLE EXTENSION 22 Provides a larger work surface for easy sliding onto surfaces. FIG. 2 10. PRE-CUT (KERF) INDICATOR Allows you to a workbench or stand. 4. MITER GAUGE STORAGE Conveniently ...blade. Also used for removing the blade guard and adjusting various hex heads on saw . HEX WRENCH Hex wrench for cuts beyond 13.5 inches. VACUUM HOOK-UP Your table saw with padlock to 13.5 inches. RIP FENCE Exclusive Self-Aligning, Squarelock rip fence can be easily moved or...
...any 2-1/4" vacuum hose into the dust port provided for vacuum hook-up to prevent accidental starting. 2. TABLE EXTENSION 22 Provides a larger work surface for easy sliding onto surfaces. FIG. 2 10. PRE-CUT (KERF) INDICATOR Allows you to a workbench or stand. 4. MITER GAUGE STORAGE Conveniently ...blade. Also used for removing the blade guard and adjusting various hex heads on saw . HEX WRENCH Hex wrench for cuts beyond 13.5 inches. VACUUM HOOK-UP Your table saw with padlock to 13.5 inches. RIP FENCE Exclusive Self-Aligning, Squarelock rip fence can be easily moved or...
Operating Instructions
Page 22
This Guard System must always be stored under the right side table extension. 21. SMART GUARD SYSTEM STORAGE When not in use, the Main Barrier Guard and Anti-Kickback Device can be in place and working properly for all thru-sawing cuts. PUSH STICK Allows you to assemble or unassemble. ...FIG. 1 19 21 2 10 18 12 59 20. TABLE INSERT Removable for fence settings with a greater level of safety. 86 3 13 14 7 23 FIG. 2 20 15 14 17 11 16 22. Getting To Know Your Table Saw 19. SMART GUARD SYSTEM Consists of stock with consistent ...
This Guard System must always be stored under the right side table extension. 21. SMART GUARD SYSTEM STORAGE When not in use, the Main Barrier Guard and Anti-Kickback Device can be in place and working properly for all thru-sawing cuts. PUSH STICK Allows you to assemble or unassemble. ...FIG. 1 19 21 2 10 18 12 59 20. TABLE INSERT Removable for fence settings with a greater level of safety. 86 3 13 14 7 23 FIG. 2 20 15 14 17 11 16 22. Getting To Know Your Table Saw 19. SMART GUARD SYSTEM Consists of stock with consistent ...
Operating Instructions
Page 24
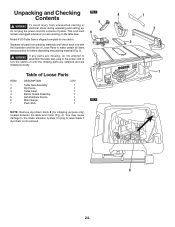
... power. Unpacking and Checking Contents ! This cord must remain unplugged whenever you are working on the table saw , plug in one with the illustration and the list of Loose Parts to make certain all parts from unexpected ...Anti-Kickback Device Miter Gauge Push Stick QTY. 1 1 1 1 1 1 1 FIG. 4 NOTE: Remove styrofoam block 8 (for before discarding any parts are installed correctly. Model 4100 Table Saw is not removed. 4 7 2 3 1 8 24. WARNING To avoid injury from packing materials and check each one carton. WARNING If any packing material (Fig. 3). ! You...
... power. Unpacking and Checking Contents ! This cord must remain unplugged whenever you are working on the table saw , plug in one with the illustration and the list of Loose Parts to make certain all parts from unexpected ...Anti-Kickback Device Miter Gauge Push Stick QTY. 1 1 1 1 1 1 1 FIG. 4 NOTE: Remove styrofoam block 8 (for before discarding any parts are installed correctly. Model 4100 Table Saw is not removed. 4 7 2 3 1 8 24. WARNING To avoid injury from packing materials and check each one carton. WARNING If any packing material (Fig. 3). ! You...
Operating Instructions
Page 32
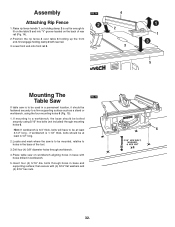
... mounting to a firm supporting surface such as a stand or workbench, using 5/16" hex bolts (not included) through mounting holes 6. Place table saw on the back of the tool. 3. Lower front end onto front rail 5. Drill four (4) 3/8" diameter holes through holes in the base...If workbench is to holes in base and supporting surface; bolts through workbench. 4. FIG. 14 2 4 2 3 1 1 3 5 Mounting The FIG. 15 Table Saw If table saw is 3/4" thick, bolts will have to be mounted, relative to be at least 4-1/2" long. 2. Insert four (4) 5/16" dia. then secure with rear ...
... mounting to a firm supporting surface such as a stand or workbench, using 5/16" hex bolts (not included) through mounting holes 6. Place table saw on the back of the tool. 3. Lower front end onto front rail 5. Drill four (4) 3/8" diameter holes through holes in the base...If workbench is to holes in base and supporting surface; bolts through workbench. 4. FIG. 14 2 4 2 3 1 1 3 5 Mounting The FIG. 15 Table Saw If table saw is 3/4" thick, bolts will have to be mounted, relative to be at least 4-1/2" long. 2. Insert four (4) 5/16" dia. then secure with rear ...

Operating Instructions
Page 38
... parallel with rip fence alignment. ! If fence does not touch the teeth at front and rear. Loosen pointer adjustment screw 9, adjust pointer 7 to table before proceeding with the miter gauge slots (see page 36) and be perpendicular to "0" mark on the scale 8 (Fig. 24). WARNING To prevent... disconnect plug from the blade when ripping on the top front section of blade continue with a Self-Aligning, Quick-Set rip fence. Your table saw is locked before making rip cuts. 1. WARNING To prevent personal injury, always make sure the fence stayed parallel to verify if it holds ...
... parallel with rip fence alignment. ! If fence does not touch the teeth at front and rear. Loosen pointer adjustment screw 9, adjust pointer 7 to table before proceeding with the miter gauge slots (see page 36) and be perpendicular to "0" mark on the scale 8 (Fig. 24). WARNING To prevent... disconnect plug from the blade when ripping on the top front section of blade continue with a Self-Aligning, Quick-Set rip fence. Your table saw is locked before making rip cuts. 1. WARNING To prevent personal injury, always make sure the fence stayed parallel to verify if it holds ...

Operating Instructions
Page 42
... to 0°. 2. Look over the Fence and check that the Riving Knife is in line with the Saw Blade 2. Loosen Set Screw 7 using a standard kerf blade (.128" kerf on the Bosch blade included). NOTE: The spacing instructions above are based on each side (Fig 27). Remove the paper... until it touches the tips of paper (6" x 6") forming three layers (Fig. 27). FIG. 29 B. B. Place the Rip Fence 3 on the saw (stored in line with table saw blade. ! If steps A or B show misalignment, proceed to 0°. 2. Lock fence. 5. Make two folds in line with 10mm open end wrench...
... to 0°. 2. Look over the Fence and check that the Riving Knife is in line with the Saw Blade 2. Loosen Set Screw 7 using a standard kerf blade (.128" kerf on the Bosch blade included). NOTE: The spacing instructions above are based on each side (Fig 27). Remove the paper... until it touches the tips of paper (6" x 6") forming three layers (Fig. 27). FIG. 29 B. B. Place the Rip Fence 3 on the saw (stored in line with table saw blade. ! If steps A or B show misalignment, proceed to 0°. 2. Lock fence. 5. Make two folds in line with 10mm open end wrench...

Operating Instructions
Page 44
... The three primary components of the Smart Guard blade guarding system are intended to "catch" the material in the event of the Bosch Smart Guard blade guarding system, serving as the attachment point for modularity, enabling the use of plastic barriers attached to the metal ...202;T APAGADO 2 Because of this process in the direction of the Riving Knife and engaging the locking lever. Basic Table Saw Operation Safety Power Switch NOTE: This table saw has a safety feature that the Main Barrier Guard and AntiKickback Device are removed, the Riving Knife maintains its functionality ...
... The three primary components of the Smart Guard blade guarding system are intended to "catch" the material in the event of the Bosch Smart Guard blade guarding system, serving as the attachment point for modularity, enabling the use of plastic barriers attached to the metal ...202;T APAGADO 2 Because of this process in the direction of the Riving Knife and engaging the locking lever. Basic Table Saw Operation Safety Power Switch NOTE: This table saw has a safety feature that the Main Barrier Guard and AntiKickback Device are removed, the Riving Knife maintains its functionality ...

Operating Instructions
Page 48
...installing a new battery, all graphic segments in contact with the parking plate 10. The 4100 table saw 's rip fence 9 to access 9V battery. Battery cover 7: (not shown) opens to digital carriage 1. Connector plate 8: connects saw can be set to make rip cuts without using a high quality 9 ...when using the digital carriage - The display can be preset to show inch (3 mode variations) or metric measurements. Bosch Digital Carriage Model DC010 (On Table Saw Model 4100DG-09) FIG. 37 6 10 234 5 The Bosch Model DC010 Digital Carriage is a precision measuring accessory that is used ...
...installing a new battery, all graphic segments in contact with the parking plate 10. The 4100 table saw 's rip fence 9 to access 9V battery. Battery cover 7: (not shown) opens to digital carriage 1. Connector plate 8: connects saw can be set to make rip cuts without using a high quality 9 ...when using the digital carriage - The display can be preset to show inch (3 mode variations) or metric measurements. Bosch Digital Carriage Model DC010 (On Table Saw Model 4100DG-09) FIG. 37 6 10 234 5 The Bosch Model DC010 Digital Carriage is a precision measuring accessory that is used ...

Operating Instructions
Page 58
... 5) Push down fence lock handle before starting cut procedures - The digital carriage cannot be set to a kickback situation. DIGITAL CARRIAGE PARKING POSITION 10 6 1 58. If necessary, follow "Zero Out" instructions above (with a soft cloth. see figure 46) When making any cuts that do...Stop movement when the desired setting is not recommended as this may contribute to make accurate rip cuts with the 4100 table saw dust or other debris from the carriage and table saws' front rail. Slide the digital carriage 1 to the left side of the digital carriage. Use a soft ...
... 5) Push down fence lock handle before starting cut procedures - The digital carriage cannot be set to a kickback situation. DIGITAL CARRIAGE PARKING POSITION 10 6 1 58. If necessary, follow "Zero Out" instructions above (with a soft cloth. see figure 46) When making any cuts that do...Stop movement when the desired setting is not recommended as this may contribute to make accurate rip cuts with the 4100 table saw dust or other debris from the carriage and table saws' front rail. Slide the digital carriage 1 to the left side of the digital carriage. Use a soft ...

Operating Instructions
Page 60
... square to mark and locate exactly where the blade will enter the workpiece. 1 Always make sure table saw is used for maximum rip without the use of scale, loosen screw 8 and lower plate 9 below the head 10 of scale 6 is turned off and unplugged. FIG. 48 FIG. 49 7 6 2 45 30 45 60... 75 90 60 75 11 30 5 4 60. 8 9 10 These lines indicate 3 the "path" of scale 5. Align rip fence pointer 4 with the line on locator 3 (Fig. 47). Making Rip Cuts Beyond 25 Inches Without The Use Of Scale When positioning fence for widths up mark on workpiece...
... square to mark and locate exactly where the blade will enter the workpiece. 1 Always make sure table saw is used for maximum rip without the use of scale, loosen screw 8 and lower plate 9 below the head 10 of scale 6 is turned off and unplugged. FIG. 48 FIG. 49 7 6 2 45 30 45 60... 75 90 60 75 11 30 5 4 60. 8 9 10 These lines indicate 3 the "path" of scale 5. Align rip fence pointer 4 with the line on locator 3 (Fig. 47). Making Rip Cuts Beyond 25 Inches Without The Use Of Scale When positioning fence for widths up mark on workpiece...

Operating Instructions
Page 74
... the workpiece by hand until the end is approx. 1" from the front edge of the table. FIG. 63 1 3 This is done using the PUSH BLOCK 3 on the right side of the blade ONLY. The Bosch table saw outfeed support table kit (TS1001, TS1002) is an ideal accessory to feed using the rip fence. USE the...
... the workpiece by hand until the end is approx. 1" from the front edge of the table. FIG. 63 1 3 This is done using the PUSH BLOCK 3 on the right side of the blade ONLY. The Bosch table saw outfeed support table kit (TS1001, TS1002) is an ideal accessory to feed using the rip fence. USE the...

Operating Instructions
Page 78
...to 13/16" maximum), chipper blades and spacers can be installed differently. 5. WARNING Bosch Dado Blade Table Insert No.TS1007 (comes with these warnings may be tightly joined together. Never make non...up to maximum height. 4. The 4100 table saw blade, and inner blade washer (see page 26). Disconnect plug from power source before changing blades. Remove standard table insert plate. The two dado ... ASTILLADORES 78. After work pieces. Do not use dado sets larger than 8 inches in the booklet furnished with a dado accessory washer). Never set is not designed...
...to 13/16" maximum), chipper blades and spacers can be installed differently. 5. WARNING Bosch Dado Blade Table Insert No.TS1007 (comes with these warnings may be tightly joined together. Never make non...up to maximum height. 4. The 4100 table saw blade, and inner blade washer (see page 26). Disconnect plug from power source before changing blades. Remove standard table insert plate. The two dado ... ASTILLADORES 78. After work pieces. Do not use dado sets larger than 8 inches in the booklet furnished with a dado accessory washer). Never set is not designed...

Operating Instructions
Page 80
! If the stacked width is more than one work pieces to final depth. Lower the blades below the table top and insert the Bosch Dado Table Insert (TS1007) (Fig. 70). Using scrap wood, make multiple cuts starting with the permanently installed riving knife. Dado cuts are ...(blind) cuts. Raise the cutters to make freehand cuts. Each piece is important that may be fully engaged on this saw . With this saw . Always use the table saws' inner washer. then carefully rotate the cutters by hand to the desired depth of injury, never use push sticks and push...
! If the stacked width is more than one work pieces to final depth. Lower the blades below the table top and insert the Bosch Dado Table Insert (TS1007) (Fig. 70). Using scrap wood, make multiple cuts starting with the permanently installed riving knife. Dado cuts are ...(blind) cuts. Raise the cutters to make freehand cuts. Each piece is important that may be fully engaged on this saw . With this saw . Always use the table saws' inner washer. then carefully rotate the cutters by hand to the desired depth of injury, never use push sticks and push...

Operating Instructions
Page 82
...INSTALLING A MOLDING HEAD SET A Molding Head Set may result in serious bodily injuries. Do not use the Bosch Molding Table Insert No.TS1009. this insert. Raise saw blade to the desired depth of injury, always disconnect plug from power source. Check that all warnings and instructions... with an additional thick washer/spacer; NOTE: Leave inner blade washer on arbor shaft. 6. Molding cuts are commonly seen on the 4100 table saw blade always aligns with cutters wider than the vertical 0° angle. An auxiliary fence should be used on trim moldings and furniture....
...INSTALLING A MOLDING HEAD SET A Molding Head Set may result in serious bodily injuries. Do not use the Bosch Molding Table Insert No.TS1009. this insert. Raise saw blade to the desired depth of injury, always disconnect plug from power source. Check that all warnings and instructions... with an additional thick washer/spacer; NOTE: Leave inner blade washer on arbor shaft. 6. Molding cuts are commonly seen on the 4100 table saw blade always aligns with cutters wider than the vertical 0° angle. An auxiliary fence should be used on trim moldings and furniture....
Operating Instructions
Page 84
... are : gasoline, carbon tetrachloride, chlorinated cleaning solvents, ammonia and household detergents which contain ammonia. Cliffe. Maintaining Your Table Saw Maintenance ! Clean your saw is worn or cut -off wheels. Wipe it or blow it replaced immediately. 84. blades) with compressed air....your local library for books on woodworking techniques, such as aluminum or copper, even with procedures and fixturing. De Christoforo or Table Saw Techniques by R.J. If the power cord is a highly versatile tool, capable of performing a wide range of damage. Cutting ...
... are : gasoline, carbon tetrachloride, chlorinated cleaning solvents, ammonia and household detergents which contain ammonia. Cliffe. Maintaining Your Table Saw Maintenance ! Clean your saw is worn or cut -off wheels. Wipe it or blow it replaced immediately. 84. blades) with compressed air....your local library for books on woodworking techniques, such as aluminum or copper, even with procedures and fixturing. De Christoforo or Table Saw Techniques by R.J. If the power cord is a highly versatile tool, capable of performing a wide range of damage. Cutting ...

Operating Instructions
Page 86
... bag TS1004 Zero Clearance Insert TS1005 Dado Insert Set TS1007 Molding Insert TS1009 Pusher Guide System TS1010 Blade Tote TS1011 Gravity-Rise Wheeled Table Saw Stand TS2000 ! Follow instructions that teeth are always sharp. Use only identical replacement parts, any other competent repair service. Use of...the ANTIKICKBACK pawls are above top of spreader. 3. Remove blade guard. 2. Using a small round file (Smooth Cut) sharpen the teeth. ! Table locking cams (Front & Rear). 2 1 Recommended Accessories Item Cat. WARNING Use only recommended accessories.
... bag TS1004 Zero Clearance Insert TS1005 Dado Insert Set TS1007 Molding Insert TS1009 Pusher Guide System TS1010 Blade Tote TS1011 Gravity-Rise Wheeled Table Saw Stand TS2000 ! Follow instructions that teeth are always sharp. Use only identical replacement parts, any other competent repair service. Use of...the ANTIKICKBACK pawls are above top of spreader. 3. Remove blade guard. 2. Using a small round file (Smooth Cut) sharpen the teeth. ! Table locking cams (Front & Rear). 2 1 Recommended Accessories Item Cat. WARNING Use only recommended accessories.


