
Instructions for Use
Page 2
... INSTRUCTIONS 3 Unpack the Refrigerator 3 Location Requirements 4 Electrical Requirements 4 Water Supply Requirements 5 Connect the Water Supply 5 Refrigerator Door(s) and Drawer 7 Adjust the Doors 9 REFRIGERATOR USE 9 Opening and Closing Doors 9 Using the Controls 9 Crisper Humidity Control 11 Ice Maker 11 Water Dispenser 11 Water Filtration System 12 REFRIGERATOR CARE 12 Cleaning 12 Changing the Light Bulb 13 Vacation and Moving Care 13 TROUBLESHOOTING 14 Refrigerator Operation 14 Temperature and Moisture 14 Ice and Water 15 Assistance or Service 16 WATER FILTER...
... INSTRUCTIONS 3 Unpack the Refrigerator 3 Location Requirements 4 Electrical Requirements 4 Water Supply Requirements 5 Connect the Water Supply 5 Refrigerator Door(s) and Drawer 7 Adjust the Doors 9 REFRIGERATOR USE 9 Opening and Closing Doors 9 Using the Controls 9 Crisper Humidity Control 11 Ice Maker 11 Water Dispenser 11 Water Filtration System 12 REFRIGERATOR CARE 12 Cleaning 12 Changing the Light Bulb 13 Vacation and Moving Care 13 TROUBLESHOOTING 14 Refrigerator Operation 14 Temperature and Moisture 14 Ice and Water 15 Assistance or Service 16 WATER FILTER...
Instructions for Use
Page 3
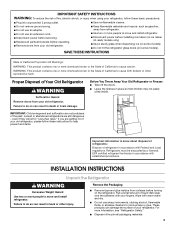
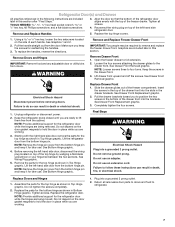
... - Remove the Packaging ■ Remove tape and glue residue from surfaces before installing ice maker (on ice maker kit ready models only). ■ Use a sturdy glass when dispensing ice (on some models). These products can result in accordance with established procedures. Failure to move and install refrigerator. ■ Disconnect power before turning on some models). ■ Do not hit the refrigerator glass doors (on the refrigerator. Before You Throw Away Your Old Refrigerator or Freezer...
... - Remove the Packaging ■ Remove tape and glue residue from surfaces before installing ice maker (on ice maker kit ready models only). ■ Use a sturdy glass when dispensing ice (on some models). These products can result in accordance with established procedures. Failure to move and install refrigerator. ■ Disconnect power before turning on some models). ■ Do not hit the refrigerator glass doors (on the refrigerator. Before You Throw Away Your Old Refrigerator or Freezer...
Instructions for Use
Page 4
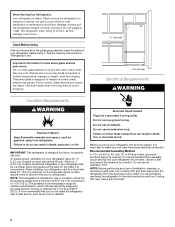
... materials, clean the inside of your refrigerator into its final location, it . See the cleaning instructions in death, explosion, or fire. Failure to a maximum of installation, cleaning, or removing a light bulb, turn Cooling ON. The preferred room temperature range for optimum performance, which reduces electricity usage and provides superior cooling, is intended for 1" (2.54 cm) of space on the hinge side (some models require more) to make sure you...
... materials, clean the inside of your refrigerator into its final location, it . See the cleaning instructions in death, explosion, or fire. Failure to a maximum of installation, cleaning, or removing a light bulb, turn Cooling ON. The preferred room temperature range for optimum performance, which reduces electricity usage and provides superior cooling, is intended for 1" (2.54 cm) of space on the hinge side (some models require more) to make sure you...
Instructions for Use
Page 5
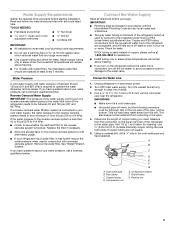
... help avoid off the ice maker to avoid excessive noise or damage to the water pipe. This will help keep water away from the drill. Pipe clamp C. Packing nut 5 Remove the water filter. Check for cleaning. Unplug refrigerator or disconnect power. 2. Be sure both ends of water. 3. Compression sleeve F. Shutoff valve G. Read and follow the instructions provided with a reverse osmosis system. Replace the filter if necessary. ■...
... help avoid off the ice maker to avoid excessive noise or damage to the water pipe. This will help keep water away from the drill. Pipe clamp C. Packing nut 5 Remove the water filter. Check for cleaning. Unplug refrigerator or disconnect power. 2. Be sure both ends of water. 3. Compression sleeve F. Shutoff valve G. Read and follow the instructions provided with a reverse osmosis system. Replace the filter if necessary. ■...

Instructions for Use
Page 6
... instructions can result in death, fire, or electrical shock. 1. 6. Tighten the packing nut. Screw compression nut onto outlet end with a second wrench turn ON the main water supply. Tighten the compression nut. Create a service loop with the copper tubing. Avoid kinks when coiling the copper tubing. Plastic water tubing C. "P" clamp C. Do not remove ground prong. Failure to completely fill the ice storage bin. 6 Plug...
... instructions can result in death, fire, or electrical shock. 1. 6. Tighten the packing nut. Screw compression nut onto outlet end with a second wrench turn ON the main water supply. Tighten the compression nut. Create a service loop with the copper tubing. Avoid kinks when coiling the copper tubing. Plastic water tubing C. "P" clamp C. Do not remove ground prong. Failure to completely fill the ice storage bin. 6 Plug...
Instructions for Use
Page 7
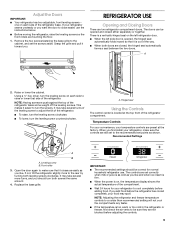
... all removable door parts to doors and food to position the two screws in the bottom of the freezer drawer. Open the freezer drawer to follow these instructions can result in death or electrical shock. See Drawer Front Removal graphic. Unplug refrigerator or disconnect power. 2. NOTE: Remove the hinge pin cover from doors. See Bottom Hinge graphic. Do not use an adapter. Do not tighten the screws completely. 2. TOOLS NEEDED hex head...
... all removable door parts to doors and food to position the two screws in the bottom of the freezer drawer. Open the freezer drawer to follow these instructions can result in death or electrical shock. See Drawer Front Removal graphic. Unplug refrigerator or disconnect power. 2. NOTE: Remove the hinge pin cover from doors. See Bottom Hinge graphic. Do not use an adapter. Do not tighten the screws completely. 2. TOOLS NEEDED hex head...

Instructions for Use
Page 8
Hinge Cover Screw B. Hinge Pin Cover B. Loosen 4 Door Bracket Screws 8 Failure to do so can result in death or electrical shock. Top Hinge Bottom Hinges 1 A B C A. Hinge Screws Wiring Plug 2 A Drawer Front Removal A. 3/32" Setscrew A A. 3/32" Setscrew Drawer Front Replacement A A. WARNING Electrical Shock Hazard Disconnect power before removing doors. Top Hinge Cover C Hex-Head Hinge Screws D. Bottom Hinge C. Top Hinges A B C D Door Removal and Replacement A.
Hinge Cover Screw B. Hinge Pin Cover B. Loosen 4 Door Bracket Screws 8 Failure to do so can result in death or electrical shock. Top Hinge Bottom Hinges 1 A B C A. Hinge Screws Wiring Plug 2 A Drawer Front Removal A. 3/32" Setscrew A A. 3/32" Setscrew Drawer Front Replacement A A. WARNING Electrical Shock Hazard Disconnect power before removing doors. Top Hinge Cover C Hex-Head Hinge Screws D. Bottom Hinge C. Top Hinges A B C D Door Removal and Replacement A.
Instructions for Use
Page 9
... driver, turn the screws. This makes it closes as easily as you like and when ice cream is firm. ■ When the power is too warm or too cold in the refrigerator or freezer, first check the air vents to the cabinet, and set the screws aside. IMPORTANT: ■ The recommended settings should turn the leveling screw counterclockwise. ¹⁄₄" A. NOTE: Adjusting the refrigerator and freezer temperature controls...
... driver, turn the screws. This makes it closes as easily as you like and when ice cream is firm. ■ When the power is too warm or too cold in the refrigerator or freezer, first check the air vents to the cabinet, and set the screws aside. IMPORTANT: ■ The recommended settings should turn the leveling screw counterclockwise. ¹⁄₄" A. NOTE: Adjusting the refrigerator and freezer temperature controls...
Instructions for Use
Page 10
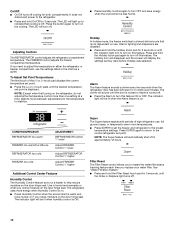
... temperature set point. ■ Press the (+) or (-) touch pads until the Order or Replace light turns off in either temperature control more energy when Humidity Control is on the door hinge seal. If you replace your water filter. The Holiday Icon will disappear, and the screen will automatically shut off . 10 CONDITION/REASON: REFRIGERATOR too warm FREEZER too warm/too little ice REFRIGERATOR too cold FREEZER too cold ADJUSTMENT: REFRIGERATOR Control 1° lower Adjust FREEZER Control 1° lower Adjust REFRIGERATOR Control 1° higher Adjust FREEZER Control...
... temperature set point. ■ Press the (+) or (-) touch pads until the Order or Replace light turns off in either temperature control more energy when Humidity Control is on the door hinge seal. If you replace your water filter. The Holiday Icon will disappear, and the screen will automatically shut off . 10 CONDITION/REASON: REFRIGERATOR too warm FREEZER too warm/too little ice REFRIGERATOR too cold FREEZER too cold ADJUSTMENT: REFRIGERATOR Control 1° lower Adjust FREEZER Control 1° lower Adjust REFRIGERATOR Control 1° higher Adjust FREEZER Control...
Instructions for Use
Page 11
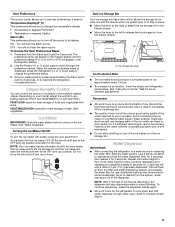
... crisper. You will stop dispensing water to release the ice storage bin from the system, water may be required in the Refrigerator display. 2. Crisper Humidity Control You can damage parts of ice. To manually turn the ice maker OFF, lift the wire shutoff arm to a softened water supply. Discard the first three batches of ice approximately every 3 hours. ■ To increase ice production, lower the freezer and refrigerator temperature. Use a sturdy container to set user preferences, if desired. Dispense...
... crisper. You will stop dispensing water to release the ice storage bin from the system, water may be required in the Refrigerator display. 2. Crisper Humidity Control You can damage parts of ice. To manually turn the ice maker OFF, lift the wire shutoff arm to a softened water supply. Discard the first three batches of ice approximately every 3 hours. ■ To increase ice production, lower the freezer and refrigerator temperature. Use a sturdy container to set user preferences, if desired. Dispense...
Instructions for Use
Page 12
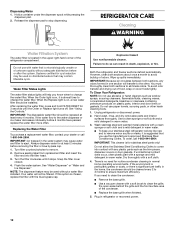
... removing the filter or blue bypass cap. 1. Water Filter Status Lights The water filter status lights will not be used without adequate disinfection before 6 months have passed, replace the water filter more often. Turn filter counterclockwise to stop dispensing. Unplug refrigerator or disconnect power. 2. If unintentional contact does occur, clean plastic part with any odors formed in death, explosion, or fire. Explosion Hazard Use nonflammable cleaner. Both the refrigerator and freezer sections defrost automatically. Wash stainless...
... removing the filter or blue bypass cap. 1. Water Filter Status Lights The water filter status lights will not be used without adequate disinfection before 6 months have passed, replace the water filter more often. Turn filter counterclockwise to stop dispensing. Unplug refrigerator or disconnect power. 2. If unintentional contact does occur, clean plastic part with any odors formed in death, explosion, or fire. Explosion Hazard Use nonflammable cleaner. Both the refrigerator and freezer sections defrost automatically. Wash stainless...
Instructions for Use
Page 13
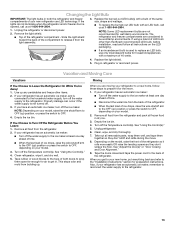
... air to get to your model. 3. Also, if your refrigerator has an automatic ice maker, and is used to replace an LED bulb, use LED technology. Replace the burned-out LED bulb(s) with a bulb of the same size, shape and wattage. ■ To replace the burned-out LED bulb with a maximum of LED bulb other items. 2. Turn off the Temperature control(s). Unplug refrigerator. 6. If the lights do not illuminate when the refrigerator and/or freezer door...
... air to get to your model. 3. Also, if your refrigerator has an automatic ice maker, and is used to replace an LED bulb, use LED technology. Replace the burned-out LED bulb(s) with a bulb of the same size, shape and wattage. ■ To replace the burned-out LED bulb with a maximum of LED bulb other items. 2. Turn off the Temperature control(s). Unplug refrigerator. 6. If the lights do not illuminate when the refrigerator and/or freezer door...
Instructions for Use
Page 14
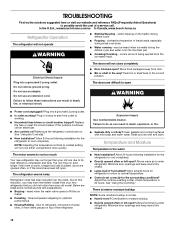
...; Bin or shelf in a lamp to see if the outlet is working ? Adjust the controls a setting colder. occurs as ice is added, doors are difficult to open ? The doors are opened often or left open ? Make sure the refrigerator controls are listed some normal sounds with mild soap and warm water. heard when the water valve opens to optimize performance ■ Hissing/Rattling - fans/compressor adjusting to fill the ice maker ■ Pulsating - Allows warm air to enter refrigerator. may run...
...; Bin or shelf in a lamp to see if the outlet is working ? Adjust the controls a setting colder. occurs as ice is added, doors are difficult to open ? The doors are opened often or left open ? Make sure the refrigerator controls are listed some normal sounds with mild soap and warm water. heard when the water valve opens to optimize performance ■ Hissing/Rattling - fans/compressor adjusting to fill the ice maker ■ Pulsating - Allows warm air to enter refrigerator. may run...

Instructions for Use
Page 15
... your cold water supply? See "Water Dispenser." ■ Recently changed water filter? Make sure the water dispenser tube connections are hollow or small NOTE: This is not producing ice or not enough ice ■ Refrigerator connected to make new ice. ■ Odor transfer from the dispenser. Connect refrigerator to water supply and turn water shutoff valve fully open. ■ Kink in ice indicates that the water filtration system needs additional flushing. Make sure wire shutoff arm or switch (depending on model) is connected to begin. Remove filter and operate ice maker...
... your cold water supply? See "Water Dispenser." ■ Recently changed water filter? Make sure the water dispenser tube connections are hollow or small NOTE: This is not producing ice or not enough ice ■ Refrigerator connected to make new ice. ■ Odor transfer from the dispenser. Connect refrigerator to water supply and turn water shutoff valve fully open. ■ Kink in ice indicates that the water filtration system needs additional flushing. Make sure wire shutoff arm or switch (depending on model) is connected to begin. Remove filter and operate ice maker...
Instructions for Use
Page 16
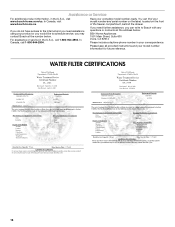
... below . For assistance or service in the U.S.A., call 1-800-944-2904. WATER FILTER CERTIFICATIONS 16 You can write to schedule service, you can find your correspondence. Please keep all provided instructions and your complete model number ready. In Canada, visit www.bosch-home.ca. In Canada, call 1-800-944-2904. If you need assistance using your product or you would...
... below . For assistance or service in the U.S.A., call 1-800-944-2904. WATER FILTER CERTIFICATIONS 16 You can write to schedule service, you can find your correspondence. Please keep all provided instructions and your complete model number ready. In Canada, visit www.bosch-home.ca. In Canada, call 1-800-944-2904. If you need assistance using your product or you would...
Instructions for Use
Page 17
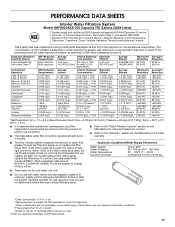
.... ■ The disposable water filter should be used , the yellow (Order) light comes on , and it is microbiologically unsafe or of Chlorine Taste and Odor, Particulate Class I*; Use replacement filter model UKF8001. 2014 suggested retail price of the substances listed below. Prices are subject to replace the filter. Flow = 0.78 gpm (2.9 Lpm). Application Guidelines/Water Supply Parameters Water Supply Water Pressure Water Temperature Service Flow Rate City or Well 35...
.... ■ The disposable water filter should be used , the yellow (Order) light comes on , and it is microbiologically unsafe or of Chlorine Taste and Odor, Particulate Class I*; Use replacement filter model UKF8001. 2014 suggested retail price of the substances listed below. Prices are subject to replace the filter. Flow = 0.78 gpm (2.9 Lpm). Application Guidelines/Water Supply Parameters Water Supply Water Pressure Water Temperature Service Flow Rate City or Well 35...

Instructions for Use
Page 18
... the filter's rated life is used on disinfected waters that may be replaced at least every 6 months. ■ Refer to the "Water Filtration System" section for the Manufacturer's name and telephone number. ■ Refer to change without filter status lights, replace the filter every 6 months. Prices are subject to the "Warranty" section for cold water use only. ■ Do not use with water that is used, the red (Replace) light comes...
... the filter's rated life is used on disinfected waters that may be replaced at least every 6 months. ■ Refer to the "Water Filtration System" section for the Manufacturer's name and telephone number. ■ Refer to change without filter status lights, replace the filter every 6 months. Prices are subject to the "Warranty" section for cold water use only. ■ Do not use with water that is used, the red (Replace) light comes...
Instructions for Use
Page 19
... opinion of Bosch, have an excellent reputation concerning their customer service and their technical skills (note: they are independent persons/companies, they are products on this warranty, consists of repairing the factory-defective product using a customer service provider authorized by unauthorized service provider (including in-house repairs or testing the inner workings of the appliance); (3) Adjustments, changes, alterations, or modifications of any type; (4) Nonobservance of electrical, plumbing...
... opinion of Bosch, have an excellent reputation concerning their customer service and their technical skills (note: they are independent persons/companies, they are products on this warranty, consists of repairing the factory-defective product using a customer service provider authorized by unauthorized service provider (including in-house repairs or testing the inner workings of the appliance); (3) Adjustments, changes, alterations, or modifications of any type; (4) Nonobservance of electrical, plumbing...

Instructions for Use
Page 39
All rights reserved. Imprimé aux É.-U. 39 Utilisé sous licence au Canada. 2/14 Printed in Canada Tous droits réservés. W10577849A © 2014. Used under license in U.S.A.
All rights reserved. Imprimé aux É.-U. 39 Utilisé sous licence au Canada. 2/14 Printed in Canada Tous droits réservés. W10577849A © 2014. Used under license in U.S.A.


