Instructions for Use
Page 3
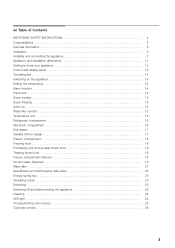
... Deli drawer 17 Variable interior design 17 Freezer compartment 18 Freezing food 18 Purchasing and storing deep−frozen food 18 Thawing frozen food 18 Freezer compartment features 19 Ice and water dispenser 19 Water filter 21 Specification and performance data sheet 22 Energy−saving tips 23 Operating noises 23 Defrosting 23 Switching off and disconnecting the appliance 23 Cleaning 23 LED light 24 Troubleshooting minor issues 25 Customer service 28...
... Deli drawer 17 Variable interior design 17 Freezer compartment 18 Freezing food 18 Purchasing and storing deep−frozen food 18 Thawing frozen food 18 Freezer compartment features 19 Ice and water dispenser 19 Water filter 21 Specification and performance data sheet 22 Energy−saving tips 23 Operating noises 23 Defrosting 23 Switching off and disconnecting the appliance 23 Cleaning 23 LED light 24 Troubleshooting minor issues 25 Customer service 28...

Instructions for Use
Page 4
... food in the freezer compartment. Risk of not observing this warning. S Do not stand or support yourself on the base, drawers or doors or other repairs. Before operating the appliance Please read the operating and installation instructions carefully! Improper installations and repairs may change the power cord and carry out any other parts of not observing this warning. 4 S Before cleaning, unplug the appliance or switch off frost...
... food in the freezer compartment. Risk of not observing this warning. S Do not stand or support yourself on the base, drawers or doors or other repairs. Before operating the appliance Please read the operating and installation instructions carefully! Improper installations and repairs may change the power cord and carry out any other parts of not observing this warning. 4 S Before cleaning, unplug the appliance or switch off frost...
Instructions for Use
Page 6
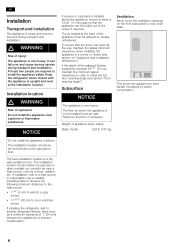
... the adjacent kitchen equipment exceeds 29ā1/8I (75 cm), maintain the minimum lateral clearances in a corner or recess (see section "Door opening angle"). The floor on the front base panel or rear cover plate. S 11ā3/16I (30 cm) to install the appliance safely. Installation location WARNING Risk of injury! This forces the appliance to electric or gas...
... the adjacent kitchen equipment exceeds 29ā1/8I (75 cm), maintain the minimum lateral clearances in a corner or recess (see section "Door opening angle"). The floor on the front base panel or rear cover plate. S 11ā3/16I (30 cm) to install the appliance safely. Installation location WARNING Risk of injury! This forces the appliance to electric or gas...
Instructions for Use
Page 7
S Always connect the water before plugging in the compressor may have the installation inspected by a qualified electrician. S Only a customer service technician should be used in another easily accessible location. Only a qualified installation technician may only be improved by a qualified electrician. 7 The ice maker will not work on ships, etc.). In this case, observe the separate connection requirements related to the filter (see "Cleaning the appliance"). The outlet...
S Always connect the water before plugging in the compressor may have the installation inspected by a qualified electrician. S Only a customer service technician should be used in another easily accessible location. Only a qualified installation technician may only be improved by a qualified electrician. 7 The ice maker will not work on ships, etc.). In this case, observe the separate connection requirements related to the filter (see "Cleaning the appliance"). The outlet...
Instructions for Use
Page 8
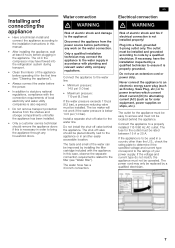
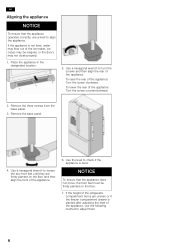
... align the appliance. Remove the base panel. 4. Use a hexagonal wrench to check if the appliance is level. Place the appliance in the designated location. 5. Remove the three screws from the base panel. 3. Use the level to loosen the two front feet until they are uneven or if the freezer compartment drawer is not level, water may flow out of the appliance: Turn the screw clockwise...
... align the appliance. Remove the base panel. 4. Use a hexagonal wrench to check if the appliance is level. Place the appliance in the designated location. 5. Remove the three screws from the base panel. 3. Use the level to loosen the two front feet until they are uneven or if the freezer compartment drawer is not level, water may flow out of the appliance: Turn the screw clockwise...

Instructions for Use
Page 9
... lower a refrigerator door: Turn the screw clockwise. 4. Adjusting a refrigerator door If the height of electric shock! Determine which side needs adjustment. 2. Determine which refrigerator door needs adjustment. 2. Tighten the two screws. 5. Move the hinge sideways to be raised. 2. Realign panel. 8. Insert and tighten the five screws. 9 Before removing the top panel: 1. en Adjusting the freezer compartment drawer 1. Do not remove the screw! Unplug the appliance or switch off the water supply to adjust the freezer compartment drawer. 4. Loosen...
... lower a refrigerator door: Turn the screw clockwise. 4. Adjusting a refrigerator door If the height of electric shock! Determine which side needs adjustment. 2. Determine which refrigerator door needs adjustment. 2. Tighten the two screws. 5. Move the hinge sideways to be raised. 2. Realign panel. 8. Insert and tighten the five screws. 9 Before removing the top panel: 1. en Adjusting the freezer compartment drawer 1. Do not remove the screw! Unplug the appliance or switch off the water supply to adjust the freezer compartment drawer. 4. Loosen...
Instructions for Use
Page 12
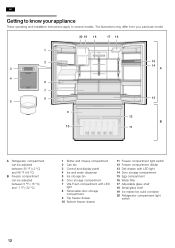
... −7 °F (−22 °C) 1 Butter and cheese compartment 2 Can bin 3 Control and display panel 4 Ice and water dispenser 5 Ice storage bin 6 Door storage compartment 7 Vita Fresh compartment with LED light 8 Removable door storage compartment 9 Top freezer drawer 10 Bottom freezer drawer 11 Freezer compartment light switch 12 Freezer compartment divider 13 Deli drawer with LED light 14 Door storage compartment 15 Egg compartment 16 Water filter 17 Adjustable glass shelf 18 Small glass shelf 19 Ice maker/Ice cube container 20 Refrigerator compartment light switch 12
... −7 °F (−22 °C) 1 Butter and cheese compartment 2 Can bin 3 Control and display panel 4 Ice and water dispenser 5 Ice storage bin 6 Door storage compartment 7 Vita Fresh compartment with LED light 8 Removable door storage compartment 9 Top freezer drawer 10 Bottom freezer drawer 11 Freezer compartment light switch 12 Freezer compartment divider 13 Deli drawer with LED light 14 Door storage compartment 15 Egg compartment 16 Water filter 17 Adjustable glass shelf 18 Small glass shelf 19 Ice maker/Ice cube container 20 Refrigerator compartment light switch 12
Instructions for Use
Page 13
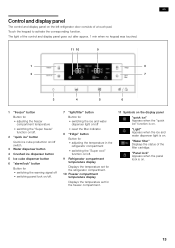
.... 3 Water dispenser button 4 Crushed ice dispenser button 5 Ice cube dispenser button 6 "alarm/lock" button Button for S switching the warning signal off S switching panel lock on/off. 7 "light/filter" button Button for S switching the ice and water dispenser light on/off S reset the filter indicator. 8 fridge" button Button for S adjusting the temperature in the refrigerator compartment S switching the "Super cool" function on/off. 9 Refrigerator compartment temperature display Displays the temperature set for the refrigerator compartment. 10 Freezer compartment temperature display Displays...
.... 3 Water dispenser button 4 Crushed ice dispenser button 5 Ice cube dispenser button 6 "alarm/lock" button Button for S switching the warning signal off S switching panel lock on/off. 7 "light/filter" button Button for S switching the ice and water dispenser light on/off S reset the filter indicator. 8 fridge" button Button for S adjusting the temperature in the refrigerator compartment S switching the "Super cool" function on/off. 9 Refrigerator compartment temperature display Displays the temperature set for the refrigerator compartment. 10 Freezer compartment temperature display Displays...

Instructions for Use
Page 14
Connect the appliance plug to the set . The interior light in the refrigerator compartment switches on the display panel. Setting the temperature Refrigerator compartment (can be adjusted between 5 °F (−15 °C) and −7 °F (−22 °C)) Press the "freezer" button until the desired refrigerator compartment temperature is set temperature. The word "alarm" will take several hours for the inside the appliance is too high or one of the appliance doors is...
Connect the appliance plug to the set . The interior light in the refrigerator compartment switches on the display panel. Setting the temperature Refrigerator compartment (can be adjusted between 5 °F (−15 °C) and −7 °F (−22 °C)) Press the "freezer" button until the desired refrigerator compartment temperature is set temperature. The word "alarm" will take several hours for the inside the appliance is too high or one of the appliance doors is...
Instructions for Use
Page 15
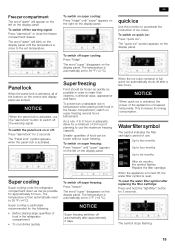
... buttons on the control and display panel are locked. Panel lock When the panel lock is increased temporarily. To prevent an undesirable rise in temperature when placing fresh food in the refrigerator compartment. To reset the water filter symbol after approximately 2 days. Freezer compartment The word "alarm" will blink on the display panel until the temperature is adequate. To switch on super cooling: Press "fridge" until "super" appears on the left...
... buttons on the control and display panel are locked. Panel lock When the panel lock is increased temporarily. To prevent an undesirable rise in temperature when placing fresh food in the refrigerator compartment. To reset the water filter symbol after approximately 2 days. Freezer compartment The word "alarm" will blink on the display panel until the temperature is adequate. To switch on super cooling: Press "fridge" until "super" appears on the left...

Instructions for Use
Page 18
... freezer compartment door right away, wait two to thaw or has already thawed. Never store products containing flammable propellants (such as follows: S at room temperature S in the refrigerator S in the microwave. 18 Thawing frozen food CAUTION Risk of explosion! The frozen food will become covered with /without fan−assisted hot air S in an electric oven with thick ice...
... freezer compartment door right away, wait two to thaw or has already thawed. Never store products containing flammable propellants (such as follows: S at room temperature S in the refrigerator S in the microwave. 18 Thawing frozen food CAUTION Risk of explosion! The frozen food will become covered with /without fan−assisted hot air S in an electric oven with thick ice...

Instructions for Use
Page 19
Carefully pull out the clips on , it will still be dispensed without bubbles. Bottom freezer drawer The freezer drawer can be in order to cool them quickly. Never use the first 30 to the water supply. NOTICE Risk of damage to the dispenser opening . en When switching on the appliance, note the following may be heard. 19 Operating the ice maker Once the freezer compartment has reached its...
Carefully pull out the clips on , it will still be dispensed without bubbles. Bottom freezer drawer The freezer drawer can be in order to cool them quickly. Never use the first 30 to the water supply. NOTICE Risk of damage to the dispenser opening . en When switching on the appliance, note the following may be heard. 19 Operating the ice maker Once the freezer compartment has reached its...

Instructions for Use
Page 20
... filter cartridge at the water intake point. Hold an appropriate receptacle under the ice and water dispenser. 2. Ice storage bin The ice storage bin stores a reserve supply of ice cubes the freezer compartment. Reactivating the ice maker: S Switch the on/off switch behind the ice cube container on /off switch behind the ice cube container off the water supply to shut off (0) − the ice maker is in the receptacle. Keep the ice cube or crushed ice button...
... filter cartridge at the water intake point. Hold an appropriate receptacle under the ice and water dispenser. 2. Ice storage bin The ice storage bin stores a reserve supply of ice cubes the freezer compartment. Reactivating the ice maker: S Switch the on/off switch behind the ice cube container on /off switch behind the ice cube container off the water supply to shut off (0) − the ice maker is in the receptacle. Keep the ice cube or crushed ice button...
Instructions for Use
Page 21
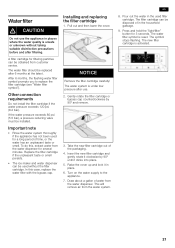
... "light/filter" button for several minutes. Important note S Rinse the water system thoroughly if the appliance has not been used for filtering particles can be obtained from the water dispenser. S The ice maker and water dispenser can be used filter cartridge. NOTICE Remove the filter cartridge carefully! The new filter cartridge is reset. Do not use . 2. The symbol stops flashing. Pull out and then lower the cover. The water filter should be installed. Other connection requirements Do not install the filter cartridge if the water...
... "light/filter" button for several minutes. Important note S Rinse the water system thoroughly if the appliance has not been used for filtering particles can be obtained from the water dispenser. S The ice maker and water dispenser can be used filter cartridge. NOTICE Remove the filter cartridge carefully! The new filter cartridge is reset. Do not use . 2. The symbol stops flashing. Pull out and then lower the cover. The water filter should be installed. Other connection requirements Do not install the filter cartridge if the water...
Instructions for Use
Page 22
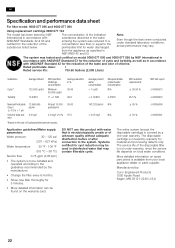
... to the substances listed below. en Specification and performance data sheet For filter model: 9000 077 095 and 9000 077 096 Using replacement cartridge 9000 077 104 The model has been tested by NSF International in accordance with ANSI/NSF Standards 42 & 53 and The concentration of the indicated substances dissolved in disinfected water that is to be installed and operated according to the...
... to the substances listed below. en Specification and performance data sheet For filter model: 9000 077 095 and 9000 077 096 Using replacement cartridge 9000 077 104 The model has been tested by NSF International in accordance with ANSI/NSF Standards 42 & 53 and The concentration of the indicated substances dissolved in disinfected water that is to be installed and operated according to the...
Instructions for Use
Page 23
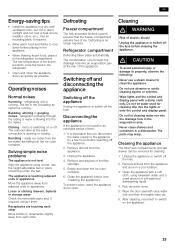
... cleaning water run into an evaporation pan at the water connection is not level Align the appliance using lukewarm water and a small amount of time: 1. Switching off and disconnecting the appliance Switching off the appliance Unplug the appliance or switch off . Unplug the appliance. 4. Do not let water used for a few hours before placing in a cool location. 3. S Open and close the appliance doors as quickly as possible. Use the height−adjustable feet...
... cleaning water run into an evaporation pan at the water connection is not level Align the appliance using lukewarm water and a small amount of time: 1. Switching off and disconnecting the appliance Switching off the appliance Unplug the appliance or switch off . Unplug the appliance. 4. Do not let water used for a few hours before placing in a cool location. 3. S Open and close the appliance doors as quickly as possible. Use the height−adjustable feet...
Instructions for Use
Page 24
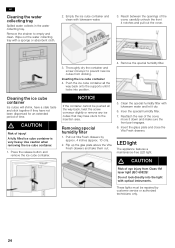
.... Use caution when removing the ice cube container. 1. LED light The appliance features a maintenance−free LED light. Thoroughly dry the container and screw conveyor to empty and clean. en Cleaning the water collecting tray Spilled water collects in the water collecting tray. Wipe out the water collecting tray with lukewarm water and let it down and make sure the front part engages. 8. CAUTION Risk of the cover, carefully unhook...
.... Use caution when removing the ice cube container. 1. LED light The appliance features a maintenance−free LED light. Thoroughly dry the container and screw conveyor to empty and clean. en Cleaning the water collecting tray Spilled water collects in the water collecting tray. Wipe out the water collecting tray with lukewarm water and let it down and make sure the front part engages. 8. CAUTION Risk of the cover, carefully unhook...
Instructions for Use
Page 25
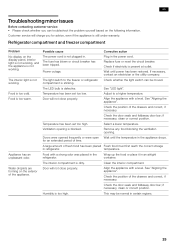
.... Door will not close properly. The interior compartment is sticking. Wait until the temperature in . compartment is dirty. Remove any food blocking the ventilation opening is present at outlet. Water droplets are forming on the following information. Humidity is not working. Refrigerator compartment and freezer compartment Problem Possible cause Corrective action No display on the display panel, interior light is not working . Food is defective. Clean the interior...
.... Door will not close properly. The interior compartment is sticking. Wait until the temperature in . compartment is dirty. Remove any food blocking the ventilation opening is present at outlet. Water droplets are forming on the following information. Humidity is not working. Refrigerator compartment and freezer compartment Problem Possible cause Corrective action No display on the display panel, interior light is not working . Food is defective. Clean the interior...
Instructions for Use
Page 26
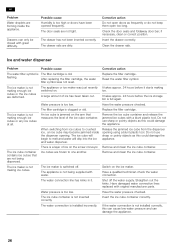
.... Shut off . en Problem Water droplets are not tight. The door seals are forming inside the dispenser opening using a blunt plastic tool. Insert the drawer correctly. After replacing the filter cartridge, the water filter symbol was just recently switched on the screw conveyor. Have a qualified technician check the water connection. Have damaged water connection lines replaced with a blunt plastic tool. Insert the ice cube container correctly. Clean the drawer rails. Reset the water filter symbol. The ice maker is...
.... Shut off . en Problem Water droplets are not tight. The door seals are forming inside the dispenser opening using a blunt plastic tool. Insert the drawer correctly. After replacing the filter cartridge, the water filter symbol was just recently switched on the screw conveyor. Have a qualified technician check the water connection. Have damaged water connection lines replaced with a blunt plastic tool. Insert the ice cube container correctly. Clean the drawer rails. Reset the water filter symbol. The ice maker is...

Instructions for Use
Page 27
... period of water. The water has been in the water supply. 27 This is normal when using the water dispenser for the water to the room temperature. Have the water pressure checked. Adjust the shut−off valve so it may contain carbon dust from the water dispenser. Replace the filter cartridge. Fill and discard the first 15 glasses of time and has adjusted to cool down. cartridge, it is open all the...
... period of water. The water has been in the water supply. 27 This is normal when using the water dispenser for the water to the room temperature. Have the water pressure checked. Adjust the shut−off valve so it may contain carbon dust from the water dispenser. Replace the filter cartridge. Fill and discard the first 15 glasses of time and has adjusted to cool down. cartridge, it is open all the...


