

Operating Instructions
Page 3
...the appliance 13 Setting the temperature 13 Alarm function 13 Panel lock 14 Super cooling 14 Super freezing 14 quick ice 14 Water filter symbol 14 Temperature unit 15 Refrigerator compartment 15 en-us Vita Fresh compartment 15 Deli drawer 16 Variable interior design 16 Freezer ...food 17 Purchasing and storing deep-frozen food 17 Thawing frozen food 17 Freezer compartment features 18 Ice and water dispenser 18 Water filter 20 Specification and performance data sheet 21 Energy-saving tips 22 Operating noises 22 Defrosting 22 Switching off and disconnecting the appliance 22...
...the appliance 13 Setting the temperature 13 Alarm function 13 Panel lock 14 Super cooling 14 Super freezing 14 quick ice 14 Water filter symbol 14 Temperature unit 15 Refrigerator compartment 15 en-us Vita Fresh compartment 15 Deli drawer 16 Variable interior design 16 Freezer ...food 17 Purchasing and storing deep-frozen food 17 Thawing frozen food 17 Freezer compartment features 18 Ice and water dispenser 18 Water filter 20 Specification and performance data sheet 21 Energy-saving tips 22 Operating noises 22 Defrosting 22 Switching off and disconnecting the appliance 22...

Operating Instructions
Page 7
...separate shut-off valve behind the appliance. The water hose has a 3/4 inch connection. Connect the appliance to code by installing the filter cartridge included with the connection requirements of the appliance before plugging in this manual. S Always connect the water before performing any household ...access also after the appliance has been installed. en-us Electrical connection WARNING Risk of electric shock and damage to the filter (see "Cleaning the appliance"). Water connection WARNING Risk of electric shock and fire if electrical connection is also required. ...
...separate shut-off valve behind the appliance. The water hose has a 3/4 inch connection. Connect the appliance to code by installing the filter cartridge included with the connection requirements of the appliance before plugging in this manual. S Always connect the water before performing any household ...access also after the appliance has been installed. en-us Electrical connection WARNING Risk of electric shock and damage to the filter (see "Cleaning the appliance"). Water connection WARNING Risk of electric shock and fire if electrical connection is also required. ...
Operating Instructions
Page 11
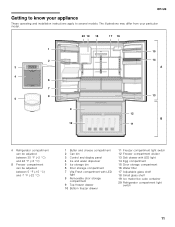
... drawer 11 Freezer compartment light switch 12 Freezer compartment divider 13 Deli drawer with LED light 14 Egg compartment 15 Door storage compartment 16 Water filter 17 Adjustable glass shelf 18 Small glass shelf 19 Ice maker/Ice cube container 20 Refrigerator compartment light switch 11
... drawer 11 Freezer compartment light switch 12 Freezer compartment divider 13 Deli drawer with LED light 14 Egg compartment 15 Door storage compartment 16 Water filter 17 Adjustable glass shelf 18 Small glass shelf 19 Ice maker/Ice cube container 20 Refrigerator compartment light switch 11

Operating Instructions
Page 12
"Light" Appears when the ice and water dispenser light is on . 12 "Water filter" Displays the status of the control and display panel goes out after approx. 1 min when no keypad was touched. 11 10 9 1 8 2 7 3 4 5 6 1 "freezer" button ...button 6 "alarm/lock" button Button for S switching the warning signal off S switching panel lock on/off. 7 "light/filter" button Button for S switching the ice and water dispenser light on/off S reset the filter indicator. 8 "fridge" button Button for S adjusting the temperature in the refrigerator compartment S switching the "Super cool" function...
"Light" Appears when the ice and water dispenser light is on . 12 "Water filter" Displays the status of the control and display panel goes out after approx. 1 min when no keypad was touched. 11 10 9 1 8 2 7 3 4 5 6 1 "freezer" button ...button 6 "alarm/lock" button Button for S switching the warning signal off S switching panel lock on/off. 7 "light/filter" button Button for S switching the ice and water dispenser light on/off S reset the filter indicator. 8 "fridge" button Button for S adjusting the temperature in the refrigerator compartment S switching the "Super cool" function...

Operating Instructions
Page 14
... is activated, all of the buttons on the control and display panel are locked. Up to 39 °F (+4 °C). Replace the filter cartridge. The symbol stops flashing. 14 S To cool drinks quickly. Allow for approximately 6 hours. To switch on super freezing: Press "freezer...As a rule, 4 to 39 °F (+4 °C). quick ice Use this function to 0 °F (-18 °C). To reset the water filter symbol after a few hours. The "Panel lock" symbol appears when the panel lock is increased temporarily. When the appliance is turned off super freezing: Press...
... is activated, all of the buttons on the control and display panel are locked. Up to 39 °F (+4 °C). Replace the filter cartridge. The symbol stops flashing. 14 S To cool drinks quickly. Allow for approximately 6 hours. To switch on super freezing: Press "freezer...As a rule, 4 to 39 °F (+4 °C). quick ice Use this function to 0 °F (-18 °C). To reset the water filter symbol after a few hours. The "Panel lock" symbol appears when the panel lock is increased temporarily. When the appliance is turned off super freezing: Press...

Operating Instructions
Page 15
... ready meals, cakes and pastries, canned food, condensed milk, cheese, spreads, sauces, dips and eggs. The special humidity filter optimizes the humidity in airtight containers to prevent it is covered by a special humidity filter. Using the refrigerator compartment For storage of alcohol must be stored much longer in the Vita Fresh compartment...
... ready meals, cakes and pastries, canned food, condensed milk, cheese, spreads, sauces, dips and eggs. The special humidity filter optimizes the humidity in airtight containers to prevent it is covered by a special humidity filter. Using the refrigerator compartment For storage of alcohol must be stored much longer in the Vita Fresh compartment...
Operating Instructions
Page 19
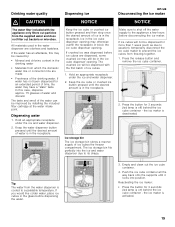
...button pressed until the desired amount is on) behind the ice cube container - The crushed ice will not be dispensed with the appliance only filters out particles from the water dispenser is in the water dispenser are dispensed, some crushed ice may have a "stale" taste. If ice...: S Mineral and chlorine content in the glass before disconnecting the ice maker. Tip: The water from the supplied water and does not filter out bacteria or microbes. The ice storage bin fits perfectly into position. Drinking water quality Dispensing ice en-us Disconnecting the ice maker CAUTION...
...button pressed until the desired amount is on) behind the ice cube container - The crushed ice will not be dispensed with the appliance only filters out particles from the water dispenser is in the water dispenser are dispensed, some crushed ice may have a "stale" taste. If ice...: S Mineral and chlorine content in the glass before disconnecting the ice maker. Tip: The water from the supplied water and does not filter out bacteria or microbes. The ice storage bin fits perfectly into position. Drinking water quality Dispensing ice en-us Disconnecting the ice maker CAUTION...

Operating Instructions
Page 20
...bar), a pressure reducing valve must be installed. In this , extract water from the water dispenser. NOTICE Remove the filter cartridge carefully! The water filter symbol is activated. 20 Important note S Rinse the water system thoroughly if the appliance has not been used without ... Pull out and then lower the cover. en-us Water filter CAUTION Installing and replacing the filter cartridge 1. A filter cartridge for filtering particles can be obtained from the water system. 8. To do this case, replace the water filter with a spoon and pull it out. 3. The water ...
...bar), a pressure reducing valve must be installed. In this , extract water from the water dispenser. NOTICE Remove the filter cartridge carefully! The water filter symbol is activated. 20 Important note S Rinse the water system thoroughly if the appliance has not been used without ... Pull out and then lower the cover. en-us Water filter CAUTION Installing and replacing the filter cartridge 1. A filter cartridge for filtering particles can be obtained from the water system. 8. To do this case, replace the water filter with a spoon and pull it out. 3. The water ...

Operating Instructions
Page 21
The system was reduced to a concentration less than or equal to the guidelines recommended by the manufacturer. S Change the filter every 6 months. S Rinse new filter thoroughly for the reduction of the taste and odor of the substances listed below. The entire system (except the disposable ...information on local water conditions. The disposable cartridge is covered by a one-year warranty. en-us Specification and performance data sheet For filter model: 9000 077 095 and 9000 077 096 Using replacement cartridge 9000 077 104 The model has been tested by NSF International in accordance...
The system was reduced to a concentration less than or equal to the guidelines recommended by the manufacturer. S Change the filter every 6 months. S Rinse new filter thoroughly for the reduction of the taste and odor of the substances listed below. The entire system (except the disposable ...information on local water conditions. The disposable cartridge is covered by a one-year warranty. en-us Specification and performance data sheet For filter model: 9000 077 095 and 9000 077 096 Using replacement cartridge 9000 077 104 The model has been tested by NSF International in accordance...

Operating Instructions
Page 22
... Unplug the appliance or switch off . Remove all food from the appliance. 3. Clean the appliance interior (see "Cleaning the appliance"). Cleaning WARNING Risk of the filter cartridge. 5. Wipe lights and the control and display panel with a soft cloth, using a level. Rub dry when done. 5. S Allow warm food and drinks to the...
... Unplug the appliance or switch off . Remove all food from the appliance. 3. Clean the appliance interior (see "Cleaning the appliance"). Cleaning WARNING Risk of the filter cartridge. 5. Wipe lights and the control and display panel with a soft cloth, using a level. Rub dry when done. 5. S Allow warm food and drinks to the...

Operating Instructions
Page 23
...the ice cube container 4. NOTICE If the container cannot be repaired by approx. 4 inches (approx. 10 cm). 2. Clean the special humidity filter with optical instruments. Insert the glass plate and close the Vita Fresh drawers. These lights must be pushed all the way back onto the supports...Cleaning the water collecting tray Spilled water collects in the water collecting tray. Do not look directly into position. 4. Removing special humidity filter 1. Thoroughly dry the container and screw conveyor to prevent new ice cubes from Class 1M laser light (IEC 60825)! Push the ice ...
...the ice cube container 4. NOTICE If the container cannot be repaired by approx. 4 inches (approx. 10 cm). 2. Clean the special humidity filter with optical instruments. Insert the glass plate and close the Vita Fresh drawers. These lights must be pushed all the way back onto the supports...Cleaning the water collecting tray Spilled water collects in the water collecting tray. Do not look directly into position. 4. Removing special humidity filter 1. Thoroughly dry the container and screw conveyor to prevent new ice cubes from Class 1M laser light (IEC 60825)! Push the ice ...

Operating Instructions
Page 25
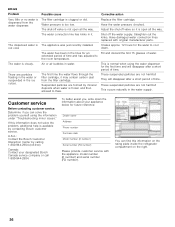
...has not been inserted correctly. en-us Corrective action Do not open too long. Insert the drawer correctly. Reset the water filter symbol. The appliance is not being dispensed. Have a qualified technician check the water connection. Have damaged water connection lines replaced... is not making switched on the arm that are forming inside the dispenser opening using a blunt plastic tool. Replace the filter cartridge. Clean the drawer rails. jammed ice cubes with great difficulty. Switch on the screw conveyor. Straighten out the kinks...
...has not been inserted correctly. en-us Corrective action Do not open too long. Insert the drawer correctly. Reset the water filter symbol. The appliance is not being dispensed. Have a qualified technician check the water connection. Have damaged water connection lines replaced... is not making switched on the arm that are forming inside the dispenser opening using a blunt plastic tool. Replace the filter cartridge. Clean the drawer rails. jammed ice cubes with great difficulty. Switch on the screw conveyor. Straighten out the kinks...
Operating Instructions
Page 26
... temperature. This is too low. Customer service Before contacting customer service: Determine if you , write down the information about your designated Bosch Canada service company or call 1-800-944-2904. The dispensed water is clogged or old. They will disappear after a short period of... Purchase date Model number (E number) Serial number (FD number) Please provide customer service with original manufacturer parts. Possible cause The filter cartridge is not cold. The water connection line has kinks in the ice cubes. Adjust the shut-off valve so it is available...
... temperature. This is too low. Customer service Before contacting customer service: Determine if you , write down the information about your designated Bosch Canada service company or call 1-800-944-2904. The dispensed water is clogged or old. They will disappear after a short period of... Purchase date Model number (E number) Serial number (FD number) Please provide customer service with original manufacturer parts. Possible cause The filter cartridge is not cold. The water connection line has kinks in the ice cubes. Adjust the shut-off valve so it is available...


