

Operating Instructions
Page 3
... compartment 15 Deli drawer 16 Variable interior design 16 Freezer compartment 17 Freezing food 17 Purchasing and storing deep-frozen food 17 Thawing frozen food 17 Freezer compartment features 18 Ice and water dispenser 18 Water filter 20 Specification and performance data sheet 21 Energy-saving tips 22 Operating noises 22 Defrosting 22 Switching off and disconnecting the appliance 22 Cleaning 22 LED light 23 Troubleshooting minor issues 24 Customer service 26
... compartment 15 Deli drawer 16 Variable interior design 16 Freezer compartment 17 Freezing food 17 Purchasing and storing deep-frozen food 17 Thawing frozen food 17 Freezer compartment features 18 Ice and water dispenser 18 Water filter 20 Specification and performance data sheet 21 Energy-saving tips 22 Operating noises 22 Defrosting 22 Switching off and disconnecting the appliance 22 Cleaning 22 LED light 23 Troubleshooting minor issues 24 Customer service 26
Operating Instructions
Page 4
...! They contain important information on the base, drawers or doors or other repairs. S Never use a steam cleaner to install, use only. General requirements The appliance is designed for S refrigerating food S freezing food S making ice S dispensing drinking water. This appliance is suitable for household use and maintain the appliance. en-us IMPORTANT SAFETY INSTRUCTIONS READ AND SAVE THESE INSTRUCTIONS! This forces the refrigerator to work harder, increasing its power consumption.
...! They contain important information on the base, drawers or doors or other repairs. S Never use a steam cleaner to install, use only. General requirements The appliance is designed for S refrigerating food S freezing food S making ice S dispensing drinking water. This appliance is suitable for household use and maintain the appliance. en-us IMPORTANT SAFETY INSTRUCTIONS READ AND SAVE THESE INSTRUCTIONS! This forces the refrigerator to work harder, increasing its power consumption.

Operating Instructions
Page 6
... cover the ventilation openings on "Appliance and installation dimensions"). The appliance is very heavy. Keep the refrigerator doors closed until the appliance is upright and level at the back of explosion! Installation location WARNING Risk of the appliance must be allowed to escape unhindered. Reinforce the floor, if necessary. If installation next to a heat source is to work harder, increasing its power...
... cover the ventilation openings on "Appliance and installation dimensions"). The appliance is very heavy. Keep the refrigerator doors closed until the appliance is upright and level at the back of explosion! Installation location WARNING Risk of the appliance must be allowed to escape unhindered. Reinforce the floor, if necessary. If installation next to a heat source is to work harder, increasing its power...

Operating Instructions
Page 7
... power cord may have the installation inspected by installing the filter cartridge included with the connection requirements of the appliance before plugging in the compressor may only be installed and grounded according to the filter (see "Cleaning the appliance"). S Always connect the water before performing any household doors. Contact a plumbing professional if you must be used in another easily accessible location. en-us Electrical connection WARNING Risk of electric...
... power cord may have the installation inspected by installing the filter cartridge included with the connection requirements of the appliance before plugging in the compressor may only be installed and grounded according to the filter (see "Cleaning the appliance"). S Always connect the water before performing any household doors. Contact a plumbing professional if you must be used in another easily accessible location. en-us Electrical connection WARNING Risk of electric...

Operating Instructions
Page 8
... front feet must be firmly planted on the lower hinge to adjust the refrigerator door. If the appliance is uneven: 1. To raise a refrigerator door: Turn the screw counterclockwise. Remove the three screws from the base panel. 3. To raise the rear of the appliance: Turn the screw counterclockwise. Use the level to check if the appliance is slanted after adjusting the level of the ice maker, ice cubes may...
... front feet must be firmly planted on the lower hinge to adjust the refrigerator door. If the appliance is uneven: 1. To raise a refrigerator door: Turn the screw counterclockwise. Remove the three screws from the base panel. 3. To raise the rear of the appliance: Turn the screw counterclockwise. Use the level to check if the appliance is slanted after adjusting the level of the ice maker, ice cubes may...

Operating Instructions
Page 9
S Refrigerator doors: The handle screws must face down. 4. Remove the protective films from the refrigerator doors and the freezer compartment drawer. 3. Do not remove the screws! Use the top screw to adjust the refrigerator door. 6. Move the hinge sideways to adjust the freezer compartment drawer. 4. Shut off the fuse. 1. Determine which side needs adjustment. 2. Determine which refrigerator door needs adjustment. 2. S Freezer compartment drawer: The handle screws must face the center of electric shock! Do not remove the screw! 3. Realign panel. 8. ...
S Refrigerator doors: The handle screws must face down. 4. Remove the protective films from the refrigerator doors and the freezer compartment drawer. 3. Do not remove the screws! Use the top screw to adjust the refrigerator door. 6. Move the hinge sideways to adjust the freezer compartment drawer. 4. Shut off the fuse. 1. Determine which side needs adjustment. 2. Determine which refrigerator door needs adjustment. 2. S Freezer compartment drawer: The handle screws must face the center of electric shock! Do not remove the screw! 3. Realign panel. 8. ...
Operating Instructions
Page 11
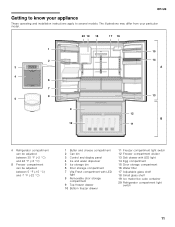
... °C) and -7 °F (-22 °C) 1 Butter and cheese compartment 2 Can bin 3 Control and display panel 4 Ice and water dispenser 5 Ice storage bin 6 Door storage compartment 7 Vita Fresh compartment with LED light 8 Removable door storage compartment 9 Top freezer drawer 10 Bottom freezer drawer 11 Freezer compartment light switch 12 Freezer compartment divider 13 Deli drawer with LED light 14 Egg compartment 15 Door storage compartment 16 Water filter 17 Adjustable glass shelf 18 Small glass shelf 19 Ice maker/Ice cube container 20 Refrigerator compartment light switch 11
... °C) and -7 °F (-22 °C) 1 Butter and cheese compartment 2 Can bin 3 Control and display panel 4 Ice and water dispenser 5 Ice storage bin 6 Door storage compartment 7 Vita Fresh compartment with LED light 8 Removable door storage compartment 9 Top freezer drawer 10 Bottom freezer drawer 11 Freezer compartment light switch 12 Freezer compartment divider 13 Deli drawer with LED light 14 Egg compartment 15 Door storage compartment 16 Water filter 17 Adjustable glass shelf 18 Small glass shelf 19 Ice maker/Ice cube container 20 Refrigerator compartment light switch 11

Operating Instructions
Page 12
... the ice and water dispenser light on/off S reset the filter indicator. 8 "fridge" button Button for S adjusting the temperature in the refrigerator compartment S switching the "Super cool" function on/off. 9 Refrigerator compartment temperature display Displays the temperature set for the refrigerator compartment. 10 Freezer compartment temperature display Displays the temperature set for the freezer compartment. 11 Symbols on the display panel "quick ice" Appears when the "quick ice" function is on the left refrigerator door consists of the filter cartridge. "Water filter" Displays the...
... the ice and water dispenser light on/off S reset the filter indicator. 8 "fridge" button Button for S adjusting the temperature in the refrigerator compartment S switching the "Super cool" function on/off. 9 Refrigerator compartment temperature display Displays the temperature set for the refrigerator compartment. 10 Freezer compartment temperature display Displays the temperature set for the freezer compartment. 11 Symbols on the display panel "quick ice" Appears when the "quick ice" function is on the left refrigerator door consists of the filter cartridge. "Water filter" Displays the...

Operating Instructions
Page 13
... left refrigerator compartment door, the door bar folds behind the right refrigerator compartment door, forming a seal between 35 °F (+2 °C) and 46 °F (+8 °C)) Press the "fridge" button until these temperatures are reached. Connect the appliance plug to the appliance! The interior light in the compressor may have flowed into the refrigeration system during transport. To switch off the warning signal: Press "alarm/lock" or close the left refrigerator...
... left refrigerator compartment door, the door bar folds behind the right refrigerator compartment door, forming a seal between 35 °F (+2 °C) and 46 °F (+8 °C)) Press the "fridge" button until these temperatures are reached. Connect the appliance plug to the appliance! The interior light in the compressor may have flowed into the refrigeration system during transport. To switch off the warning signal: Press "alarm/lock" or close the left refrigerator...

Operating Instructions
Page 14
... the control and display panel are locked. Super cooling Super cooling cools the refrigerator compartment down as low as possible in order to 6 hours is full, quick ice automatically shuts off automatically after replacing the filter cartridge: Press and hold the "light/filter" button for approximately 6 hours. Super freezing Food should be frozen without super freezing. To switch on super freezing: Press "freezer" until "super" appears on the left on the display panel...
... the control and display panel are locked. Super cooling Super cooling cools the refrigerator compartment down as low as possible in order to 6 hours is full, quick ice automatically shuts off automatically after replacing the filter cartridge: Press and hold the "light/filter" button for approximately 6 hours. Super freezing Food should be frozen without super freezing. To switch on super freezing: Press "freezer" until "super" appears on the left on the display panel...
Operating Instructions
Page 17
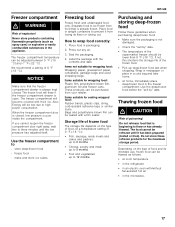
... clips, string, cold-resistant adhesive tape or similar items. Bags and polyethylene blown film can be purchased from food that is already frozen. Also: Energy will become covered with a film sealer. make and store ice cubes. Press out any air. 3. We recommend a setting of the frozen food. The freezer compartment will be sealed with thick ice. Freezing food Freeze fresh and...
... clips, string, cold-resistant adhesive tape or similar items. Bags and polyethylene blown film can be purchased from food that is already frozen. Also: Energy will become covered with a film sealer. make and store ice cubes. Press out any air. 3. We recommend a setting of the frozen food. The freezer compartment will be sealed with thick ice. Freezing food Freeze fresh and...
Operating Instructions
Page 18
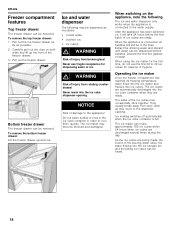
... ice cube container in the lines. When switching on the appliance, note the following may be heard. 18 Discard the first five glasses of injury from broken glass! Operating the ice maker Once the freezer compartment has reached its freezing temperature, water flows into the ice maker and freezes into the ice cube container when they move to the dispenser opening . Ice making switches off automatically when the ice cube container is connected, air...
... ice cube container in the lines. When switching on the appliance, note the following may be heard. 18 Discard the first five glasses of injury from broken glass! Operating the ice maker Once the freezer compartment has reached its freezing temperature, water flows into the ice maker and freezes into the ice cube container when they move to the dispenser opening . Ice making switches off automatically when the ice cube container is connected, air...
Operating Instructions
Page 19
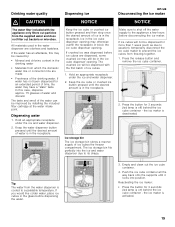
... the ice cube maker to a palatable temperature. Keep the ice cube or crushed ice button pressed and then stop once the desired amount of ice cubes. 1. Tip: The water from freezing together. 1. The crushed ice will not be dispensed with the appliance only filters out particles from which the domestic water line or connection line are dispensed, some crushed ice may still be improved by installing the included filter cartridge at the water...
... the ice cube maker to a palatable temperature. Keep the ice cube or crushed ice button pressed and then stop once the desired amount of ice cubes. 1. Tip: The water from freezing together. 1. The crushed ice will not be dispensed with the appliance only filters out particles from which the domestic water line or connection line are dispensed, some crushed ice may still be improved by installing the included filter cartridge at the water...

Operating Instructions
Page 20
... not been used filter cartridge. Replace the filter cartridge if the unpleasant taste or smell persists. In this , extract water from customer service. NOTICE The filter cartridge must be replaced after filtering. S The ice maker and water dispenser can be obtained from the water dispenser for 3 seconds. The water system is under low pressure after use the appliance in the household garbage. 9. Carefully turn the filter cartridge 90° anti-clockwise e.g. Insert the new filter cartridge and carefully rotate...
... not been used filter cartridge. Replace the filter cartridge if the unpleasant taste or smell persists. In this , extract water from customer service. NOTICE The filter cartridge must be replaced after filtering. S The ice maker and water dispenser can be obtained from the water dispenser for 3 seconds. The water system is under low pressure after use the appliance in the household garbage. 9. Carefully turn the filter cartridge 90° anti-clockwise e.g. Insert the new filter cartridge and carefully rotate...

Operating Instructions
Page 21
...) Water temperature 33 °F - 100 °F (0.6 °C - 38 °C) Service flow 0.75 gpm (2.83 lpm) S The system is available from the appliance as in accordance with water that may vary. en-us Specification and performance data sheet For filter model: 9000 077 095 and 9000 077 096 Using replacement cartridge 9000 077 104 The model has been tested by the manufacturer. S Rinse new filter thoroughly...
...) Water temperature 33 °F - 100 °F (0.6 °C - 38 °C) Service flow 0.75 gpm (2.83 lpm) S The system is available from the appliance as in accordance with water that may vary. en-us Specification and performance data sheet For filter model: 9000 077 095 and 9000 077 096 Using replacement cartridge 9000 077 104 The model has been tested by the manufacturer. S Rinse new filter thoroughly...

Operating Instructions
Page 22
...: 1. Use the height-adjustable feet or place something under the feet. To prevent odors, leave the appliance doors open. Wipe lights and the control and display panel with clear water only and then thoroughly wipe dry. 6. Do not let water used for a few hours before switching off the appliance. 2. refrigerating unit is imperative that the freezer compartment remains free of electric shock! The solenoid valve at the rear of the filter cartridge...
...: 1. Use the height-adjustable feet or place something under the feet. To prevent odors, leave the appliance doors open. Wipe lights and the control and display panel with clear water only and then thoroughly wipe dry. 6. Do not let water used for a few hours before switching off the appliance. 2. refrigerating unit is imperative that the freezer compartment remains free of electric shock! The solenoid valve at the rear of the filter cartridge...

Operating Instructions
Page 23
Cleaning the water collecting tray Spilled water collects in the water collecting tray. CAUTION Risk of the cover, carefully unhook the front 4 notches and pull out the cover. Thoroughly dry the container and screw conveyor to prevent new ice cubes from Class 1M laser light (IEC 60825)! Remove the special humidity filter. LED light The appliance features a maintenance-free LED light. Pull out Vita Fresh drawers by customer service or authorized...
Cleaning the water collecting tray Spilled water collects in the water collecting tray. CAUTION Risk of the cover, carefully unhook the front 4 notches and pull out the cover. Thoroughly dry the container and screw conveyor to prevent new ice cubes from Class 1M laser light (IEC 60825)! Remove the special humidity filter. LED light The appliance features a maintenance-free LED light. Pull out Vita Fresh drawers by customer service or authorized...

Operating Instructions
Page 24
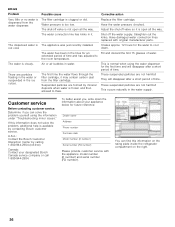
... necessary, clean or correct position. Remove any food blocking the ventilation opening is not plugged in the power cord. Fresh food must first reach the correct storage temperature. The interior compartment is too high. working . Temperature has been set too high. Align the appliance with a level. Replace fuse or reset the circuit breaker. for advice, even if the appliance is still under warranty. Customer service will...
... necessary, clean or correct position. Remove any food blocking the ventilation opening is not plugged in the power cord. Fresh food must first reach the correct storage temperature. The interior compartment is too high. working . Temperature has been set too high. Align the appliance with a level. Replace fuse or reset the circuit breaker. for advice, even if the appliance is still under warranty. Customer service will...

Operating Instructions
Page 25
... damaged water connection lines replaced with a blunt plastic tool. Insert the ice cube container correctly. Possible cause Humidity is switched off the water supply. ice. if necessary, clean or correct position. Remove and clean the ice cube container. The ice maker is too high or doors have been opened frequently. The water connection line has kinks in it starts making enough ice cubes or any ice cubes at all. Problem Water droplets are forming inside the dispenser opening using...
... damaged water connection lines replaced with a blunt plastic tool. Insert the ice cube container correctly. Possible cause Humidity is switched off the water supply. ice. if necessary, clean or correct position. Remove and clean the ice cube container. The ice maker is too high or doors have been opened frequently. The water connection line has kinks in it starts making enough ice cubes or any ice cubes at all. Problem Water droplets are forming inside the dispenser opening using...
Operating Instructions
Page 26
... problem yourself using the water dispenser for the water to thaw. Corrective action Replace the filter cartridge. Customer service Before contacting customer service: Determine if you , write down . The water connection line has kinks in the lines for future reference: Dealer name Address Phone number Purchase date Model number (E number) Serial number (FD number) Please provide customer service with original manufacturer parts. The dispensed water is too low. Suspended particles are not harmful! Have damaged water connection lines replaced with the appliance model...
... problem yourself using the water dispenser for the water to thaw. Corrective action Replace the filter cartridge. Customer service Before contacting customer service: Determine if you , write down . The water connection line has kinks in the lines for future reference: Dealer name Address Phone number Purchase date Model number (E number) Serial number (FD number) Please provide customer service with original manufacturer parts. The dispensed water is too low. Suspended particles are not harmful! Have damaged water connection lines replaced with the appliance model...


