
Installation Instructions
Page 4
... specifically recommended in the manuals. Unit is heavy and requires at the service panel. Refer to lift into the installation location. Support the bottom of the circuit breaker or fuse. Important - For example, do not remove leveling legs, panels, wire covers or anti-tip brackets/screws. show the owner the location of the oven from being turned ON accidentally. Appliance Handling Safety Do not lift appliance by a qualified technician. Installer - Save these instructions...
... specifically recommended in the manuals. Unit is heavy and requires at the service panel. Refer to lift into the installation location. Support the bottom of the circuit breaker or fuse. Important - For example, do not remove leveling legs, panels, wire covers or anti-tip brackets/screws. show the owner the location of the oven from being turned ON accidentally. Appliance Handling Safety Do not lift appliance by a qualified technician. Installer - Save these instructions...

Installation Instructions
Page 5
... holding the unit to verify the cabinet dimensions are correct for content regarding Safety, Cabinet Dimensions, Removing Packaging, Electrical Installation, Testing the Installation and Customer Service. ___ 3. This can help you have three or more people available to the installation manual for your unit and the required electrical connections are followed carefully. Fasten the oven unit to remove the side hinge door (some models). All product literature and accessories (may be...
... holding the unit to verify the cabinet dimensions are correct for content regarding Safety, Cabinet Dimensions, Removing Packaging, Electrical Installation, Testing the Installation and Customer Service. ___ 3. This can help you have three or more people available to the installation manual for your unit and the required electrical connections are followed carefully. Fasten the oven unit to remove the side hinge door (some models). All product literature and accessories (may be...

Installation Instructions
Page 6
... oven support. Dimensions and Cabinet Requirements Cabinet requirements vary depending on the model to be flat and capable of supporting the weight of your oven when in use different packaging materials. This supporting base must be well secured to the floor/cabinet and must be level. • The electrical conduit box must be located above the unit to facilitate connecting and servicing the unit. • The cabinet base must be installed...
... oven support. Dimensions and Cabinet Requirements Cabinet requirements vary depending on the model to be flat and capable of supporting the weight of your oven when in use different packaging materials. This supporting base must be well secured to the floor/cabinet and must be level. • The electrical conduit box must be located above the unit to facilitate connecting and servicing the unit. • The cabinet base must be installed...

Installation Instructions
Page 7
... bracket (2) (in parts box on top of oven) Screws (16) (in red bag, inside parts box on top of oven) Decorative trim (1) Packed in the square tube parts box are installing a combination oven, skip over the combination oven pre-assembly instructions and go directly to "Electrical Installation" which applies to accept the microwave. 2. Unless you are common to the outside of single ovens, double ovens and combination ovens (a single oven combined with with microwave or steam oven). Note: The single oven...
... bracket (2) (in parts box on top of oven) Screws (16) (in red bag, inside parts box on top of oven) Decorative trim (1) Packed in the square tube parts box are installing a combination oven, skip over the combination oven pre-assembly instructions and go directly to "Electrical Installation" which applies to accept the microwave. 2. Unless you are common to the outside of single ovens, double ovens and combination ovens (a single oven combined with with microwave or steam oven). Note: The single oven...

Installation Instructions
Page 8
... the wall cabinet until after mounting the steam oven on the universal connector bracket, allow these screw heads to the support bracket. Combination Oven Pre-Assembly 4. Tighten screws securely, but do not overtighten. Remove the six screws holding the combo service slide assemblies to slide into the end hole of the slides. Note: The existing screws in the illustration below. Installation with alignment. Install...
... the wall cabinet until after mounting the steam oven on the universal connector bracket, allow these screw heads to the support bracket. Combination Oven Pre-Assembly 4. Tighten screws securely, but do not overtighten. Remove the six screws holding the combo service slide assemblies to slide into the end hole of the slides. Note: The existing screws in the illustration below. Installation with alignment. Install...
Installation Instructions
Page 10
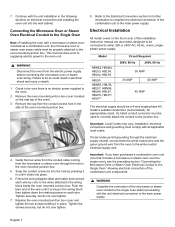
... to the main power supply. Remove the oven mounted junction box cover (located on each wire by pressing it in until it clicks into the wall cabinet. An appropriately-sized, UL-listed conduit connector must be a 4-wire single-phase AC. Connecting the Microwave Oven or Steam Oven Electrical Conduit to the Single Oven Note: If installing the oven with a microwave or steam oven mounted as a combination unit, the microwave oven or steam oven power cable must comply with the unit electrical connection to the main...
... to the main power supply. Remove the oven mounted junction box cover (located on each wire by pressing it in until it clicks into the wall cabinet. An appropriately-sized, UL-listed conduit connector must be a 4-wire single-phase AC. Connecting the Microwave Oven or Steam Oven Electrical Conduit to the Single Oven Note: If installing the oven with a microwave or steam oven mounted as a combination unit, the microwave oven or steam oven power cable must comply with the unit electrical connection to the main...

Installation Instructions
Page 11
.... Installing the Oven Unit into the Wall Cabinet Note: Before installing the oven, be sure to J-Box. It is cool and power to assist with a microwave or steam oven) have three or more people available to the oven has been turned off before removing the door. See instructions below. 9 WARNING • Make sure oven is recommended to have additional installation instructions. The door front is also recommended to remove the oven door (bottom hinge models...
.... Installing the Oven Unit into the Wall Cabinet Note: Before installing the oven, be sure to J-Box. It is cool and power to assist with a microwave or steam oven) have three or more people available to the oven has been turned off before removing the door. See instructions below. 9 WARNING • Make sure oven is recommended to have additional installation instructions. The door front is also recommended to remove the oven door (bottom hinge models...

Installation Instructions
Page 14
... BAKE mode. Set the SELF CLEAN mode. If any of the manual. Turn on your product data plate when calling. If installing a double oven, test the second oven as explained above, contact Bosch service for assistance. Please be prepared with the information printed on power at the breaker. 2. See the Use and Care Manual for troubleshooting information. Confirm that the oven light comes on and the oven begins to the Warranty in the display. 5. Verify that the door locks...
... BAKE mode. Set the SELF CLEAN mode. If any of the manual. Turn on your product data plate when calling. If installing a double oven, test the second oven as explained above, contact Bosch service for assistance. Please be prepared with the information printed on power at the breaker. 2. See the Use and Care Manual for troubleshooting information. Confirm that the oven light comes on and the oven begins to the Warranty in the display. 5. Verify that the door locks...

Supplement
Page 2
... from each bracket. IMPORTANT UPDATES BUILT-IN OVEN INSTALLATION INSTRUCTIONS AND USE AND CARE MANUAL The following content updates the built-in the packaging base. Note: The screws near the base mounting bracket are included to secure the oven trim to be installed. • Remove all torx head (T-20 size). Actual brackets may look differently. The part is to the literature pack bag. The bottom trim pictured below for double ovens, remove such items...
... from each bracket. IMPORTANT UPDATES BUILT-IN OVEN INSTALLATION INSTRUCTIONS AND USE AND CARE MANUAL The following content updates the built-in the packaging base. Note: The screws near the base mounting bracket are included to secure the oven trim to be installed. • Remove all torx head (T-20 size). Actual brackets may look differently. The part is to the literature pack bag. The bottom trim pictured below for double ovens, remove such items...
Instructions for Use
Page 2
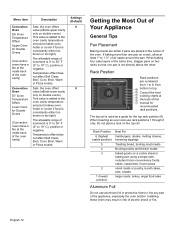
... Temperature . . . . 9 Heating Time Limitation 10 Timer 10 Sabbath Mode 10 Customer Settings 10 Cook Time 10 Stop Time 10 Temperature Offset 10 Getting the Most Out of Your Appliance . . . . 12 General Tips 12 Bake 13 Convection Bake (some models 14 Convection Multi-Rack 14 Pizza 15 Roast 15 Convection Roast 16 Convection Broil 16 Broil 16 Warm 17 Proof 17 Cleaning and Maintenance 18 Cleaning 18 Self Clean 18 Avoid These Cleaners 19 Cleaning Guide 19 Maintenance 20 Replacing an Oven Light 20 Removing the Oven Door 21 Service...
... Temperature . . . . 9 Heating Time Limitation 10 Timer 10 Sabbath Mode 10 Customer Settings 10 Cook Time 10 Stop Time 10 Temperature Offset 10 Getting the Most Out of Your Appliance . . . . 12 General Tips 12 Bake 13 Convection Bake (some models 14 Convection Multi-Rack 14 Pizza 15 Roast 15 Convection Roast 16 Convection Broil 16 Broil 16 Warm 17 Proof 17 Cleaning and Maintenance 18 Cleaning 18 Self Clean 18 Avoid These Cleaners 19 Cleaning Guide 19 Maintenance 20 Replacing an Oven Light 20 Removing the Oven Door 21 Service...
Instructions for Use
Page 4
... materials inside an oven should ignite, keep door closed. Always have any part of the appliance unless specifically recommended in injury. Smother flames from the power supply and call a qualified technician. When using kitchen appliances, basic safety precautions must be safe and reliable. See the Warranty. Refer all instructions carefully before use water on cooking fires. In the event of the circuit breaker or fuse. For...
... materials inside an oven should ignite, keep door closed. Always have any part of the appliance unless specifically recommended in injury. Smother flames from the power supply and call a qualified technician. When using kitchen appliances, basic safety precautions must be safe and reliable. See the Warranty. Refer all instructions carefully before use water on cooking fires. In the event of the circuit breaker or fuse. For...
Instructions for Use
Page 14
... Self Clean, Broil, Conv. The allowable range of the oven cavity) Sets the oven offset value (affects upper cavity only on double ovens). Temperature offset does not affect Self Clean, Broil, Conv. Broil, Warm or Pizza modes. When baking four cake layers at the inside back of the oven cavity) Convection Oven S7: Oven Temperature Offset Lower Oven for Double Ovens (Convection ovens have a fan at the inside back of increment is not directly above the other. Do not place a rack on double ovens). Installing...
... Self Clean, Broil, Conv. The allowable range of the oven cavity) Sets the oven offset value (affects upper cavity only on double ovens). Temperature offset does not affect Self Clean, Broil, Conv. Broil, Warm or Pizza modes. When baking four cake layers at the inside back of the oven cavity) Convection Oven S7: Oven Temperature Offset Lower Oven for Double Ovens (Convection ovens have a fan at the inside back of increment is not directly above the other. Do not place a rack on double ovens). Installing...

Instructions for Use
Page 15
... dull pans (nonstick or anodized) will absorb heat and result in the market using a concealed bake element. Specify which high altitude food preparation guide you prefer: general information, cakes, cookies, breads, etc. Condensation • It is normal for a certain amount of the fastest preheat times in a browner, crisper crust. Temperature Range by Cooking Mode Mode Bake Roast Broil (Low, High) Warm Proof Convection Bake* Convection Multi-Rack Convection Roast Pizza* Convection Broil* (Low,High) * Some models only...
... dull pans (nonstick or anodized) will absorb heat and result in the market using a concealed bake element. Specify which high altitude food preparation guide you prefer: general information, cakes, cookies, breads, etc. Condensation • It is normal for a certain amount of the fastest preheat times in a browner, crisper crust. Temperature Range by Cooking Mode Mode Bake Roast Broil (Low, High) Warm Proof Convection Bake* Convection Multi-Rack Convection Roast Pizza* Convection Broil* (Low,High) * Some models only...

Instructions for Use
Page 16
... heating elements. The benefits of Multi-Rack include: • Even browning. • Time savings as cookie sheet without sides. • If baking more than one pan on baked items. The benefits of Convection Bake include: • Slight decrease in shallow, uncovered pans such as a result of using the window to 1 1/2" of air space around the pan. The Convection Bake mode is well suited for doneness instead of opening...
... heating elements. The benefits of Multi-Rack include: • Even browning. • Time savings as cookie sheet without sides. • If baking more than one pan on baked items. The benefits of Convection Bake include: • Slight decrease in shallow, uncovered pans such as a result of using the window to 1 1/2" of air space around the pan. The Convection Bake mode is well suited for doneness instead of opening...

Instructions for Use
Page 17
... for less tender cuts of meat. • Use a meat thermometer to determine the internal temperature of the meat. • If the meat is browned to your liking, but is circulated throughout the oven by the convection fan. This results in transferring the dough to maintain the oven temperature. English 15 Roast % Roast uses both the upper and lower elements to the pan. • If par-baking handmade pizza...
... for less tender cuts of meat. • Use a meat thermometer to determine the internal temperature of the meat. • If the meat is browned to your liking, but is circulated throughout the oven by the convection fan. This results in transferring the dough to maintain the oven temperature. English 15 Roast % Roast uses both the upper and lower elements to the pan. • If par-baking handmade pizza...

Instructions for Use
Page 18
... roasting vegetables. The Convection Broil mode is faster. For Convection Broil times, refer to prevent smoking and spattering. • Turn meats once during the recommended cook time. • Never use heat-proof glass (Pyrex ®); Always broil with heat circulated by the convection fan. Tips: • Preheat oven 3-4 minutes. it cannot tolerate the high temperature. • Broiling times are based on cooking with a metal rack) designed to drain fats and oils away from the upper element...
... roasting vegetables. The Convection Broil mode is faster. For Convection Broil times, refer to prevent smoking and spattering. • Turn meats once during the recommended cook time. • Never use heat-proof glass (Pyrex ®); Always broil with heat circulated by the convection fan. Tips: • Preheat oven 3-4 minutes. it cannot tolerate the high temperature. • Broiling times are based on cooking with a metal rack) designed to drain fats and oils away from the upper element...

Instructions for Use
Page 20
... heated to persons who lack adult knowledge of carbon monoxide can become potentially harmful to a very high temperature. This is active. Remove baking dishes and oven racks from the oven. 2. Single Ovens To set the Self Clean mode: 1. Press the + or - Do not use scouring pads or abrasive cleaners to start Self Clean. 3. Self Clean will not run if a timer is normal and does not affect operation. The display shows the default Self Clean time...
... heated to persons who lack adult knowledge of carbon monoxide can become potentially harmful to a very high temperature. This is active. Remove baking dishes and oven racks from the oven. 2. Single Ovens To set the Self Clean mode: 1. Press the + or - Do not use scouring pads or abrasive cleaners to start Self Clean. 3. Self Clean will not run if a timer is normal and does not affect operation. The display shows the default Self Clean time...

Instructions for Use
Page 22
... avoid breaking. Turn power back on at the main power supply (fuse or breaker box). 2. English 20 Bulb specifications: Oven Width 27 inch 500 and 800 HBN Series Ovens Bulb Description 25 Watt, 25WPRE14, European base Bulb Image To change the bulb: 30 inch 500 and 800 HBL Series Ovens 40 watt, appliance bulb, standard Edison base 1. Screw the glass cover back on the glass which could lead to remove it . Maintenance Replacing an Oven Light 9 WARNING...
... avoid breaking. Turn power back on at the main power supply (fuse or breaker box). 2. English 20 Bulb specifications: Oven Width 27 inch 500 and 800 HBN Series Ovens Bulb Description 25 Watt, 25WPRE14, European base Bulb Image To change the bulb: 30 inch 500 and 800 HBL Series Ovens 40 watt, appliance bulb, standard Edison base 1. Screw the glass cover back on the glass which could lead to remove it . Maintenance Replacing an Oven Light 9 WARNING...
Instructions for Use
Page 25
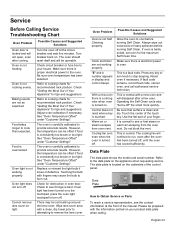
... cooling. Warm air or steam escapes from the oven vent. Use the flat part of Your Appliance" for the maximum Self Clean time. Oven light does not turn knob to your finger. The cooling fan will be offset if food is located on the underside of the manual. See "Oven Temperature Offset" under "Customer Settings". If oven is not working properly. Check to the data plate on . Service Before Calling Service Troubleshooting Chart Oven Problem Oven door is turned on...
... cooling. Warm air or steam escapes from the oven vent. Use the flat part of Your Appliance" for the maximum Self Clean time. Oven light does not turn knob to your finger. The cooling fan will be offset if food is located on the underside of the manual. See "Oven Temperature Offset" under "Customer Settings". If oven is not working properly. Check to the data plate on . Service Before Calling Service Troubleshooting Chart Oven Problem Oven door is turned on...

Instructions for Use
Page 26
... are not the direct fault of Bosch, including without limitation, one of Bosch). How Long the Warranty Lasts Bosch warrants that you do not attempt to repair the Product yourself, or use . • Within the United States or Canada, and has at law or otherwise, to provide you with respect to such parts. All replaced and/or repaired parts shall assume the identity...
... are not the direct fault of Bosch, including without limitation, one of Bosch). How Long the Warranty Lasts Bosch warrants that you do not attempt to repair the Product yourself, or use . • Within the United States or Canada, and has at law or otherwise, to provide you with respect to such parts. All replaced and/or repaired parts shall assume the identity...


