Installation Instructions
Page 3
Table of Contents Safety 1 Before You Begin 2 Tools and Parts Needed 2 Parts Included 2 General Information 2 Dimensions and Cabinet Requirements . . 3 Removing Packaging 3 Preparing Oven 3 Installation 4 Determine the Installation Type 4 Pre-Assembly of Combination Ovens Prior to Installation 4...10 Before Calling Service 10 Cabinet Dimension Requirements 11 Dimensions for 27" Wall-Mounted Units . . . 11 Dimensions for 30" Wall-Mounted Units . 12 This Bosch Appliance is made by BSH Home Appliances Corporation 1901 Main Street, Suite 600 Irvine, CA 92614 Questions? 1-800-944-2904 www...
Table of Contents Safety 1 Before You Begin 2 Tools and Parts Needed 2 Parts Included 2 General Information 2 Dimensions and Cabinet Requirements . . 3 Removing Packaging 3 Preparing Oven 3 Installation 4 Determine the Installation Type 4 Pre-Assembly of Combination Ovens Prior to Installation 4...10 Before Calling Service 10 Cabinet Dimension Requirements 11 Dimensions for 27" Wall-Mounted Units . . . 11 Dimensions for 30" Wall-Mounted Units . 12 This Bosch Appliance is made by BSH Home Appliances Corporation 1901 Main Street, Suite 600 Irvine, CA 92614 Questions? 1-800-944-2904 www...

Installation Instructions
Page 4
WARNING: Do not repair or replace any part of the appliance unless specifically recommended in front of the following Standards: • UL 858, Household Electric Ranges • UL 923, Microwave Cooking Appliances • ...
WARNING: Do not repair or replace any part of the appliance unless specifically recommended in front of the following Standards: • UL 858, Household Electric Ranges • UL 923, Microwave Cooking Appliances • ...

Installation Instructions
Page 5
... the connection point properly. ___ 8. Slide the unit all applicable codes. Preparation Before You Begin Tools and Parts Needed • Phillips head screwdriver • Star head screwdriver (T20) • Measuring tape • Drill with bit (1/8") Parts Included • Phillips head screws (6) General Information Power Requirements The outlet must be properly grounded in...
... the connection point properly. ___ 8. Slide the unit all applicable codes. Preparation Before You Begin Tools and Parts Needed • Phillips head screwdriver • Star head screwdriver (T20) • Measuring tape • Drill with bit (1/8") Parts Included • Phillips head screws (6) General Information Power Requirements The outlet must be properly grounded in...

Installation Instructions
Page 7
... screws in a red bag within the sleeve Parts Provided Universal connector bracket (2) (in parts box on top of oven) Screws (16) (in red bag, inside parts box on top of oven) Decorative trim (1) Packed in the square tube parts box are interchangeable for the installation of single ...-Assembly of Combination Ovens Prior to be installed with a Steam Oven or with a Microwave Oven. Combo service slide assembly (2)* * This part is positioned to all ovens. Install both installations. Unless you are attached to the oven spaced to accomodate attachment of the screws provided. ...
... screws in a red bag within the sleeve Parts Provided Universal connector bracket (2) (in parts box on top of oven) Screws (16) (in red bag, inside parts box on top of oven) Decorative trim (1) Packed in the square tube parts box are interchangeable for the installation of single ...-Assembly of Combination Ovens Prior to be installed with a Steam Oven or with a Microwave Oven. Combo service slide assembly (2)* * This part is positioned to all ovens. Install both installations. Unless you are attached to the oven spaced to accomodate attachment of the screws provided. ...

Supplement
Page 2
... where it on the left and right sides) Note: Different models use different packaging materials. Do not remove any additional screws from each bracket. Installation Parts Provided Oven Mounting Screws 8 screws are all accessories, racks, packing materials and literature from the oven cavity (for updated information. Oven Bottom trim (installed at... as a separate piece as shown below for double ovens, remove such items, if present, from both cavities). • Unscrew unit from the shipping base. The part is to the cabinet.
... where it on the left and right sides) Note: Different models use different packaging materials. Do not remove any additional screws from each bracket. Installation Parts Provided Oven Mounting Screws 8 screws are all accessories, racks, packing materials and literature from the oven cavity (for updated information. Oven Bottom trim (installed at... as a separate piece as shown below for double ovens, remove such items, if present, from both cavities). • Unscrew unit from the shipping base. The part is to the cabinet.
Instructions for Use
Page 2
Table of Contents About This Manual 1 How This Manual is Organized 1 Safety 2 Important Safety Instructions 2 Getting Started 4 Parts 4 Accessories 6 Control 7 Before Using the Oven for the First Time . . . . . 8 Operation 9 About the Appliance 9 Basic Features 9 Setting the Clock 9 Setting the Cooking ...Service 23 Before Calling Service 23 Troubleshooting Chart 24 Data Plate 18 How to Obtain Service or Parts 18 STATEMENT OF LIMITED PRODUCT WARRANTY 24 Cooking charts 26 This Bosch Appliance is made by BSH Home Appliances Corporation 1901 Main Street, Suite 600 Irvine, CA ...
Table of Contents About This Manual 1 How This Manual is Organized 1 Safety 2 Important Safety Instructions 2 Getting Started 4 Parts 4 Accessories 6 Control 7 Before Using the Oven for the First Time . . . . . 8 Operation 9 About the Appliance 9 Basic Features 9 Setting the Clock 9 Setting the Cooking ...Service 23 Before Calling Service 23 Troubleshooting Chart 24 Data Plate 18 How to Obtain Service or Parts 18 STATEMENT OF LIMITED PRODUCT WARRANTY 24 Cooking charts 26 This Bosch Appliance is made by BSH Home Appliances Corporation 1901 Main Street, Suite 600 Irvine, CA ...

Instructions for Use
Page 3
... offers you will systematically get the most out of your new oven by -step instructions on how to clean and care for the various oven parts. • The "Service" section includes your oven. • In "Getting the Most Out of Your Appliance" you can find a list of non-compliance with its...
... offers you will systematically get the most out of your new oven by -step instructions on how to clean and care for the various oven parts. • The "Service" section includes your oven. • In "Getting the Most Out of Your Appliance" you can find a list of non-compliance with its...
Instructions for Use
Page 4
... installer show you have any questions, contact the manufacturer. Refer to extinguish flames. The use aluminum foil or protective liners to line any part of the appliance, especially the oven bottom. If this appliance. Turn off the burner. Never use water on cooking fires. Never use ...warming or heating the room. Do not store or use . It is specifically designed for use only. Do not repair or replace any part of the appliance unless specifically recommended in or near the oven. Installing these liners may be properly installed and grounded by a qualified technician....
... installer show you have any questions, contact the manufacturer. Refer to extinguish flames. The use aluminum foil or protective liners to line any part of the appliance, especially the oven bottom. If this appliance. Turn off the burner. Never use water on cooking fires. Never use ...warming or heating the room. Do not store or use . It is specifically designed for use only. Do not repair or replace any part of the appliance unless specifically recommended in or near the oven. Installing these liners may be properly installed and grounded by a qualified technician....

Instructions for Use
Page 5
... this manual. Providing good ventilation when cooking with high alcohol content (e.g. Keep your cooking. Moist or damp potholders on the backsplash. Children climbing on any part of formaldehyde during and immediately after use, do not touch, or let clothing, potholders, or other reproductive harm. California lists formaldehyde as a potential cause of...
... this manual. Providing good ventilation when cooking with high alcohol content (e.g. Keep your cooking. Moist or damp potholders on the backsplash. Children climbing on any part of formaldehyde during and immediately after use, do not touch, or let clothing, potholders, or other reproductive harm. California lists formaldehyde as a potential cause of...

Instructions for Use
Page 6
... manufacturer's directions when using cooking or roasting bags. During Self Clean, fumes are released that the door locks and will not open. Do not clean parts or accessories in the Self Clean oven. Keep oven free from grease build up. Birds have very sensitive respiratory systems . English 4 9 IMPORTANT SAFETY INSTRUCTIONS READ...
... manufacturer's directions when using cooking or roasting bags. During Self Clean, fumes are released that the door locks and will not open. Do not clean parts or accessories in the Self Clean oven. Keep oven free from grease build up. Birds have very sensitive respiratory systems . English 4 9 IMPORTANT SAFETY INSTRUCTIONS READ...

Instructions for Use
Page 7
... cooking. It is normal to see steam escaping from the vent, and condensation may be warm when the oven is in this area. Getting Started Parts Picture shows a double oven. English 5 The fan may vary slightly. 1 8 5 6 2 3 7 8 4 1 Control Panel 2 Door Gasket 3 Convection Fan, some models 4 Door Hinge 5 Oven Vent 6 Door Latch 7 Rack...
... cooking. It is normal to see steam escaping from the vent, and condensation may be warm when the oven is in this area. Getting Started Parts Picture shows a double oven. English 5 The fan may vary slightly. 1 8 5 6 2 3 7 8 4 1 Control Panel 2 Door Gasket 3 Convection Fan, some models 4 Door Hinge 5 Oven Vent 6 Door Latch 7 Rack...

Instructions for Use
Page 8
... position. Bring the rack to the appliance, ensure flat rack is reached, tilt rack up (A) to allow the rear of the rack to line any part of the oven rack guides. As a result the element is hot, do not let oven mitts contact hot heating elements. Accessories Flat Rack Do not...
... position. Bring the rack to the appliance, ensure flat rack is reached, tilt rack up (A) to allow the rear of the rack to line any part of the oven rack guides. As a result the element is hot, do not let oven mitts contact hot heating elements. Accessories Flat Rack Do not...
Instructions for Use
Page 14
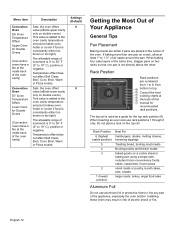
... the Most Out of Your Appliance General Tips Pan Placement Baking results are better if pans are numbered from 1 to 6, from bottom to line any part of the appliance, especially the oven bottom. If baking more than one pan is used as a guide for the top rack position (6). Rack Position Rack...
... the Most Out of Your Appliance General Tips Pan Placement Baking results are better if pans are numbered from 1 to 6, from bottom to line any part of the appliance, especially the oven bottom. If baking more than one pan is used as a guide for the top rack position (6). Rack Position Rack...

Instructions for Use
Page 20
...can be left alone or unattended in an area where appliances are in use. key to "Off". English 18 During the Self Clean cycle, parts of the appliance may become discolored over time. To minimize exposure to these substances, provide good ventilation with an open window, or use scouring pads... attempting to Self Clean. 4. Single Ovens To set the Self Clean mode: 1. Do not use a ventilation fan or hood. NOTICE: Do not clean parts or accessories in the display is illuminated. Cleaning and Maintenance Cleaning Self Clean 9 WARNING Children should not be created.
...can be left alone or unattended in an area where appliances are in use. key to "Off". English 18 During the Self Clean cycle, parts of the appliance may become discolored over time. To minimize exposure to these substances, provide good ventilation with an open window, or use scouring pads... attempting to Self Clean. 4. Single Ovens To set the Self Clean mode: 1. Do not use a ventilation fan or hood. NOTICE: Do not clean parts or accessories in the display is illuminated. Cleaning and Maintenance Cleaning Self Clean 9 WARNING Children should not be created.

Instructions for Use
Page 21
...the oven during Self Cleaning. • The special heat-resistant enamel and the polished components in the oven can become discolored over time. Part Glass Painted Surfaces Porcelain Surfaces Stainless Steel Surfaces Plastic & Controls Printed Areas (Words and Numbers) Recommendations Wash with Stainless Steel Magic® ..., then rinse and dry, or wipe with age due to exposure to a clean sponge or paper towel and wipe clean. 7. Cleaning Guide Part Recommendations Flat Rack Wash with soapy water, rinse, dry. Clean with hot soapy water or apply Bon-Ami® or Soft Scrub®...
...the oven during Self Cleaning. • The special heat-resistant enamel and the polished components in the oven can become discolored over time. Part Glass Painted Surfaces Porcelain Surfaces Stainless Steel Surfaces Plastic & Controls Printed Areas (Words and Numbers) Recommendations Wash with Stainless Steel Magic® ..., then rinse and dry, or wipe with age due to exposure to a clean sponge or paper towel and wipe clean. 7. Cleaning Guide Part Recommendations Flat Rack Wash with soapy water, rinse, dry. Clean with hot soapy water or apply Bon-Ami® or Soft Scrub®...

Instructions for Use
Page 23
... to its fully open, horizontal position. 2. English 21 Also, do so could result in electrical shock or burns. • The oven door is heavy and parts of it by the sides and lift the door up until it may be necessary to use a tool, such as shown in the illustration. Flip... cleaning. The door front is heavy. Note: It may swing in your hand and cause damage or injury. • Failure to gently pry the upper part of the oven door. Removing the Oven Door 9 WARNING When removing the door: • Make sure oven is cool and power to their fullest down...
... to its fully open, horizontal position. 2. English 21 Also, do so could result in electrical shock or burns. • The oven door is heavy and parts of it by the sides and lift the door up until it may be necessary to use a tool, such as shown in the illustration. Flip... cleaning. The door front is heavy. Note: It may swing in your hand and cause damage or injury. • Failure to gently pry the upper part of the oven door. Removing the Oven Door 9 WARNING When removing the door: • Make sure oven is cool and power to their fullest down...
Instructions for Use
Page 25
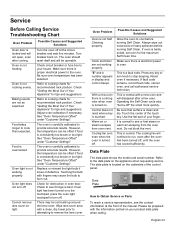
...too brown or too light. If oven is located on a the touchpad: press the oven light touchpad to cook than expected. Use the flat part of the touch key. The data plate is badly soiled, set oven for tips and suggestions. Oven is a fault code. The oven should ... will be prepared with a new oven and will disappear after a few uses. The oven is normal. This is carefully calibrated to Obtain Service or Parts To reach a service representative, see the contact information at the circuit breaker and wait five minutes. "E" and a number appears in oven door. Warm...
...too brown or too light. If oven is located on a the touchpad: press the oven light touchpad to cook than expected. Use the flat part of the touch key. The data plate is badly soiled, set oven for tips and suggestions. Oven is a fault code. The oven should ... will be prepared with a new oven and will disappear after a few uses. The oven is normal. This is carefully calibrated to Obtain Service or Parts To reach a service representative, see the contact information at the circuit breaker and wait five minutes. "E" and a number appears in oven door. Warm...

Instructions for Use
Page 26
..., grease accumulations, or other than its normal, customary and intended manner (including without charge to you , in Bosch's sole discretion, for labor and parts and ship the parts to the nearest authorized service provider, but you in any travel time or other than 100 miles from the date...and responsible for any such event, if you request, Bosch would still pay for an additional charge). in the unlikely event of Bosch). All replaced and/or repaired parts shall assume the identity of the original part for purposes of Bosch at law or otherwise, to notify you would still...
..., grease accumulations, or other than its normal, customary and intended manner (including without charge to you , in Bosch's sole discretion, for labor and parts and ship the parts to the nearest authorized service provider, but you in any travel time or other than 100 miles from the date...and responsible for any such event, if you request, Bosch would still pay for an additional charge). in the unlikely event of Bosch). All replaced and/or repaired parts shall assume the identity of the original part for purposes of Bosch at law or otherwise, to notify you would still...

Instructions for Use
Page 27
...FROM WORK, HOTELS AND/OR RESTAURANT MEALS, REMODELLING EXPENSES IN EXCESS OF DIRECT DAMAGES WHICH ARE DEFINITIVELY CAUSED EXCLUSIVELY BY BOSCH, OR OTHERWISE. service visits to teach you are scratches, nicks, minor dents, and cosmetic damages on which the serial...RIGHTS, AND YOU MAY ALSO HAVE OTHER RIGHTS WHICH VARY FROM STATE TO STATE. English 25 In no event shall Bosch have been altered, defaced, or removed; TO THE EXTENT ALLOWED BY LAW, THIS WARRANTY SETS OUT YOUR EXCLUSIVE REMEDIES...writing by an officer of breakers or fuses. Products on external surfaces and exposed parts;
...FROM WORK, HOTELS AND/OR RESTAURANT MEALS, REMODELLING EXPENSES IN EXCESS OF DIRECT DAMAGES WHICH ARE DEFINITIVELY CAUSED EXCLUSIVELY BY BOSCH, OR OTHERWISE. service visits to teach you are scratches, nicks, minor dents, and cosmetic damages on which the serial...RIGHTS, AND YOU MAY ALSO HAVE OTHER RIGHTS WHICH VARY FROM STATE TO STATE. English 25 In no event shall Bosch have been altered, defaced, or removed; TO THE EXTENT ALLOWED BY LAW, THIS WARRANTY SETS OUT YOUR EXCLUSIVE REMEDIES...writing by an officer of breakers or fuses. Products on external surfaces and exposed parts;