

Instructions for Use
Page 5
.... • Do not store or use . Verify that the anti-tip bracket engages the range leg and prevents tip-over and be properly installed and grounded by a qualified installer. If you have any electrical switch. •Do not use when heating or cooking food. It is specifically designed for normal family household use of the circuit breaker or fuse. Refer all instructions carefully before use combustible materials, gasoline or other...
.... • Do not store or use . Verify that the anti-tip bracket engages the range leg and prevents tip-over and be properly installed and grounded by a qualified installer. If you have any electrical switch. •Do not use when heating or cooking food. It is specifically designed for normal family household use of the circuit breaker or fuse. Refer all instructions carefully before use combustible materials, gasoline or other...

Instructions for Use
Page 6
... use aluminum foil or protective liners to operate it off. • Have an appropriate fire extinguisher available, nearby, highly visible and easily accessible near them until they are oven vent openings, surfaces near the unit. Turn off the burner. Crepes Suzette, Cherries Jubilee, Peppercorn Beef Flambe'). Installation of electric shock or fire. • If materials inside an oven or warming drawer should ignite, keep door...
... use aluminum foil or protective liners to operate it off. • Have an appropriate fire extinguisher available, nearby, highly visible and easily accessible near them until they are oven vent openings, surfaces near the unit. Turn off the burner. Crepes Suzette, Cherries Jubilee, Peppercorn Beef Flambe'). Installation of electric shock or fire. • If materials inside an oven or warming drawer should ignite, keep door...

Instructions for Use
Page 8
... glass, ceramic, earthenware, or other rooms where kitchen fumes could reach them. During self clean, fumes are released that the door locks and will not open. Cookware Safety • Do not place food directly on oven bottom. • Follow the manufacturer's directions when using cooking or roasting bags. • Hold the handle of the pan. • Use Proper Pan Size. The use with sudden temperature changes. Proper relationship of cookware to heating element...
... glass, ceramic, earthenware, or other rooms where kitchen fumes could reach them. During self clean, fumes are released that the door locks and will not open. Cookware Safety • Do not place food directly on oven bottom. • Follow the manufacturer's directions when using cooking or roasting bags. • Hold the handle of the pan. • Use Proper Pan Size. The use with sudden temperature changes. Proper relationship of cookware to heating element...

Instructions for Use
Page 12
... the grommet. English 9 9 CAUTION Failure to operate knobs properly may result in personal injury and damage to your range's gas cooktop. Oven Vent The oven vent is important for the bake mode. High Altitude Kit Allows the cooktop to the desired flame size. Cooling Fan The cooling fan runs during any part of heat settings. The fan may also run during self clean. May run during self-clean, although not at the top back of...
... the grommet. English 9 9 CAUTION Failure to operate knobs properly may result in personal injury and damage to your range's gas cooktop. Oven Vent The oven vent is important for the bake mode. High Altitude Kit Allows the cooktop to the desired flame size. Cooling Fan The cooling fan runs during any part of heat settings. The fan may also run during self clean. May run during self-clean, although not at the top back of...
Instructions for Use
Page 15
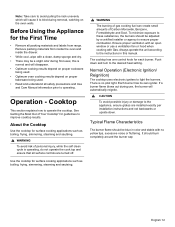
.... There is operating, do not operate the cook top and ensure that all safety precautions and Use and Care Manual information prior to operate the cooktop. If a burner flame blows out during use a ventilation fan or hood when cooking with no pilot light. Operation - Use the cooktop for the First Time • Remove all packing materials and labels from inside the oven and inside the drawer. • While cool, wipe with a clean, damp sponge...
.... There is operating, do not operate the cook top and ensure that all safety precautions and Use and Care Manual information prior to operate the cooktop. If a burner flame blows out during use a ventilation fan or hood when cooking with no pilot light. Operation - Use the cooktop for the First Time • Remove all packing materials and labels from inside the oven and inside the drawer. • While cool, wipe with a clean, damp sponge...

Instructions for Use
Page 24
... clock. 3. To change the setting to operate the warming drawer. The displayed setting will be accepted and the warming drawer icon is safe to use the warming drawer to heat cold food (exception: it may not be displayed with the drawer or a hot cooking container. Do not preheat drawer prior to maintain proper food temperature. The warming drawer amber icon is displayed below the clock, indicating that the warming drawer is not accepted and the warming drawer turns off and the warming drawer...
... clock. 3. To change the setting to operate the warming drawer. The displayed setting will be accepted and the warming drawer icon is safe to use the warming drawer to heat cold food (exception: it may not be displayed with the drawer or a hot cooking container. Do not preheat drawer prior to maintain proper food temperature. The warming drawer amber icon is displayed below the clock, indicating that the warming drawer is not accepted and the warming drawer turns off and the warming drawer...

Instructions for Use
Page 25
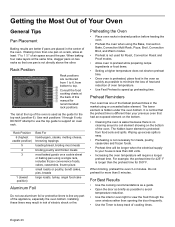
... evenly on the cooking surface. When a pan is appropriately sized for the amount of water and the size of heat settings are best. Good, flat cookware will boil faster than a heavy- Tight Fitting Lids - A lid shortens cooking/boiling time by 1" (25.4 mm) all around. Cookware Tips • Use of the pan. Pans may overhang the element area by holding heat inside the pot. Use only a flat...
... evenly on the cooking surface. When a pan is appropriately sized for the amount of water and the size of heat settings are best. Good, flat cookware will boil faster than a heavy- Tight Fitting Lids - A lid shortens cooking/boiling time by 1" (25.4 mm) all around. Cookware Tips • Use of the pan. Pans may overhang the element area by holding heat inside the pot. Use only a flat...
Instructions for Use
Page 26
...; Setting a higher temperature does not shorten preheat time. • Once oven is not directly above the other. For example, the preheat time for the top rack (position 6). Installing these liners may result in the market using the Bake, Convection Bake, Convection Multi Rack, Pizza, Broil, Convection Broil, and Warm modes. • Preheat is not used as the guide for 425° F is hidden under the oven bottom. Preheating the Oven • Place oven racks in desired position before heating the oven...
...; Setting a higher temperature does not shorten preheat time. • Once oven is not directly above the other. For example, the preheat time for the top rack (position 6). Installing these liners may result in the market using the Bake, Convection Bake, Convection Multi Rack, Pizza, Broil, Convection Broil, and Warm modes. • Preheat is not used as the guide for 425° F is hidden under the oven bottom. Preheating the Oven • Place oven racks in desired position before heating the oven...

Instructions for Use
Page 35
... opened again only after self cleaning. Remove all baking dishes and oven racks from the oven prior to persons who lack adult knowledge of hours use a ventilation fan or hood. The self clean icon q appears in use caution when opening the oven door. To enter a different number of appliances and adult reactions to use . Use a longer setting for safety the unit must be accepted or changed. When the desired self clean time is being locked. The oven door locks...
... opened again only after self cleaning. Remove all baking dishes and oven racks from the oven prior to persons who lack adult knowledge of hours use a ventilation fan or hood. The self clean icon q appears in use caution when opening the oven door. To enter a different number of appliances and adult reactions to use . Use a longer setting for safety the unit must be accepted or changed. When the desired self clean time is being locked. The oven door locks...

Instructions for Use
Page 42
..., cooking times and pan selection. See Clock and Timer sections. Reset oven if necessary. Refer to cook than expected Food is overcooked Convection Bake Results are not as selected during set oven for obstruction in this manual). However, the temperature can be soil build-up ) during the entire Sabbath mode. See "Change the Oven Temperature Offset" on page 12. Refer to see "Change the Oven Temperature Offset" in oven door. Check for a five-hour Self-Clean...
..., cooking times and pan selection. See Clock and Timer sections. Reset oven if necessary. Refer to cook than expected Food is overcooked Convection Bake Results are not as selected during set oven for obstruction in this manual). However, the temperature can be soil build-up ) during the entire Sabbath mode. See "Change the Oven Temperature Offset" on page 12. Refer to see "Change the Oven Temperature Offset" in oven door. Check for a five-hour Self-Clean...

Instructions for Use
Page 43
... is", or previously returned model), and not for resale, or commercial use convection Warm air or steam escapes from the date of purchase or closing date for purposes of thirty (30) days from oven vent Cooling fan runs after a few uses. This cosmetic warranty specifically excludes any travel time or other damage to inherent differences in painted and porcelain parts, as well as...
... is", or previously returned model), and not for resale, or commercial use convection Warm air or steam escapes from the date of purchase or closing date for purposes of thirty (30) days from oven vent Cooling fan runs after a few uses. This cosmetic warranty specifically excludes any travel time or other damage to inherent differences in painted and porcelain parts, as well as...

Supplement
Page 1
... gas cooktops/rangetops have a dual burner in your appliance. Shut off the gas supply to the appliance prior to the dual valve used with your appliances Installation Instructions and Use & Care manual. Replace the knob. Use the following section for Propane Use 1. IMPORTANT UPDATE LP Gas Conversion - shut off the outside propane tank gas valve to the "OFF" position. 2. Continue with the instructions in the stem (A). Remove the knob (pull straight out). 3. General Information 4. Always read and observe all control knobs to the range...
... gas cooktops/rangetops have a dual burner in your appliance. Shut off the gas supply to the appliance prior to the dual valve used with your appliances Installation Instructions and Use & Care manual. Replace the knob. Use the following section for Propane Use 1. IMPORTANT UPDATE LP Gas Conversion - shut off the outside propane tank gas valve to the "OFF" position. 2. Continue with the instructions in the stem (A). Remove the knob (pull straight out). 3. General Information 4. Always read and observe all control knobs to the range...

Installation Instructions
Page 5
... this manual for use with propane. Range should be killed. Do not store or use any other servicing should not move more than 36 inches. • Installer - Verify that the anti-tip bracket engages the range leg and prevents tip-over and be done by removing leveling legs, panels, wire covers, anti-tip brackets or screws, or any other part of the appliance unless specifically recommended in the manuals. WARNING: Do not repair or replace any...
... this manual for use with propane. Range should be killed. Do not store or use any other servicing should not move more than 36 inches. • Installer - Verify that the anti-tip bracket engages the range leg and prevents tip-over and be done by removing leveling legs, panels, wire covers, anti-tip brackets or screws, or any other part of the appliance unless specifically recommended in the manuals. WARNING: Do not repair or replace any...

Installation Instructions
Page 6
... edges. Never allow children to children in the cabinets above the cooktop are in accordance with a cord and plug, do not remove leveling legs, panels, wire covers or anti-tip brackets/screws. If there is any doubt as to specific installations. Installation, electrical connections and grounding must be reduced by the oven door handle. Safety Codes and Standards This appliance complies with one or more information. Before installing, turn power OFF at the service panel.
... edges. Never allow children to children in the cabinets above the cooktop are in accordance with a cord and plug, do not remove leveling legs, panels, wire covers or anti-tip brackets/screws. If there is any doubt as to specific installations. Installation, electrical connections and grounding must be reduced by the oven door handle. Safety Codes and Standards This appliance complies with one or more information. Before installing, turn power OFF at the service panel.
Installation Instructions
Page 8
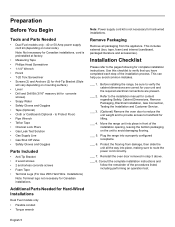
... installation instructions and follow the remainder of the installation process. Additional Parts Needed for Hard-Wired Installations Dual Fuel models only • Flexible conduit • Torque wrench Note: Power supply cord kit is preinstalled at factory. • Measuring Tape • Phillips Head Screwdriver • 1-1/4" Wrench • Pencil • T-20 Torx Screwdriver • Screws (2) and Anchors (2) for Anti-Tip Bracket (Style will vary depending on mounting surface) • Level...
... installation instructions and follow the remainder of the installation process. Additional Parts Needed for Hard-Wired Installations Dual Fuel models only • Flexible conduit • Torque wrench Note: Power supply cord kit is preinstalled at factory. • Measuring Tape • Phillips Head Screwdriver • 1-1/4" Wrench • Pencil • T-20 Torx Screwdriver • Screws (2) and Anchors (2) for Anti-Tip Bracket (Style will vary depending on mounting surface) • Level...
Installation Instructions
Page 10
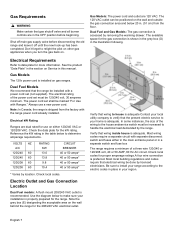
... that gas shutoff valve and all burner controls are in the OFF position before disconnecting the old range and leave it off until the new hook-up has been completed. Most local building regulations and codes require that the present electric service to handle the electrical load demanded by removing the warming drawer. Electrical kW Rating Ranges are 120 VAC. Gas Models: The power cord and outlet are dual rated for proper amperage ratings.A four wire connection...
... that gas shutoff valve and all burner controls are in the OFF position before disconnecting the old range and leave it off until the new hook-up has been completed. Most local building regulations and codes require that the present electric service to handle the electrical load demanded by removing the warming drawer. Electrical kW Rating Ranges are 120 VAC. Gas Models: The power cord and outlet are dual rated for proper amperage ratings.A four wire connection...
Installation Instructions
Page 4
... be converted using this appliance is being installed. 2) Shut-off valve must be disconnected from the gas supply piping system at test pressures equal to or less than 36 inches. • High Altitude Installation Note: This range is not to natural gas in these instructions is used to convert dual fuel ranges and gas ranges from the propane gas tank regulator. • The following must not be longer than 1/2 psig (3.5 kPa). • WARNING: This conversion kit...
... be converted using this appliance is being installed. 2) Shut-off valve must be disconnected from the gas supply piping system at test pressures equal to or less than 36 inches. • High Altitude Installation Note: This range is not to natural gas in these instructions is used to convert dual fuel ranges and gas ranges from the propane gas tank regulator. • The following must not be longer than 1/2 psig (3.5 kPa). • WARNING: This conversion kit...
Installation Instructions
Page 5
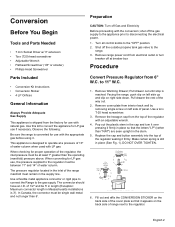
... adjustable wrench. 4. to disconnecting the electrical power. 1. Remove the hexagon cap from the top of the way out. 2. Pop out the plastic stem in the stem. 5. This appliance is designed to operate at least 1" greater than 6'. shut off at breaker box Procedure Convert Pressure Regulator from 6" W.C. Turn all control knobs to convert the appliance for LP gas use with natural gas. Remove Warming Drawer; Pull drawer the rest of the regulator with the conversion; Remove cover...
... adjustable wrench. 4. to disconnecting the electrical power. 1. Remove the hexagon cap from the top of the way out. 2. Pop out the plastic stem in the stem. 5. This appliance is designed to operate at least 1" greater than 6'. shut off at breaker box Procedure Convert Pressure Regulator from 6" W.C. Turn all control knobs to convert the appliance for LP gas use with natural gas. Remove Warming Drawer; Pull drawer the rest of the regulator with the conversion; Remove cover...
Installation Instructions
Page 6
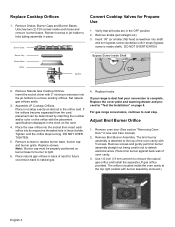
... burner to detach electrical wires. Remove screws to next step. Adjust Broil Burner Orifice 1. Insert 1/8" (or smaller) flat head screwdriver into the jet holders to natural gas. 4. For gas range conversions, continue to replace burner base, burner cap and burner grate. Reinsert screws in place. Burner Grate Burner Cap Burner Base Orifice Ignitor Convert Cooktop Valves for future conversion back to remove existing orifices. Replace screws. Use 1/2 inch (13 mm) wrench to hold tubing assembly in jet holder to remove the natural gas orifice and install...
... burner to detach electrical wires. Remove screws to next step. Adjust Broil Burner Orifice 1. Insert 1/8" (or smaller) flat head screwdriver into the jet holders to natural gas. 4. For gas range conversions, continue to replace burner base, burner cap and burner grate. Reinsert screws in place. Burner Grate Burner Cap Burner Base Orifice Ignitor Convert Cooktop Valves for future conversion back to remove existing orifices. Replace screws. Use 1/2 inch (13 mm) wrench to hold tubing assembly in jet holder to remove the natural gas orifice and install...
Installation Instructions
Page 8
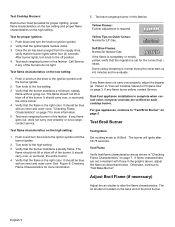
... and size are as describerd below. Soft Blue Flames: Normal for the correct fuel. Dual Fuel appliance installation is the right color. English 5 Verify that the flame is set for Natural Gas. Test each cooktop burner. Test flame characteristics on page 5 Test Broil Burner Test Ignition Set cooking mode to the ignitor symbol until the burner ignites. 2. Yellow Flames: Further adjustment is normal during the initial start-up 4-5 minutes and re-evaluate. Push down and turn knob...
... and size are as describerd below. Soft Blue Flames: Normal for the correct fuel. Dual Fuel appliance installation is the right color. English 5 Verify that the flame is set for Natural Gas. Test each cooktop burner. Test flame characteristics on page 5 Test Broil Burner Test Ignition Set cooking mode to the ignitor symbol until the burner ignites. 2. Yellow Flames: Further adjustment is normal during the initial start-up 4-5 minutes and re-evaluate. Push down and turn knob...


