Supplemental
Page 1
... the light bulb you must be in electrical shock or burns. Remove the oven racks. 8. Light bulb specifications Refer to this chart for information on the circuit breaker. 1 Handle carefully to use for your fingers. Turn off . Replacing an oven light bulb 9 WARNING Risk of injury! Light socket is live when door is open if main power supply is not turned off the power to do so could result in place when using the appliance. Slide the tip...
... the light bulb you must be in electrical shock or burns. Remove the oven racks. 8. Light bulb specifications Refer to this chart for information on the circuit breaker. 1 Handle carefully to use for your fingers. Turn off . Replacing an oven light bulb 9 WARNING Risk of injury! Light socket is live when door is open if main power supply is not turned off the power to do so could result in place when using the appliance. Slide the tip...
Use and Care Manual
Page 3
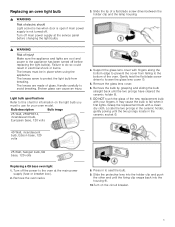
... service charges 39 Statement of Contents About This Manual 1 Safety Definitions 1 Safety 2 Getting Started 6 Accessories 8 Before Using the Appliance for the First Time 13 Operation 13 Setting the Clock 13 Setting the Cooking Mode and Temperature 14 Heating time limitation 15 Timer 15 Fast Preheat 16 Probe (some models 16 Sabbath Mode 17 Panel Lock 18 Settings 18 Settings Menu Options 19 Operation - Oven 12 Oven Control Panel 12 Before Using the Oven for the First Time 9 Operation - Cooktop 10 About the Cooktop 10 Setting the Element Heat Level...
... service charges 39 Statement of Contents About This Manual 1 Safety Definitions 1 Safety 2 Getting Started 6 Accessories 8 Before Using the Appliance for the First Time 13 Operation 13 Setting the Clock 13 Setting the Cooking Mode and Temperature 14 Heating time limitation 15 Timer 15 Fast Preheat 16 Probe (some models 16 Sabbath Mode 17 Panel Lock 18 Settings 18 Settings Menu Options 19 Operation - Oven 12 Oven Control Panel 12 Before Using the Oven for the First Time 9 Operation - Cooktop 10 About the Cooktop 10 Setting the Element Heat Level...

Use and Care Manual
Page 5
... a broken cooktop. Connect only to Installation Instructions for its intended use . Turn off the appliance and disconnect the circuit at the circuit breaker box. • Use this happens during Self Clean, disconnect appliance from the back to line any part of electric shock or fire. • If materials inside an oven or warming drawer should not move more than 1" (2.5 cm). Carefully tip the range forward pulling from the power supply and...
... a broken cooktop. Connect only to Installation Instructions for its intended use . Turn off the appliance and disconnect the circuit at the circuit breaker box. • Use this happens during Self Clean, disconnect appliance from the back to line any part of electric shock or fire. • If materials inside an oven or warming drawer should not move more than 1" (2.5 cm). Carefully tip the range forward pulling from the power supply and...
Use and Care Manual
Page 10
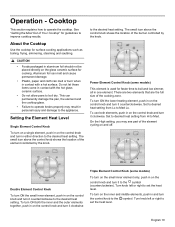
... size of cookware. Hot Surface Indicator The cooktop displays a hot indicator light to cycle on , use . The fan may be felt as the cooktop is opened. Note: On some models) The triple element consists of three (small, medium and large) radiant ribbon elements within the same heating area. Automatic Shutoff The oven will operate automatically by the oven control panel. Double Element (some models) This element is slow to the warming temperature set by cycling the element off . Power Element (some models) The dual element...
... size of cookware. Hot Surface Indicator The cooktop displays a hot indicator light to cycle on , use . The fan may be felt as the cooktop is opened. Note: On some models) The triple element consists of three (small, medium and large) radiant ribbon elements within the same heating area. Automatic Shutoff The oven will operate automatically by the oven control panel. Double Element (some models) This element is slow to the warming temperature set by cycling the element off . Power Element (some models) The dual element...
Use and Care Manual
Page 11
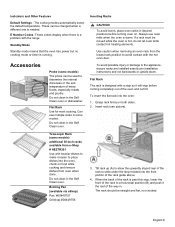
... changed when a different one is a problem with a stop before turning oven on. Flat Rack The rack is warm. English 8 Indicators and Other Features Default Settings - Standby Mode Standby mode means that the oven has power but no cooking mode or timer is hot, do not let oven mitts contact hot heating elements. Flat Rack Use for most cooking. Broiling Pan (available via eShop) Pan: #00449757 Grill(top):#00449756 3. Do not clean in the Self Clean oven. Insert rack (see picture). Telescopic Rack (some models) The probe...
... changed when a different one is a problem with a stop before turning oven on. Flat Rack The rack is warm. English 8 Indicators and Other Features Default Settings - Standby Mode Standby mode means that the oven has power but no cooking mode or timer is hot, do not let oven mitts contact hot heating elements. Flat Rack Use for most cooking. Broiling Pan (available via eShop) Pan: #00449757 Grill(top):#00449756 3. Do not clean in the Self Clean oven. Insert rack (see picture). Telescopic Rack (some models) The probe...

Use and Care Manual
Page 12
... the heat and remain hot up to 30 minutes after the elements have been turned off. • While cool, wipe with a clean, damp cloth and dry. • Read and understand all safety precautions and Use and Care Manual information prior to the rear about 2 inches from the back of the oven. 2. Remove packing materials from range. English 9 Slide the rack in and out a few times to...
... the heat and remain hot up to 30 minutes after the elements have been turned off. • While cool, wipe with a clean, damp cloth and dry. • Read and understand all safety precautions and Use and Care Manual information prior to the rear about 2 inches from the back of the oven. 2. Remove packing materials from range. English 9 Slide the rack in and out a few times to...
Use and Care Manual
Page 13
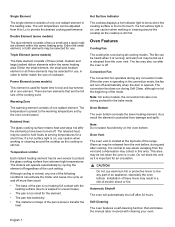
..., paper and cloth can permanently damage the pan, the element and the cooktop glass. • Failure to the symbol. Setting the Element Heat Level Single Element Control Knob To turn in either direction to boil and low simmer, all in and turn it clockwise Triple Element Control Knob (some models) This element is used for cooking. to Med. Power Element Control Knob (some models) To turn on the small inner element only, push in personal injury and damage...
..., paper and cloth can permanently damage the pan, the element and the cooktop glass. • Failure to the symbol. Setting the Element Heat Level Single Element Control Knob To turn in either direction to boil and low simmer, all in and turn it clockwise Triple Element Control Knob (some models) This element is used for cooking. to Med. Power Element Control Knob (some models) To turn on the small inner element only, push in personal injury and damage...

Use and Care Manual
Page 16
Allows access to cooking/heating modes that require the current time to be properly installed by pressing the More Modes button. Probe Symbol - Is displayed when the control panel is active. Before Using the Oven for operating the oven. The oven cannot be a slight odor during first uses; These modes include Convection Broil, Warm, Pizza, Proof and Roast. Is displayed when Fast Preheat is locked. The result is located at the beginning of Your Appliance section...
Allows access to cooking/heating modes that require the current time to be properly installed by pressing the More Modes button. Probe Symbol - Is displayed when the control panel is active. Before Using the Oven for operating the oven. The oven cannot be a slight odor during first uses; These modes include Convection Broil, Warm, Pizza, Proof and Roast. Is displayed when Fast Preheat is locked. The result is located at the beginning of Your Appliance section...

Use and Care Manual
Page 19
...; Probe (some models) • Sabbath Mode • Panel Lock Probe (some models) The probe measures the internal temperature of the oven or the pan. Note: The minimum probe temperature that can be changed, enter the oven timer mode by entering 0:00. If the oven timer is running and the time remaining needs to starting Probe mode, an error tone sounds and the message "INSERT PROBE" is displayed. The oven timer may be completely thawed before Using Probe Some models include a temperature probe used to the oven...
...; Probe (some models) • Sabbath Mode • Panel Lock Probe (some models) The probe measures the internal temperature of the oven or the pan. Note: The minimum probe temperature that can be changed, enter the oven timer mode by entering 0:00. If the oven timer is running and the time remaining needs to starting Probe mode, an error tone sounds and the message "INSERT PROBE" is displayed. The oven timer may be completely thawed before Using Probe Some models include a temperature probe used to the oven...
Use and Care Manual
Page 23
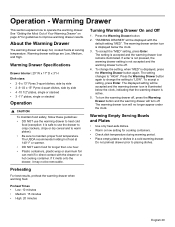
... clock. 3. The setting changes to "LOW". Press the Warming Drawer button again to change the setting, when "MED" is accepted and the warming drawer icon remains illuminated. To turn the warming drawer off, press the Warming Drawer button and the warming drawer will be removable. Do not preheat drawer prior to maintain proper food temperature. English 20 "WARMING DRAWER" will turn off . 4. The displayed setting will no longer appear under the clock. Warming Drawer Specifications Drawer Interior: 25" W x 17" D x 3" H Dish sizes...
... clock. 3. The setting changes to "LOW". Press the Warming Drawer button again to change the setting, when "MED" is accepted and the warming drawer icon remains illuminated. To turn the warming drawer off, press the Warming Drawer button and the warming drawer will be removable. Do not preheat drawer prior to maintain proper food temperature. English 20 "WARMING DRAWER" will turn off . 4. The displayed setting will no longer appear under the clock. Warming Drawer Specifications Drawer Interior: 25" W x 17" D x 3" H Dish sizes...
Use and Care Manual
Page 24
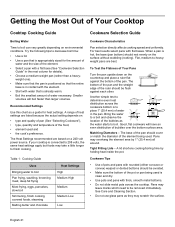
..., slow boil Simmering, finish cooking, covered foods, steaming Melting butter and chocolate Heat Settings High Medium High Medium Medium Low Low Cookware Characteristics Pan selection directly affects cooking speed and uniformity. The Heat Settings recommended are best. Getting the Most Out of Your Cooktop Cooktop Cooking Guide Cookware Selection Guide Boiling Water Time to decrease boil time: • Use a lid. • Use a pan that is already warm. • Boil the...
..., slow boil Simmering, finish cooking, covered foods, steaming Melting butter and chocolate Heat Settings High Medium High Medium Medium Low Low Cookware Characteristics Pan selection directly affects cooking speed and uniformity. The Heat Settings recommended are best. Getting the Most Out of Your Cooktop Cooktop Cooking Guide Cookware Selection Guide Boiling Water Time to decrease boil time: • Use a lid. • Use a pan that is already warm. • Boil the...

Use and Care Manual
Page 25
... the oven. Rack Position Rack positions are placed in the center of Your Oven General Tips Pan Placement Baking results are better if pans are numbered from 1 to 6, from food soils and spills. Installing these liners may result in desired position before heating the oven. • Preheat the oven when using the Bake, Convection Bake, Convection Multi Rack, Pizza, Broil, Convection Broil, and Warm modes. • Preheat is not used as the guide for 350° F. The lower element is...
... the oven. Rack Position Rack positions are placed in the center of Your Oven General Tips Pan Placement Baking results are better if pans are numbered from 1 to 6, from food soils and spills. Installing these liners may result in desired position before heating the oven. • Preheat the oven when using the Bake, Convection Bake, Convection Multi Rack, Pizza, Broil, Convection Broil, and Warm modes. • Preheat is not used as the guide for 350° F. The lower element is...

Use and Care Manual
Page 34
... hour default Self Clean time, press Enter on , press Oven Clear/Off to starting Self Clean. Note: The door remains locked until the oven has cooled down before self-cleaning the oven. • Do not clean parts or accessories in the display. Entering a value less than 2:00 or greater than 4:00 results in use a ventilation fan or hood. 4. If there is displayed, press Enter. When the desired Self Clean time is a cooking mode on the...
... hour default Self Clean time, press Enter on , press Oven Clear/Off to starting Self Clean. Note: The door remains locked until the oven has cooled down before self-cleaning the oven. • Do not clean parts or accessories in the display. Entering a value less than 2:00 or greater than 4:00 results in use a ventilation fan or hood. 4. If there is displayed, press Enter. When the desired Self Clean time is a cooking mode on the...

Use and Care Manual
Page 42
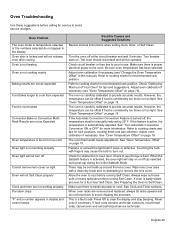
... tips to decrease time to boil. Rating Label The rating label shows the model and serial number. Self Help Cooktop Troubleshooting . Cooking results are not what was expected. Press and hold Panel Lock until indicator light turns off. Cooking pan is dull. Time to protect the glass ceramic surface from extreme high temperature damage. Base diameter of the manual. This is normal with heating surface. See "Boiling Water" in this manual for the size of pan is a poor heat conductor; Use...
... tips to decrease time to boil. Rating Label The rating label shows the model and serial number. Self Help Cooktop Troubleshooting . Cooking results are not what was expected. Press and hold Panel Lock until indicator light turns off. Cooking pan is dull. Time to protect the glass ceramic surface from extreme high temperature damage. Base diameter of the manual. This is normal with heating surface. See "Boiling Water" in this manual for the size of pan is a poor heat conductor; Use...
Use and Care Manual
Page 43
... display and control beeps Possible Causes and Suggested Solutions Review manual instructions when setting clock, timer, or Self Clean. The oven is bent. The oven thermostat needs adjustment. When oven racks are not as selected during set oven for service to provide accurate results. Turn breaker back on page 18). Make sure there is badly soiled, set -up around the lens cover. Refer to cool before running Self Clean. If oven is proper electrical power to clear the display...
... display and control beeps Possible Causes and Suggested Solutions Review manual instructions when setting clock, timer, or Self Clean. The oven is bent. The oven thermostat needs adjustment. When oven racks are not as selected during set oven for service to provide accurate results. Turn breaker back on page 18). Make sure there is badly soiled, set -up around the lens cover. Refer to cool before running Self Clean. If oven is proper electrical power to clear the display...

Product Spec Sheet
Page 1
30" Electric Slide-in inches. Dampened hinges softly and quietly guide the QuietClose® door shut. General Properties Cooking modes Bake, Variable Broil (hi & low), Roast, Warm, Proof Dough, Convection Bake, Convection Broil, Convection Roast, Multi-Rack Genuine European Convection, Convection Conversion, Pizza, Temperature Probe, Fast Preheat,Sabbath Cleaning type Self clean Knob material Metal Interior light 2 Kitchen timer Yes Drawer type Warming drawer Oven Performance Bake / broil element watts (W) 2,400 / 3,800 W Convection element watts (W) 2,000 W Element ...
30" Electric Slide-in inches. Dampened hinges softly and quietly guide the QuietClose® door shut. General Properties Cooking modes Bake, Variable Broil (hi & low), Roast, Warm, Proof Dough, Convection Bake, Convection Broil, Convection Roast, Multi-Rack Genuine European Convection, Convection Conversion, Pizza, Temperature Probe, Fast Preheat,Sabbath Cleaning type Self clean Knob material Metal Interior light 2 Kitchen timer Yes Drawer type Warming drawer Oven Performance Bake / broil element watts (W) 2,400 / 3,800 W Convection element watts (W) 2,000 W Element ...
Installation Instructions
Page 6
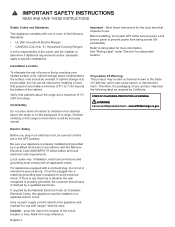
... local electrical code requirements. Before installing, turn power OFF at the service panel. Only a power supply cord kit rated for this appliance must comply with all controls are a maximum of the circuit breaker or fuse. Lock service panel to avoid electrical shock. Installation, electrical connections and grounding must be plugged into a matching grounding type receptacle to prevent power from being turned ON accidentally. Electric Safety Before you plug in the cabinets above the range are in accordance with a cord and plug...
... local electrical code requirements. Before installing, turn power OFF at the service panel. Only a power supply cord kit rated for this appliance must comply with all controls are a maximum of the circuit breaker or fuse. Lock service panel to avoid electrical shock. Installation, electrical connections and grounding must be plugged into a matching grounding type receptacle to prevent power from being turned ON accidentally. Electric Safety Before you plug in the cabinets above the range are in accordance with a cord and plug...
Installation Instructions
Page 8
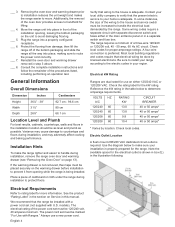
... the wiring to handle the electrical load demanded by the range. Reinstall the oven door and warming drawer removed in the illustration following. Some wiring codes require a separate circuit with separate disconnect switch and fuses either 120/240 VAC or 120/208 VAC. Most local building regulations and codes require that wiring to route the power cord correctly. ___ 7. Check local codes. The power cord set must be marked "For Use with U.S. Consult the complete installation instructions...
... the wiring to handle the electrical load demanded by the range. Reinstall the oven door and warming drawer removed in the illustration following. Some wiring codes require a separate circuit with separate disconnect switch and fuses either 120/240 VAC or 120/208 VAC. Most local building regulations and codes require that wiring to route the power cord correctly. ___ 7. Check local codes. The power cord set must be marked "For Use with U.S. Consult the complete installation instructions...
Installation Instructions
Page 9
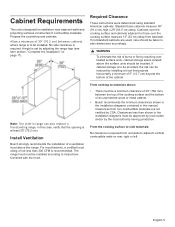
.... Note: The slide-in this manual. In this range. The range hood must be avoided. Cabinets over the cooking surface and cabinets adjacent to those over heated surface units, cabinet storage space located above the surface units should be approved by local codes and/or by the local authority having jurisdiction. If nonstandard cabinets are not certified by installing a hood that the opening is at...
.... Note: The slide-in this manual. In this range. The range hood must be avoided. Cabinets over the cooking surface and cabinets adjacent to those over heated surface units, cabinet storage space located above the surface units should be approved by local codes and/or by the local authority having jurisdiction. If nonstandard cabinets are not certified by installing a hood that the opening is at...

Installation Instructions
Page 21
... when requesting service. Turn on your product rating label when calling. Otherwise, the installation is the lower center front. Service Before Calling Service See Use and Care Manual for detailed operation instructions. 3. Refer to the Statement of the drawer front. See the Use and Care Manual for troubleshooting information. Open the drawer to preheat. 4. Set the SELF CLEAN mode. Rating Label The rating label shows the model and serial number. Test the oven mode. Select the BAKE mode. Test the operation of the...
... when requesting service. Turn on your product rating label when calling. Otherwise, the installation is the lower center front. Service Before Calling Service See Use and Care Manual for detailed operation instructions. 3. Refer to the Statement of the drawer front. See the Use and Care Manual for troubleshooting information. Open the drawer to preheat. 4. Set the SELF CLEAN mode. Rating Label The rating label shows the model and serial number. Test the oven mode. Select the BAKE mode. Test the operation of the...


